Supply and Install
 Reporting > Supply+Install
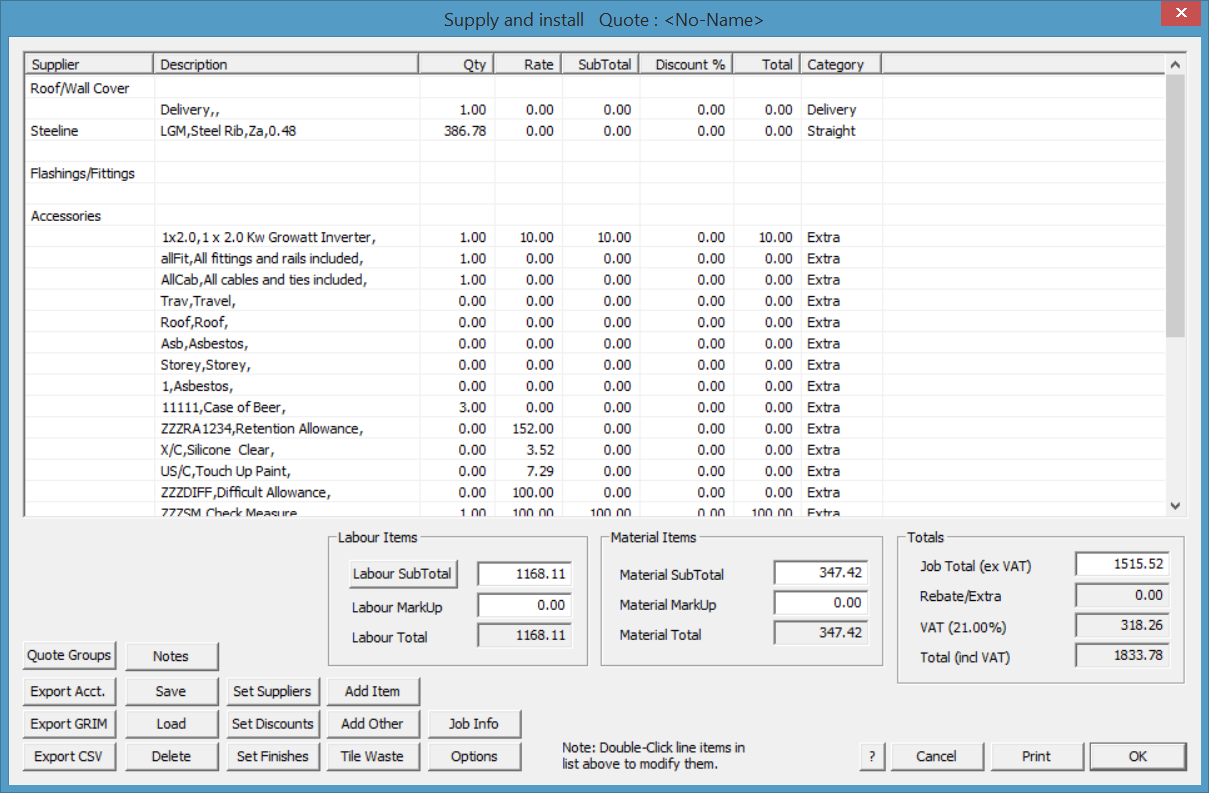
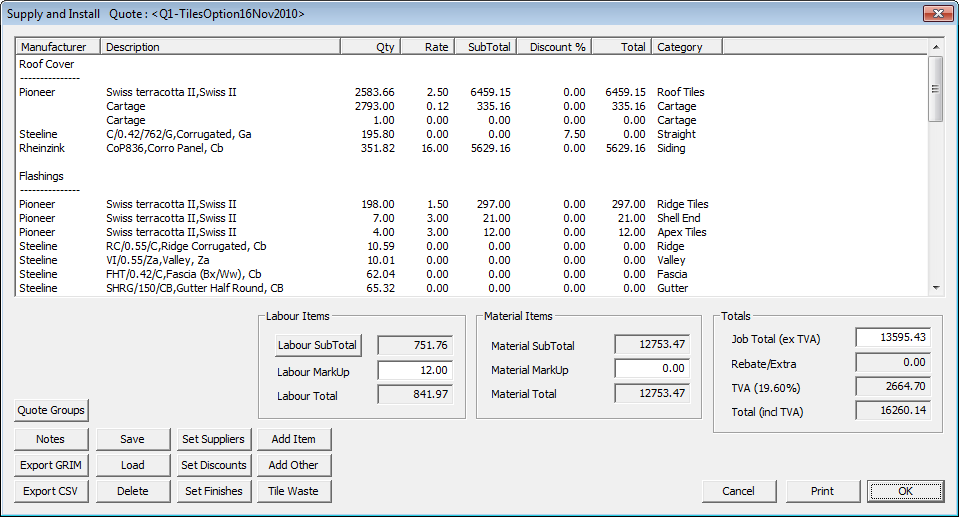
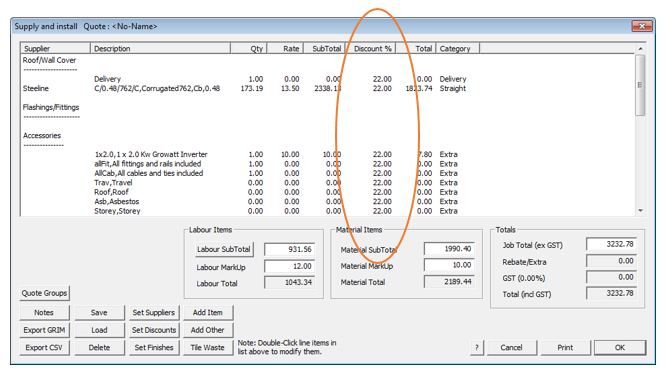
When you click Reporting > Supply+Install, all the materials are tallied, sorted and displayed on the Materials dialog box as well as the installation charge displayed on the Labour sub-total dialog.
The reporting for the job takes account of stages defined using Stage Manager such as first storey, second storey or roof material and trim. Please refer to the detailed description of Stage Manager to know how this is applied.
The title on the dialog box describes the name of the current quote as well as what page is displayed.
This dialog is similar to that for Supply-Only, except you can alter the labour charges as well as assign markup percentages to the labour and material charges. Only the differences between the two costing systems are discussed here, so please read the previous section, Supply Only.
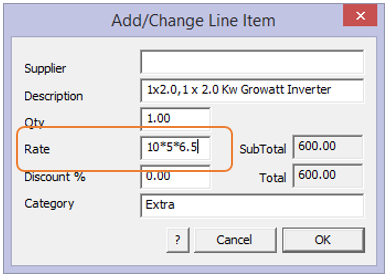
Any line item displayed in the Supply and Install list can be modified by double clicking the line item. The description can be changed and a calculation can be typed into the field.
Labour Subtotal
Clicking the Labour Sub-total displays the Roofing labour charges dialog box for this job.
For each item, there is a quantity, a rate and the total. The labour total is then the sum of the individual totals. Most of the items and rates are derived directly from the Reporting labour-rates dialog box plus those items defined in extras.dat. For details of Extra items, refer to Set-Up > More… > Extras.
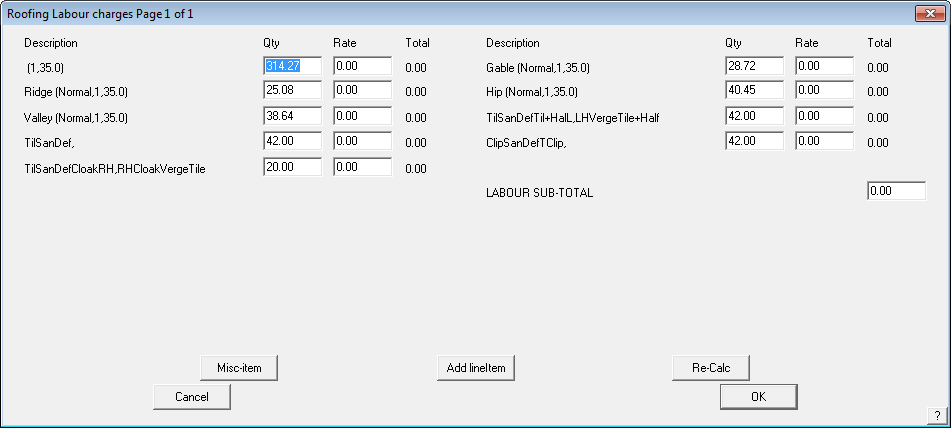
The value labelled User lengths, is derived from the Cover > Flashing > User-Lens command.
![]()
Note: If you need a pay rate that takes account of pitch use Tiler’s Pay where you can define multiple pitch intervals.
The quantities on this dialog box are either NETT or GROSS depending on what you set on the Set Up > Metal-Rates dialog box.
In the Roofing labour charges dialog box you can alter the quantities and rates. Those changes you make will only effect the current job.
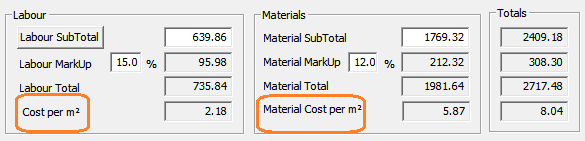
Labour markup This is the labour mark-up percentage.
Labour total This is the labour total amount including the labour mark-up percentage.
Material subtotal This is the sum of the material costs.
Material markup This is the material mark-up percentage.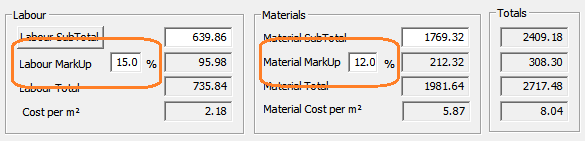
Material total This is the material total amount including the material mark-up percentage.
Job total This is the total cost for the job including material and labour.
Modify Quote Total This option allows the operator to modify the final total quotation price for the job and will be saved with the quotation.
In addition, we have also provided totals for each line item to the right, and a cost per unit area option for both Materials and Labour, to assist our customers to understand their estimating pricing against the roof and wall areas.
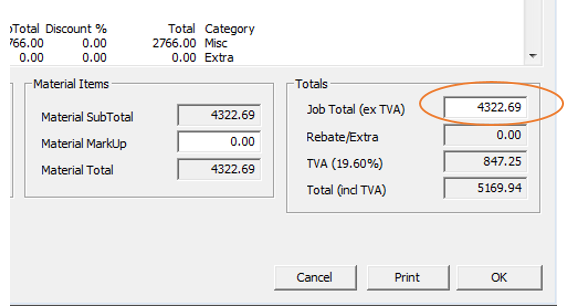
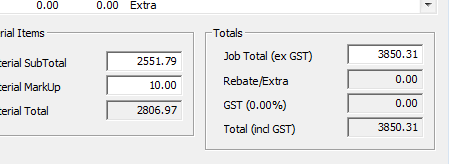
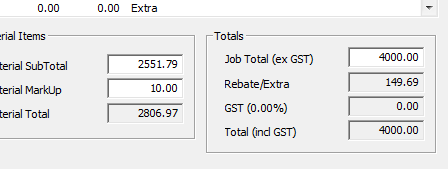
The job total price calculated by the software based on all materials (and labour) for that job. This may be adjusted up or down, simply double click inside the price cell, and the new job selling price inserted. This new value is displayed in the Job Total (ex tax) and a Rebate/Extra value is displayed which is the value of the adjustment to the job total, up or down.
This is described as a rebate or extra and is saved as a Key Text called ###Rebate. Such variations to a customer’s quotation can then be displayed on the office or sales person’s copy of the quotation by adding the Key-Text String to the office copy template.
Left click in the field that you wish to modify, in this case the Job Total, change the amount to that required and the adjustment will be shown in the Rebate/Extra field, as shown below.
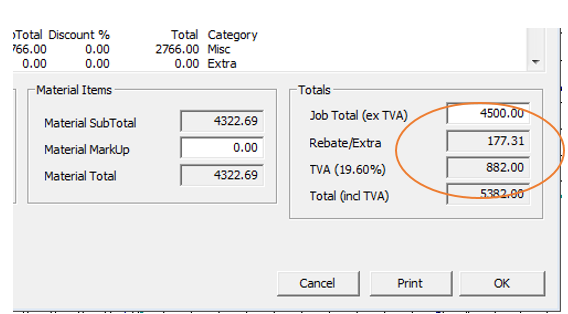
A negative number is a Rebate or discount, a positive number is an Extra or additional amount. Sales tax is applied if defined in System Preferences and the Total (including tax if applicable) is displayed and this is the amount printed on the customer’s quotation.
Costing-Plus
(Pulldown Menu)
This function allows the software to use the Tiles+ material structure and the Costing+ pricing structure to make comparisons between cost price and sell price to determine profit margin. It only works with Reporting > Supply&Install and takes account of the job stages defined using Stage Manager.
The method is simple in concept, but does require attention to detail to ensure that the correct numbers are being extracted. Remember that you set it up once – then you use it all day every day, over and over.
How it works
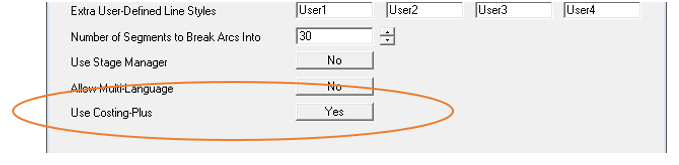
When Costing+ is enabled (Tools > System Preferences) and the Supply&Install button is selected, the Reporting process is done twice, once to create the job cost using actual material and labour cost rates, then again using the M² or Ft² rates in the customer’s sell price file. This provides the information to calculate the profit margin as a $ amount and as a percentage.
Tiles+ Datafile
The first step is to have your labour and material costs defined. The only material data structure with sufficient detail to permit this process is the Tiles+ data structure. So Costing+ only works for tile roofing using Tiles+. The Tiles+ data structure handles all field tiles plus all the accessories and the components that are required to install the accessories to be calculated. The result is extraordinarily accurate.
Once defined, the data is stored in a file called Tiles4.bin. Refer to a detailed explanation of Tiles+ elsewhere in this manual.
Tiles+ must be set as the data file of choice and this is also set in Tools > System Preferences.
Customer Lookup Table
The second step is to link the customer record and the customer’s pricing structure. The customer’s record is defined under Job-Info > Customer (Pulldown Menu). This link requires a text file to be created which is a simple list of all your customers and the pricing structure that the customer is on.
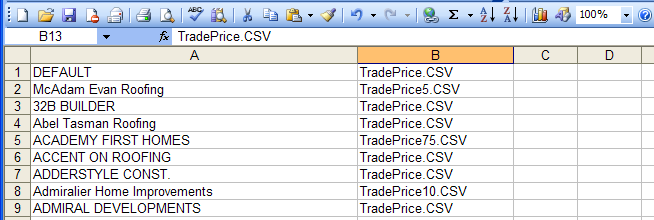
It is a CSV file which allows it to be opened in Microsoft Excel – the first column is your customer’s name and the second column is the pricing structure he is on. This file must be called CustPrice_lookup.csv. Part of a typical list is shown below.
This process would typically replace the Customer Discount structure in Job-Info > Customer but could also work in tandem with the Discount Structure. However, this would more than likely make a complex process even more so.
The Pricing Structure
The pricing structure is defined in a second file, also a text file which describes the product category and the nett cost for the line item for each increment of pitch (on a per M² or Ft² basis). The file can be any name, for example TradePrice.csv, but it must match the name used in the lookup table exactly. You may have as many of these files as you need to satisfy the requirements of your business – in the example above, we have TradePrice, TradePrice5, TradePrice75 and TradePrice10 for example.
The structure of the pricing file reflects the structure used in the labour and labour extras file – labourfile.dat.
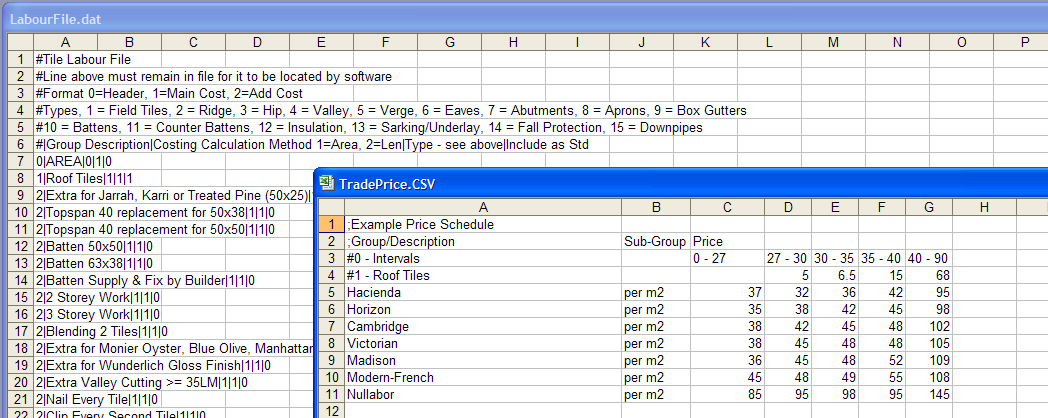
The detailed description of the labour file is elsewhere in this manual and should be referred to for a more detailed explanation of the structure. In essence, The label #0 refers to the pitch intervals used in the labour rates file. Label #1 refers to field tiles, so under that heading, create a list of the field tile options defined in the Tiles+ database. The labour rates file is a text file written and edited outside the software (in NotePad) and called labourfile.dat.
The categories are:
#Types, 1 = Field Tiles, 2 = Ridge, 3 = Hip, 4 = Valley, 5 = Verge, 6 = Eaves, 7 = Abutments, 8 = Aprons, 9 = Box Gutters ,10 = Battens, 11 = Counter Battens, 12 = Insulation, 13 = Sarking/Underlay, 14 = Fall Protection, 15 = Downpipes, 20 = Extras.
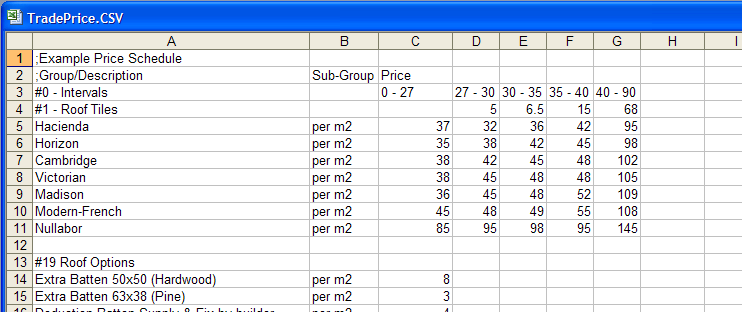
The rates, column C, D, E, F, G in this example are the M² or Ft² recommended selling price rate for the whole job, labour and materials.
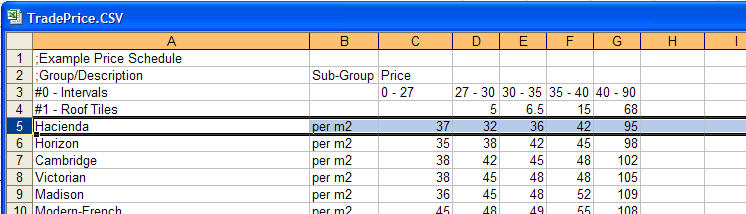
Row 5 in column A of our table shows the tile name, Hacienda; column B is the units of measure; column C is the rate per M² for the complete supply and install, materials and labour for the first pitch interval. Column D is the next pitch interval etc. up to pitch interval 40-90 degrees of pitch. An example is shown below. If you are in North America, you would typically have pitch intervals expressed as a slope and the rate would be per square foot.
The next group of items are those that incur an extra charge, over and above the flat rate – the $37 for our Hacienda in the 0-27° pitch range. These are grouped under the heading #19 – Roof Options and include such things as special battens, Extra nailing, Extra battens, tile blending etc. Usually the description of the extras will be typed exactly the same way as the extra is described in the extras.csv file (Set-Up > Extras) so that they appear the same on both the office copy and the customer’s quotation.

If the nett cost of the field tile does not include hip and ridge pieces in the M² cost, then they will need to be added to this list as well. These are described under heading #2 – Ridge and the options for installing ridge under the heading #29 – Ridge Options as shown below.
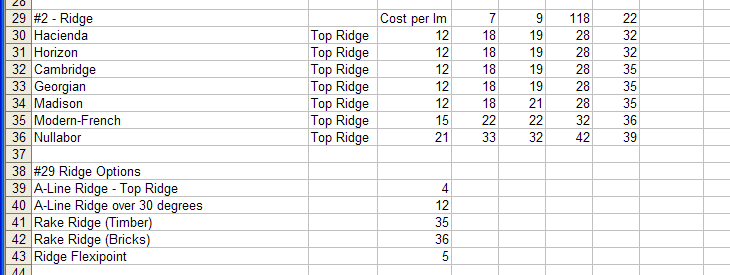
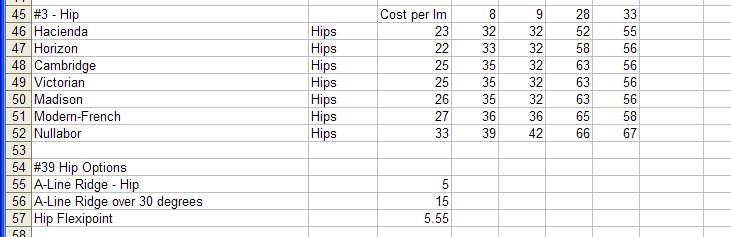
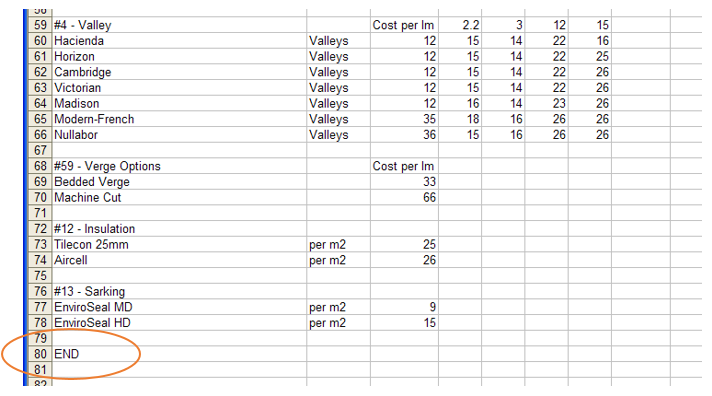
A similar method is used to describe hips, valleys and verge tiles and the hip and verge options.
Just as labour items, (from the labourfile.dat), can be included in the customer selling price and included as a line item on the quotation, items defined as Extras can also be included and may be material or labour items. These are defined under Set-Up > Extras. To be included in the Customer Sell Price list we’re defining here, they must first exist in the Extras list. The Extras list is saved in a file called Extras.CSV.
Sell price Extra’s are typically added to the bottom of the list and are headed #20.

Once all the items are described and priced, the file must be closed off with the word, END.
Any price changes are then a simple matter of editing the relevant Customer Sell Price file (TradePrice.CSV in our example here). Once set up they will permit the software to prepare the comparison pricing between cost price and sell price.
Using Costing-Plus
Model the roof as normal, check that the geometry is correct using all the appropriate tools and then select your Customer from the Job-Info option. The software finds your customer’s reference in the CustPrice. Lookup table and knows what price schedule to use for the sell price for each defined line item.
Then select the tile from the list of tiles using the Cover > Tiles option. Ensure that the Tiles+ option has been set under Set-Up > Preference Settings > System Preferences > Tile database to use.
Apply the tiles using coursing to determine the number tile items. Be aware that the number of pieces displayed on the box is BEFORE waste factors are applied. Refer to the discussion on how to set waste factors elsewhere in the Manual under the heading SetUp > Set up Pay Rates > Tile Waste Factors. The waste factor is applied when you cost the job, not here where we’re determining the base quantity.
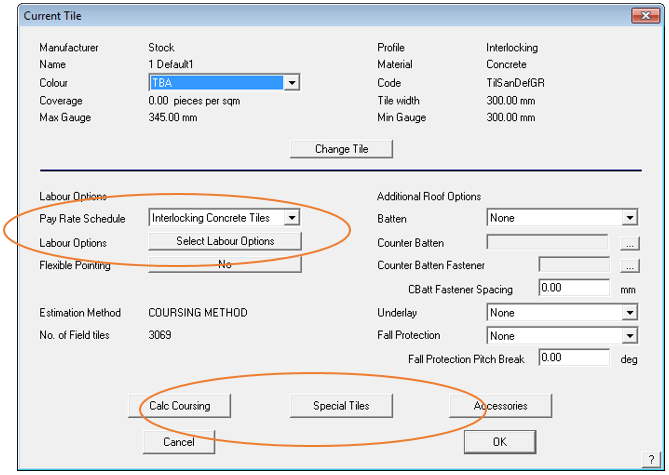
Then select the required Special Tiles and Tile Accessories buttons on the main Tile dialog and check that the right accessories are included in your quotation. Select Show All Fields so that you can check that you have a complete list of accessories and components for each category of material on the roof.
If anything is missing, you will need to check the definition of the items under Set-Up > Tiles+ as the software uses the list that you create to determine the total number of items.
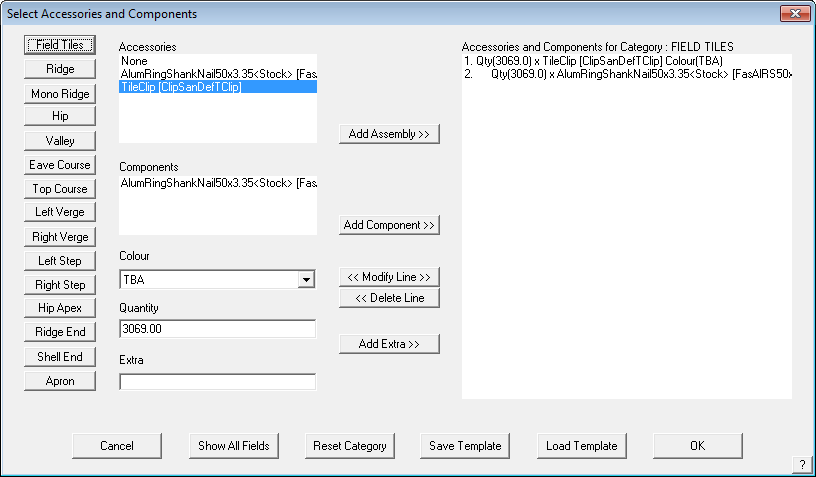
Select [OK] to exit Accessories.
 Next select the pay rate schedule to use.
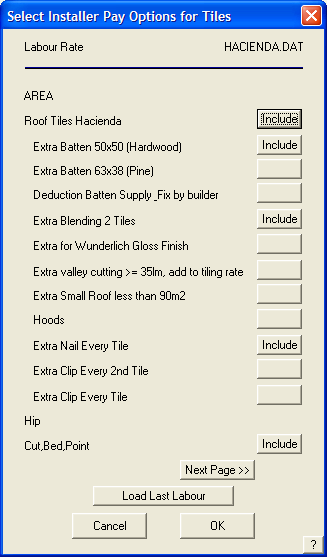
Then click the Labour options button to set the extras required on this job – things like extra nailing etc. Simply click the button next to the required item to include the cost in your quotation.
If you are doing this on a regular basis, you may simply load the last setup used by selecting the Load Last Labour button. Depending upon the level of complexity you have with your extras, there may be more than one page of items to select from.
This step adds the optional items to the labour calculation as well as priming the material list with additional items that must be included as job cost items.
Once the list is complete, select [OK].
Now you have your materials and labour rates selected, select [OK] to exist the Cover > Tile dialog go to Reporting > Supply & Install to complete the quotation.
The software then aggregates all the items and runs through the quoting process, first with the cost price, then a second time using the sell price defined here.
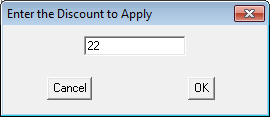
Type the revised customer price in the Job Total field and the revised price is displayed with the adjustment shown as a rebate or an extra. To adjust the global discount amount select the Set Discount button – the value typed is then applied to all line items and the result displayed.
Comments are closed.