Tiles+
Tiles+
(Pulldown Menu Only)
![]()
Note: With the advent of Accessories to the regular Tiles product database structure, the Tiles+ database has been made largely redundant. Consider your exact requirements before you invest a lot of time in developing the Tiles+ database. The key difference is the hierarchy of the parts. In the Tiles database, fittings and accessories are all “accessories” for the purpose of estimating.
The Tiles+ dialog box allows you to define a tile profile and its accessories in a more comprehensive manner than the Tiles dialog box. Here you can set the codes for each of the different piece types (ridges, hips etc). Allow for special tiles such as half tiles and tile+half tiles. Layout and quantify accessories and components required to install the tiles and accessories. Once defined, the take-off of all items is automatic.
Once materials and labour have been defined, the tiles and their accessories/components are then calculated using a method where the application of the materials is simulated on the 3D CAD model of the roof. That is, the coursing lines are drawn directly on the roof geometry and the component calculation extracted from the simulated laying of the tiles, accessories and components. After this process has been completed, the costing / output reporting process is the same as the remainder of the software.
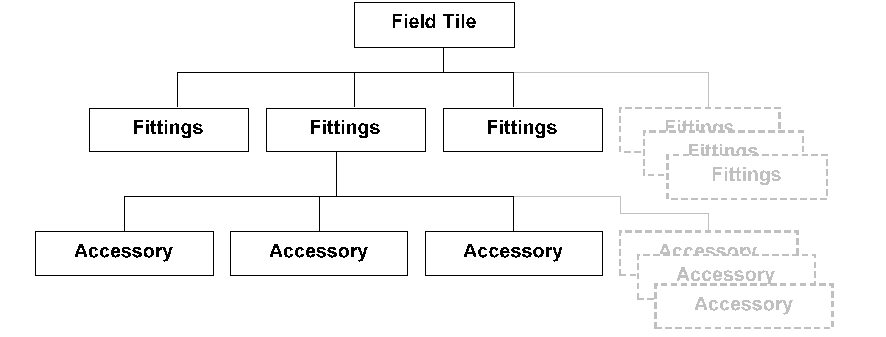
Of particular note is the structure and the importance of the order of things in Tiles+. In the hierarchy of the Tiles+ data structure, you define material items in a strict order:
Field Tiles (including fasteners)
Fittings for Field Tiles (ridge and hip caps, special tiles etc)
Accessories to Fittings (under cloak, hip irons etc)
Fasteners for Accessories (screws, nails and clips)
as outlined in the following diagram:
This structure makes it relatively easy to create your “shopping list” and not forget anything as it picks up most things automatically, with the total flexibility of adding, removing or modifying quantities of required items. When viewed in a spreadsheet program (shown in part below The structure can be seen. Field tile and then Fittings with a maximum of 120 accessory items and all 120 lines must be displayed in the spreadsheet whether they contain information or not. The file with field tiles and accessories is called TilesPlus.csv. The associated accessories are stored in a file called Accessories.CSV.
| Supplier |
Name | Material | Profile | Colour | Code |
| Redland | Pantile | Concrete | Interlocking | 5901 | |
| Acc Desc | Code | Mat Cost | Lab Cost | Est Code | Size |
| Redvent Eaves System 350 Centres | 9189 | 1 | 0 | 9 | 4900 |
| Redvent Eaves System 450 Centres | 9189 | 1 | 0 | 9 | 6000 |
| etc. – maximum of 120 lines total | |||||
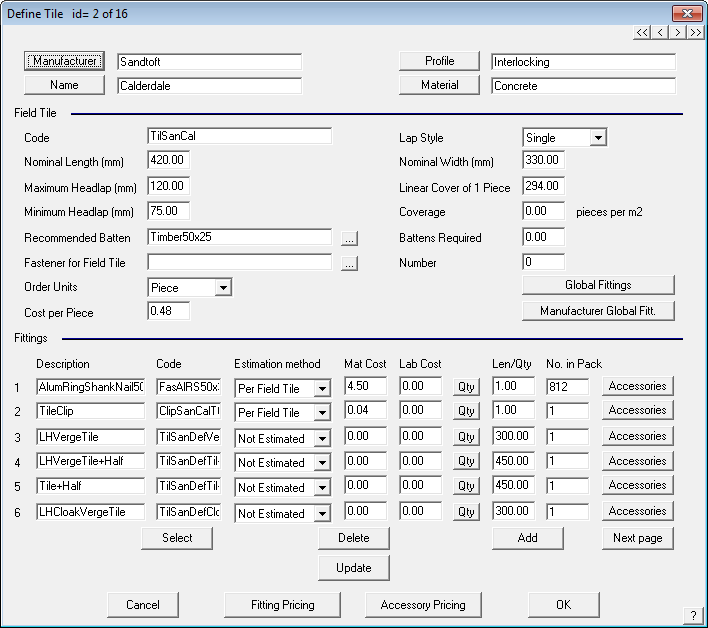
The dialog box is split into 3 discrete areas.
At the top of the dialog is the basic descriptive information regarding this tile profile. That is, you enter the supplier, profile description, tile name and the material for the tile pieces.

File tile description
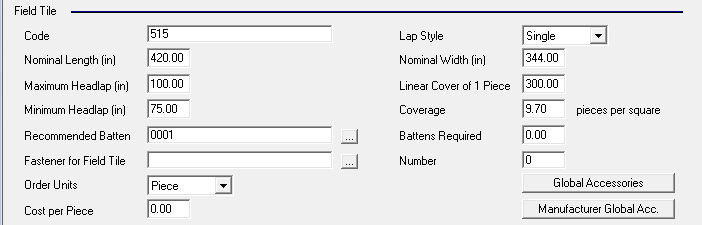
The central area defines the parameters of the field tile.
Here you define the:
Code The product code of the field tile
Lap style Here you specify if this tile is single or double lap style.
Nominal length The nominal length of the field tile
Nominal width The nominal width of the field tile
Maximum headlap The maximum headlap for the field tiles.
Minimum headlap The minimum headlap for the field tiles. The min/max head lap values are used to define the batten/coursing spacing when the application of the tiles to the roof is simulated. To accommodate for double overlap, you need to set the headlap values appropriately.
Linear cover The exposure of the field tile along the course.
Coverage The number of pieces per square metre or square (10’x10’). This value is used when estimating tile quantities by the area method.
Recommended batten This is the default batten you want to use for this profile. Clicking the ‘…’ button will display all the battens in the material database, from which you can select.
Battens required This is the length of battens (meters or feet) per square metre or square. This value is used when you want to estimate the total length of battens by the area method. If you use the coursing method, this value is not used.
Fastener This is the fastener you want to use for this field tile. Clicking the ‘…’ will display all the fasteners in the material database to select.
Number This is the number of fasteners for each field tile.
Order units This allows you to determine how you would like to order your tiles, either per piece, per square metre (foot), bundle or pallet.
Cost This is the cost of each field tile, per square metre (foot), bundle or pallet.
The lower area defines the fittings associated with this field tile and for each fitting item the additional accessories required. Here you enter the description, product code, estimation method, cost per piece and length/number for each accessory. You can link up to 120 accessories for each tile record.
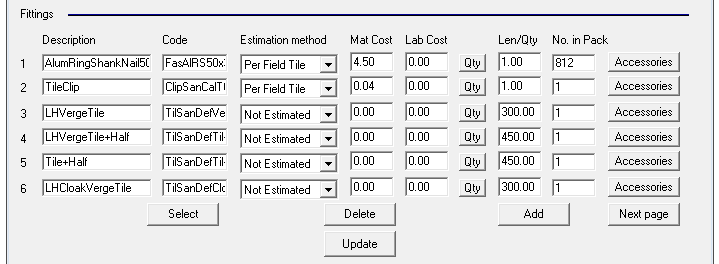
Accessory area of the dialog
To define the accessories properly, it is necessary to understand the estimation methods. The following table describes the different methods. Note that you can have more than one of each type.
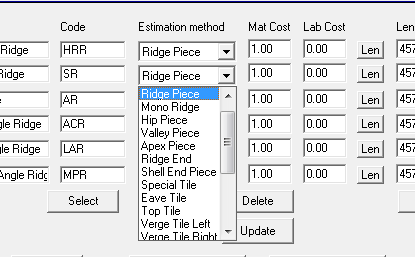
Some of the estimation methods for fittings
| Estimation method | Est Code* | Description | Notes |
| Not estimated | 0 | Fittings marked as “not estimated” will not be estimated. | You can still define accessories, but change their estimation method as you wish. |
| Ridge piece | 1 | The fitting is a ridge piece and estimated based on itslength and the total ridge length | |
| Mono ridge | 2 | The fitting is a mono ridge piece and estimated based on its length and the total mono ridge length | |
| Hip piece | 3 | The fitting is a hip piece and estimated based on its length and the total hip length | |
| Valley piece | 4 | The fitting is a valley piece and estimated based on its length and the total valley length | |
| Apex piece | 5 | The fitting is an apex piece and estimated based the number of hip apexes in the job | |
| Ridge end | 6 | The fitting is a ridge end piece and estimated based on the number of ridge ends in the job. | A ridge end is also called a barge apex. |
| Shell end piece | 7 | The fitting is a shell end piece and estimated based on the number of hip ends in the job. A hip end is the intersection of a hip and eaves. |
|
| Special Tile | 8 | Any tile for any purpose estimated by the width of the piece. Used to account for half tiles, tile and a half tiles and double tiles. Estimated per course or alternate course. |
May also be used to take account of re-use of off-cuts for metal tile. |
| Eave tile | 9 | The fitting is an eave piece and estimated by its length and the eave length in the job. |
|
| Top tile | 10 | The fitting is a top piece and estimated by its length and the ridge length in the job. | |
| Verge Tile Left | 11 | Left hand verge tile, estimated per course or alternate course. | |
| Verge Tile Right | 12 | Right hand verge tile, estimated per course or alternate course. | |
| Step Tile Left | 13 | Left hand step tile, estimated per course or alternate course. | |
| Step Tile Right | 14 | Right hand step tile, estimated per course or alternate course. | |
| Apron Piece | 15 | The fitting is a ridge piece assembly estimated by its length and the total length of ridge in the job. | |
| Miscellaneous | 16 | These are fitting pieces reported on the Reporting dialog box. | |
| Per Course | 17 | These fittings are quantified as a function of the number of courses in the job | |
| Per Code Item | 18 | These fittings are estimated as a function of another piece estimated in the job. | The code field for these pieces includes the code for this itemas well as the code to which this item is linked. The format of this is: ItemCode,LinkCode Where the colon ‘:’delimits the item code and the link code |
| Per Field Tile | 19 | These fittings are estimated as an item with the field tile. |
*The estimation method code relates to the estimation method as displayed in the file when reviewed in a spreadsheet – eg code 18 refers to estimation method ‘Per Code Item’.
The Length/No field holds either the length of a piece (eg ridge, hip) or the number of items required per instance (eg per course, miscellaneous). The item may be quantified as a function of its length or item quantity. Valley, hip and verge pieces can be estimated by cover length, or by coursing. You can have more than one of each type. When you come to select the piece for the actual job later on, (using Cover > Select-Tile), you will then set which actual set of fittings you want.
Fittings estimated as “per code item” may actually be fasteners. Therefore, when the fittings are quantified, the code is searched for in the fasteners database and if found, the cost and ordering information is used from that record.
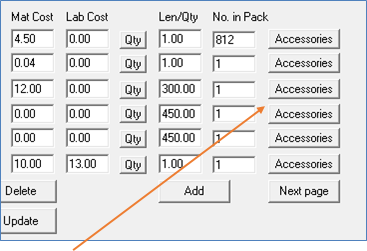
For each fitting, you can also define accessories, or extra material items that help make up the fitting or are required to install the fittings.
By clicking on the accessories field to the right of the fitting, the following dialog box is displayed.
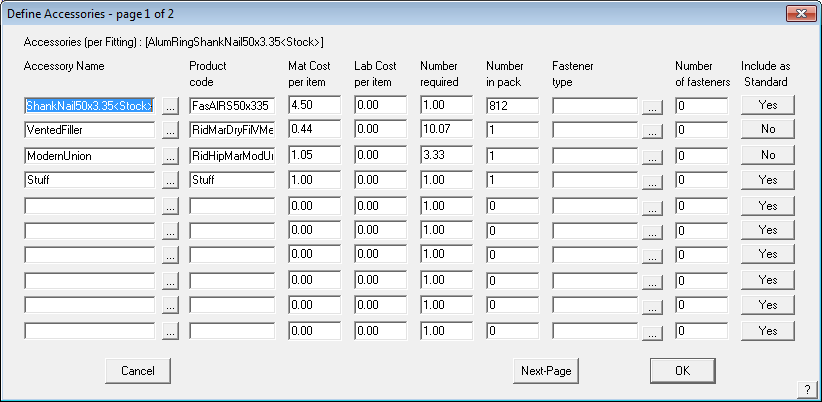
The accessories definition dialog
Items of inventory required for the installation of the field tile or the fitting can be set up using the “Accessories” button alongside that item (see previous dialog).
Fitting Name Is the name of the fitting.
Product Code Is the Product Code of the fitting.
Mat Cost Per Item This is the material cost of the fitting, if applicable.
Lab Cost Per Item This is the labour cost of the accessory, if applicable.
Number Determines how many accessories you require per fitting item.
Fastener Type The type of fastener required for the accessory.
Number Of Fasteners The number of fasteners required for the accessory.
Include As Standard If set to Yes, the accessory is included automatically for that fitting. If set to No, you will need to manually select the accessory to be included.

The “…” button allows for the selection of fittings or accessoris respectively and auto-fill in the values obtained from these existing items. You may then change the item as needed and click [OK] to save.
You can set a maximum of 20 accessories per fitting.
The “Include as Standard” option allows the user to define whether the accessory item is automatically inserted when the fitting is selected or whether it needs to be manually inserted by the user.
When you click [OK] the accessories are saved to that fitting, but remember to click [OK] to exit the Tiles+ dialog to ensure that all of your changes are saved.
To make maintenance of the accessory pricing easier, you have Fitting and Accessories Pricing buttons at the bottom the tile dialog. Select this and all the currently defined accessories are listed. Select the one to change or update the material or labour cost, then select [OK] to save the change(s).

Fitting and accessory pricing in the Tiles+ functionality can now be easily modified without the need to recursively track through each fitting or accessory. This function was included due to the complexity of tiling systems in the UK and Europe and now permits much simple management of fitting and accessory pricing.
Select the fitting or accessory item to modify and set Material and/or labour cost.
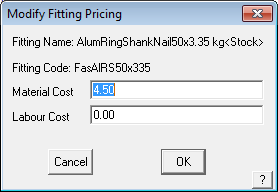
Select [OK] to save.
For both accessories and accessories, the user must decide whether they wish to include a labour accessory. If so, this accessory will be included into the final Reporting under the labour section, including any other Reporting attributed to the fitting/accessory group through the Reporting > Set Up Reporting Rate > Tiles’ pay rates – variable options (see Labour section for more information on this). The user may decide to use labour pricing based on fittings/accessories alone, based on Reporting > Set Up Reporting Rate > Tilers’ pay rates – variable fields alone or a combination of both.
The data you create using this command is saved in a text data file called TilesPlus.csv.
Material data files such as this are best edited from within AppliCad software via the appropriate dialog box, however as they are in a comma separated text file format (CSV) they may also be edited in a spreadsheet program such as Microsoft Excel.
Comments are closed.