Pay Rates
Pay Rates
Set up > Pay Rates takes you to the Labour setup commands – specifically,
Tilers’ pay rates – fixed Allows you to setup fixed tile rates.
Tilers’ pay rates – variable Allows you to setup variable tile rates – with increments for storey and pitch interval.
Tile waste factors Allows you to setup tile waste factors.
Metal pay rates – fixed Allows you to setup fixed metal rates.
Metal pay rates – variable Allows you to setup variable metal rates – with increments for storey and pitch interval.
Curved metal pay rates Allows you to setup curved metal installation rates.
Nett pay rates Allows you to setup nett pay rates ie nett cost/m².
Quote Groups Allows you to setup Quote Groups.
Wall cladding pay rates Allows you to setup Wall cladding installation rates.
Tilers’ Pay Rates – Fixed
This command displays the Roof Costing-Rates dialog box allowing you to set or change various quote rates and job cost rates associated with the estimate on a per square basis or per unit length. There is one rate regardless of pitch of the roof or storey number. The items are described below:
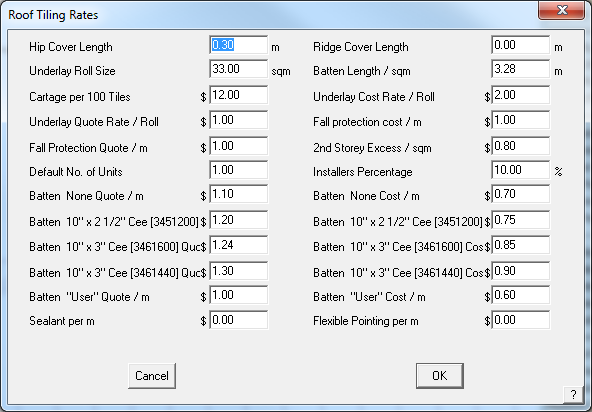
Hip cover length This value determines the number of hip tiles required. It is independent of the tile you selected.
Note that it is not used if you have supplied a hip tile length when you defined the tile using Set-Up > Tile.
Underlay/Sarking roll size This value determines the number of rolls of underlay.
Cartage per 100 tiles This value determines the total delivery cost.
Underlay/Sarking quote rate This is the rate to quote underlay/sarking.
Fall protection quote This is the rate to quote fall protection.
Default no of units This is the default number of housing units for this job.
Batten 50×25 quote This is the rate to quote 50×25 battens.
Batten 50×38 quote This is the rate to quote 50×38 battens.
Batten 50×50 quote This is the rate to quote 50×50 battens.
Batten 75×50 quote This is the rate to quote 75×50 battens.
Batten User quote This is the rate to quote the user defined batten.
Ridge cover length This value determines the number of ridge tiles required. It is independent of the tile you selected.
Note that it is not used if you have supplied a ridge tile length when you defined the tile using Material > Tiles.
Batten length This is the length of battens per m2 of roof. It is used if you perform the estimate using the area method.
Underlay/Sarking cost rate This is the cost of the underlay/sarking.
Fall protection cost This is the cost of the fall protection.
2nd storey excess An extra value for second storey work.
Installers percentage The extra percentage to apply to the installers pay.
Batten 50×25 quote This is the cost of 50×25 battens.
Batten 50×38 quote This is the cost of 50×38 battens.
Batten 50×50 quote This is the cost of 50×50 battens.
Batten 75×50 quote This is the cost of 75×50 battens.
Batten User quote This is the cost of the user defined batten.
Waste per course The number of tiles you want to add per course if using the coursing method.
Waste – area method The number of extra pieces you want based on the total length of hips and valleys.
Sealant The rate per metre to add sealant to the trim. You define the finish of the ridges, gables and valleys etc as “Seal” to get a sealant value added to the Reporting dialog box.
Flexible pointing The rate per metre for flexible pointing.
![]()
Note: The cartage per 100 tiles variable described above will not appear in the Supply and Install dialog if the value is set to 0. If a value is included, then it will appear and the value determined by the number of tiles ordered. If a value is set, then it will appear in the material list summary, even if you have not estimated for tile. This will be added to the material list even if a value is also set for delivery under Areas – refer to Set-Up > Areas.
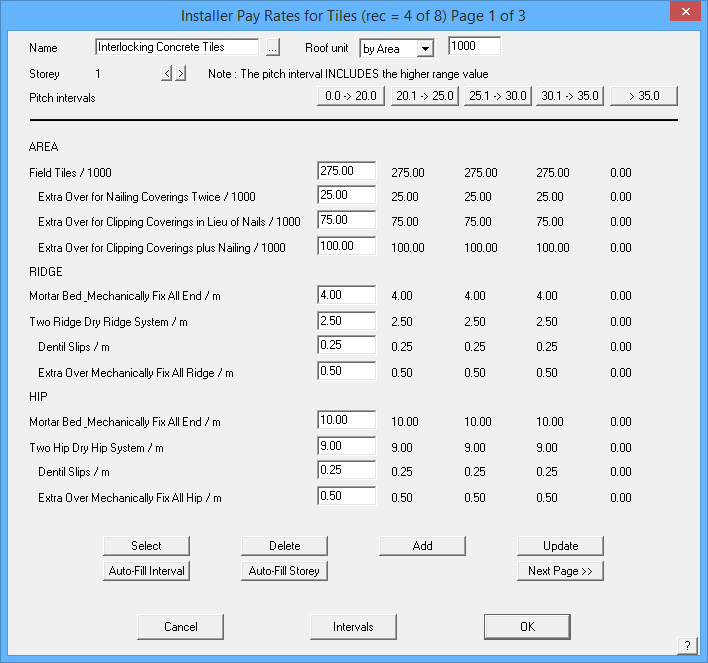
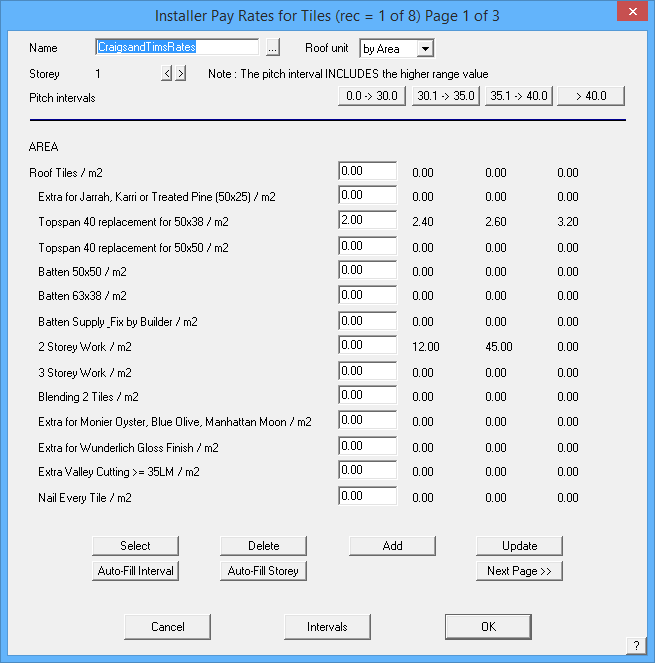
Tilers’ Pay Rates – Variable
This command lets you define tile installer pay schedules based on storey, line-item and user defined pitch interval. This Pay Rate may be applied to either Tiles or Tiles+ databases. You may define as many Tile-Pay rates as you need – for example, union or non-union rates; or sub-contractor A and sub-contractor B rates. Just remember, the more rates you set up the more you have to maintain if rates change, as they inevitably do.
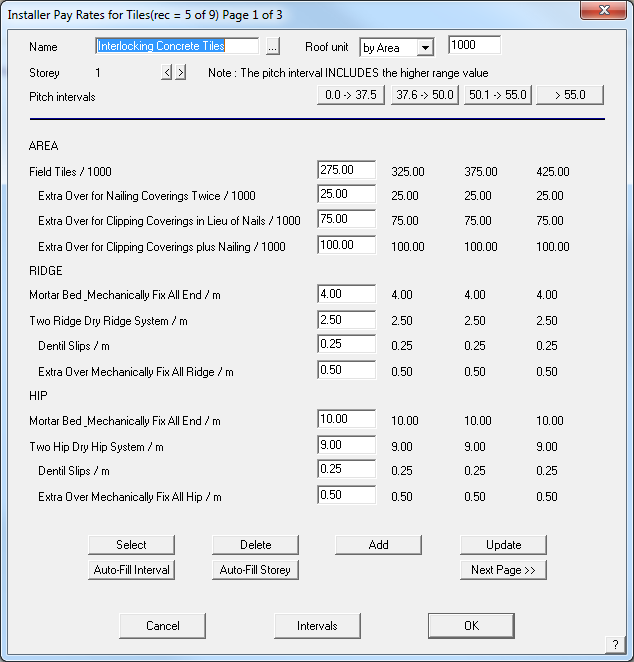
Name This is the name by which you select this pay rate in future.
Roof Unit The basis on which the costs are applied and the multiplier.
Storey This is the storey to which these values relate. You can have up to 10 storeys for the one pay rate.
Pitch intervals These values reflect those you set with the Intervals button at the foot of the dialog box. For each pitch interval value, you get a column of numbers associated with a line item. To edit a line item, highlight that column by clicking the pitch interval label.
Roof / sqm (sqFt) This is the installers rate to lay tiles on the roof.
…. The rest of the line items relate to hip, valley, gable and barge finishes you select under Cover > Select-tile.
Select This allows you to select an existing pay rate schedule.
Delete This allows you to delete an existing pay rate schedule.
Add This allows you to add a new pay rate schedule.
Update This allows you to update an existing pay rate schedule.
Auto-Fill Interval Automatically fills the table with the loading for each pitch interval.
Auto-Fill Storey Automatically fills the table with the loading for each storey.
Once the pricing table has the appropriate rates for each job function completely filled in, and don’t forget to do each storey, the file is saved away in the system using the “Add” button. Standard pricing files are stored within the software structure however user-defined pricing files are stored in a <filename>.DPT file format. In our example we created a labour pay rate file called “Interlocking Concrete Tiles” so this will be saved as InterlockingConcreteTiles.DPT.
Once the pricing table has the appropriate rates for each job function completely filled in, and don’t forget to do each storey, the file is saved away in the system using the “Add” button. Standard pricing files are stored within the software structure however user-defined pricing files are stored in a <filename>.DPT file format. In our example we created a labour pay rate file called “Interlocking Concrete Tiles” so this will be saved as InterlockingConcreteTiles.DPT.
The <filename>.DPT file is saved in a text file which allows you to make changes in an external program such as Notepad or Wordpad, or indeed, a spreadsheet program such as Excel. This is useful if you have major changes to pricing across the board and changing the values in columns is a whole lot easier in Excel if you know how. For the rest of us, open the pricing file in AppliCad (Costing > Tile-Pay) and do it long hand, one item at a time. Once complete don’t forget to select “Update” and the changes will be saved.
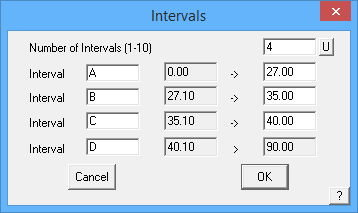
Interval Labels
Customers utilising the GRIM output feature of AppliCad to link the estimation process to downstream systems have often had to create duplicate mappings of labour rates due to the output of variable labour rates in the Roof Wizard software. Outputs such as Ridge (1, 22.5) where the 1 specifies the storey and 22.5 specifies the pitch have had to create multiple mappings for each pitch gradient in 0.1 degree increments. In 8.2, we have provided the ability for each pitch interval to be given as a label (e.g. A, B, C as can be seen in the attached image) with the output therefore being Ridge (1,A), or Ridge (1,B) etc. This greatly reduced the number of mappings required, thus reducing the workload for our users and speeding up the interface between systems.
Labour Item Decriptions
Also available is the ability to define the Labour item descriptions. These definitions are stored in a text file called LabourFile.dat and may be created or edited in a text editor such as Notepad or Wordpad.
The quick way to create the user defined group description file is to copy the file “LabourFile.TMP” to “LabourFile.DAT” in Windows Explorer, and then make any modifications using a Windows-based text editor such as NotePad or WordPad. Only attempt to edit this file if you are proficient in the use of the editor program. To return to standard groupings, the user must remove the file “LabourFile.DAT” so that the “LabourFile.TMP” in the user directory is found instead. You might also open LabourFile.TMP in the editor and use File | Save-As to create the LabourFile.DAT with your new descriptions and charges.
This will handle every permutation of Reporting for your tile item installation options.
The format of the LabourFile.dat:
 #Tile Labour File
#Line above must remain in file for it to be located by software
#Format 0=Header, 1=Main Cost, 2=Add Cost > Group Description > Reporting Calculation Method 1=Area, 2=Len |Group - see below
#1 = Field Tiles, 2 = Ridge, 3 = Hip, 4 = Valley, 5 = Verge, 6 = Eaves, 7 = Abutments, 8 = Aprons, 9 = Box Gutters, 10 = Battens,
11 = Counter Battens, 12 = Insulation, 13 = Sarking/Underlay, 14 = Fall Protection, 15 = Downpipes, 20 = Extras
#Last option defines whether default is to include in Pricing or not 0=No, 1=Yes
0|AREA|0|1|0
1|Field Tiles|1|1|1
2|Extra Over for Nailing Coverings Twice|1|1|0
2|Extra Over for Clipping Coverings in Lieu of Nails|1|1|0
2|Extra Over for Clipping Coverings plus Nailing|1|1|0
0|RIDGE|0|2|0
1|Mortar Bed & Mechanically Fix All End|2|2|1
1|Two Ridge Dry Ridge System|2|2|0
2|Dentil Slips|2|2|0
2|Extra Over Mechanically Fix All Ridge|2|2|0
0|HIP|0|3|0
1|Mortar Bed & Mechanically Fix All End|2|3|1
1|Two Hip Dry Hip System|2|3|0
2|Dentil Slips|2|3|0
2|Extra Over Mechanically Fix All Hip|2|3|0
2|Arris/Bonnett Hip|2|3|0
2|Mitred Hip|2|3|0……………….etc
Below is a screen shot of the file we created for the demonstrating the function. Notice the header of the file shows the order in which the information must be input. Once setup, you have total control over the descriptions you use for each labour item. This includes whether the labour relates to Field tile, ridge or hip etc, the description and the cost per area or per length.
The “LabourFile.DAT” file has the following format, as outlined in the header of the file:
# = Comment Line
A|B|C|D|E = Data Line, where:
A 0 = Header Line
1 = Main Cost
2 = Additional Cost
B Line Item Description
C 1 = Item to be priced by Area
2 = Item to be priced by Length
D 1 = Field Tile Catgeory
2 = Ridge Tile Category
3 = and so on, see documentation
E 0 = Do Not include in pricing calcs by default
1 = Include in pricing calcs by default.
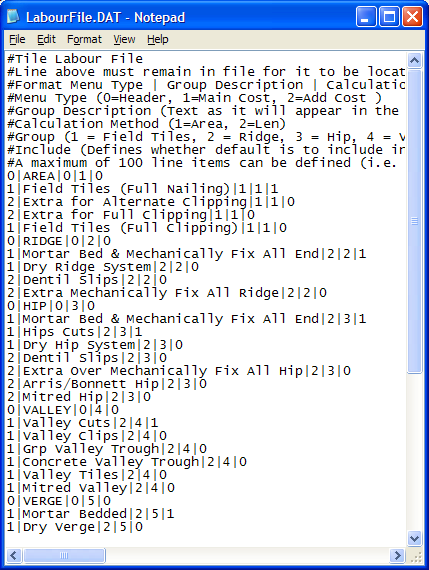
Screen captured from the LabourFile.dat being edited in Windows Notepad
The pay rate is selected when the tile is selected to cover the roof under the Cover > Tiles command.
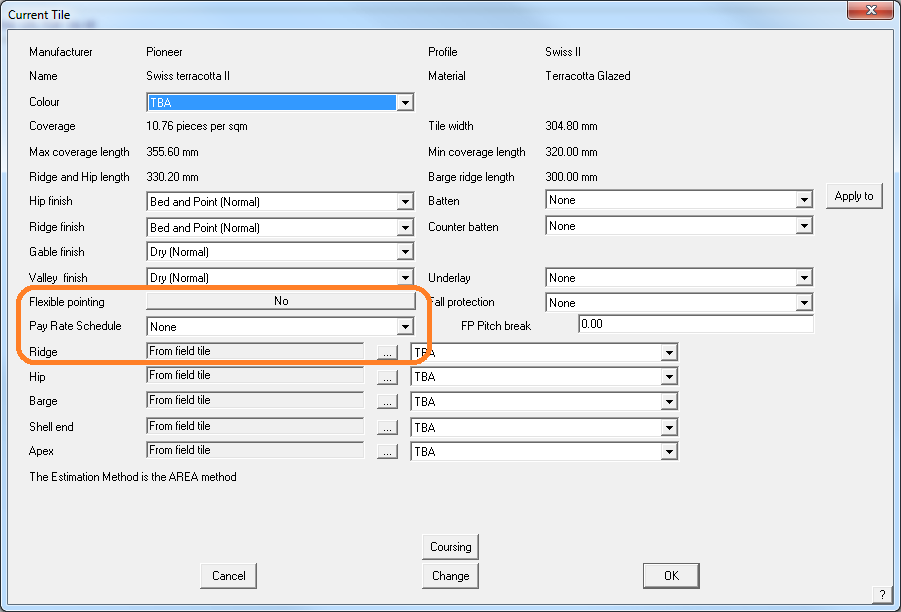
For the Tiles+ database select it here:
The selected tile details dialog for Tiles+ data file.
Click the down arrow for a drop down list of available pay scales that you have defined.
![]() Note: Should the pay rate be changed for any reason after you have selected it, then you must reselect the rate. Indeed, this applies to any database of materials or Reporting – if it is changed, you must re-select it and re-calculate the costing.
Note: Should the pay rate be changed for any reason after you have selected it, then you must reselect the rate. Indeed, this applies to any database of materials or Reporting – if it is changed, you must re-select it and re-calculate the costing.
Remember: After creating a new labour file, test it on a simple job to ensure the descriptions are transposed correctly. If it works correctly, then you are ready to use it on real jobs. This is a good tip whenever you change or update a data file, whether a labour or material data file.
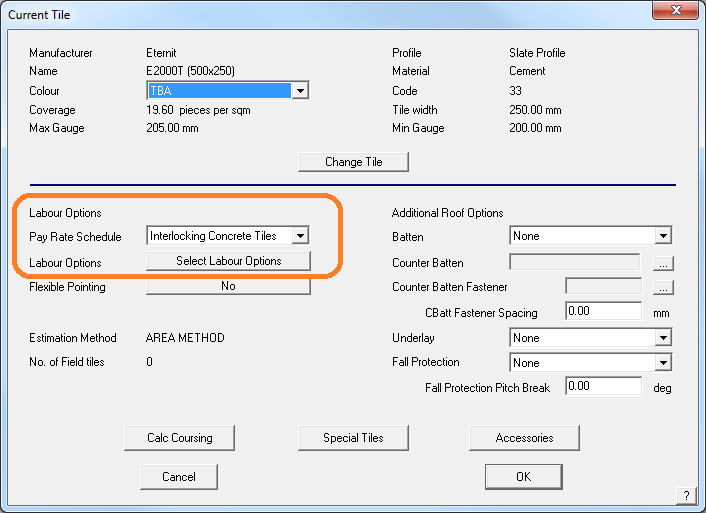
For the Tiles database, select the pay rate here:
The selected tile details dialog for Tiles data file.
![]() Note: Should the pay rate be changed for any reason after you have selected it, then you must reselect the rate. Indeed, this applies to any database of materials or Reporting – if it is changed, you must re-select it and re-calculate the costing.
Note: Should the pay rate be changed for any reason after you have selected it, then you must reselect the rate. Indeed, this applies to any database of materials or Reporting – if it is changed, you must re-select it and re-calculate the costing.
Labour Setup
Apart from the labour costs that can be associated with any particular accessory or component under the Set-Up > Tiles+ setup, it is expected that most users will want to set up labour options based on the Set-Up > Set Up Pay Rates > Tilers’ pay rates – variable (not Tile-Rates) menu which permits the user to associate costs to tile profiles and have these costs cross-referenced with the relative pitch and storey of any given roof plane it is joined to. You may define as many labour files as you need for different profiles, different sub-contractors or different geographic areas – whatever works for your business. Refer to the Reference Manual section on Cover > Tile-Pay for more details on setting up the pay rates.
Once the labour rate is defined, the labour pay scale for the installation of a job is set when the tile profile is selected under the Cover > Tiles command.
The Labour Setup for Tiles+ is very extensive and allows the user to operate in one of 2 modes; either using the standard grouping descriptions as released with the software, or to create user defined grouping descriptions to suit your circumstances. The grouping descriptions are set up in a file you create that must be called “LabourFile.DAT” as described above.
The existence of this file in the user directory of the software determines whether the user wishes to use user-defined grouping descriptions in the Set-Up > Set Up Pay Rates > Tilers’ pay rates – variable menu as opposed to the standard grouping descriptions as released with the software. If it does not exist (because you didn’t define new grouping descriptions) the file provided with the software by the name of “LabourFile.TMP” is used instead, resulting in the descriptions shown below left. The difference is most easily explained by reviewing the 2 resultant dialog boxes. Left is the standard group descriptions and right is an example of one used by a customer in the north of England.
Each dialog box demonstrates the value for each respective field for a pitch interval as well as a given storey. Thus, various values can be entered to allow for different pitch and storey rates often charged by sub-contractors working on a job. The “Auto-Fill Interval” and “Auto-Fill Storey” buttons assist in the filling in of values across the dialog by allowing the user to specify a percentage increase from the first interval / storey and to automatically fill the other fields in the dialog box with the modified values.
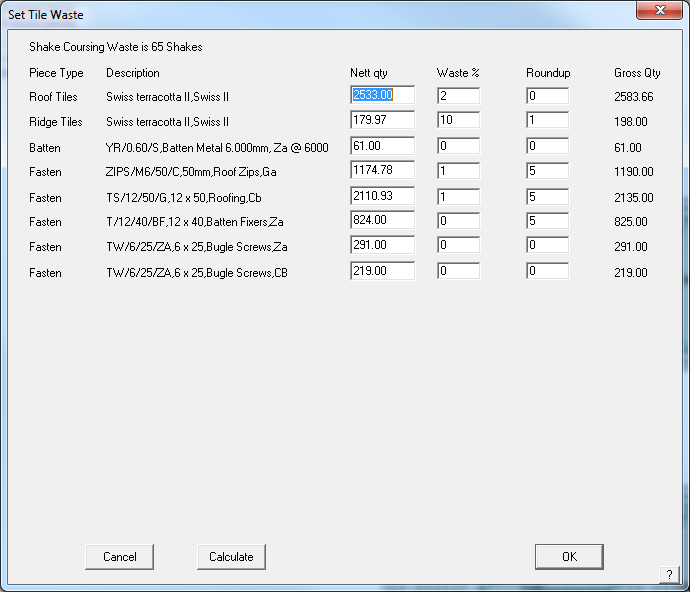
Tile-Waste
This command displays the Tile-Waste dialog box allowing you to set or change the wastage factors for different tile items.
The tile wastage values are calculated in the following sequence:
The nett number of field tiles is first calculated,
Then the number of extra pieces per course is added,
Then the extra number of field pieces per length of hips and valleys is added (field pieces per metre or per foot of hip and valley),
Then the percentage waste of field pieces is added,
Then the total number of field pieces rounded to give the final number.
Each waste value is applied in turn. If you do not want a particular waste factor to be applied then set the value to zero.
The first option – Extra Field Pieces (per course) is a number or decimal fraction, of a tile to add at the end of each course line to account for waste as a result of typical job variables such as breakages. The more course lines, the more field pieces that are added to the total tile count.
Extra Field Pieces (per length of hip and valley) is applied as a result of the total length of hip and valley combined and expressed as pieces or decimal fraction of pieces, per metre (or foot) of hip and valley. This is typically used to account for extra tiles that may be required as a result of breakages during cutting of tiles to fit at hips and valleys.
The more cuts there are, often the more breakages there are. No account is made for the re-use of the off-cut, as is sometimes possible with metal tiles.
If the off-cut is reused as a matter of course, then this needs to be taken into account and the number reduced. Experiment with different values until you get the correct result based on your experience.
All other fields are individual values for each category of tile piece. Waste % takes the total number calculated based on the course lines and adds the specified percentage and then rounds up to the nearest value as specified. A value of zero does not round up.
Multiple configurations of tile wastage and rounding of elements can be specified and saved into various configuration files. These files can now be linked to each tile record, thus allowing improved streamlining of waste and rounding calculation without requiring the estimator to remember to modfiy these values. Select [Save-As] to save the tile waste file and select [Load] to load a previously defined set of values.
When you click [OK], the values are saved. These values are applied to the tile calculations when the Reporting > Supply+Install is selected. A summary of the tile waste calculations is then displayed when you select Tile-Waste from the Supply+Install or Supply-Only dialog box.
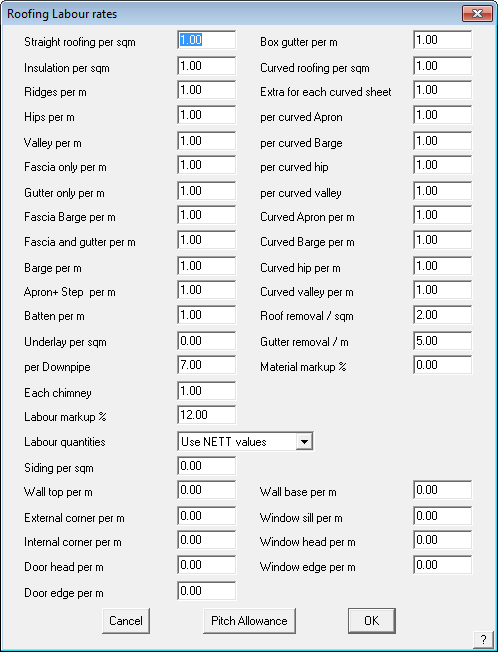
Metal Pay Rates – Fixed
This command displays the Roofing Labour rates dialog which allows you to set installation rates for different categories of roofing items on a per square basis or per unit length. There is one rate regardless of pitch of the roof or storey number. The following table describes the rates:
Labour Rate |
Description |
Straight roofing per m2 |
The rate to install straight sheeting on the roof (or verandah) |
Insulation per m2 |
The rate to lay the insulation |
Ridges/hips per m |
The rate to install the ridges and hips |
Valley per m |
The rate to install valley flashing |
Fascia only per m |
The rate to install fascia flashing only |
Gutter only per m |
The rate to install gutter only |
Fascia barge per m |
The rate to install fascia on a barge |
Fascia and gutter per m |
The rate to install fascia and gutter together |
Barge per m |
The rate to install barge flashing |
Apron per m |
The rate to install apron flashing |
Batten per m |
The rate to install battens |
Each Downpipe |
The amount to install each downpipe |
Each chimney |
The rate to cater for each chimney |
Labor markup % |
The percentage the total labour cost will be marked up in the final costing |
Labour quantities |
This is either “NETT values” or “GROSS values”. Nett values are the geometric values of the roof. Gross values are the quantities of materials you order. Setting the method here will effect the quantity you see in the Reporting dialog boxes later. They only apply to metal eoofing and metal flashing quantities for all methods of labour calculation – fixed and variable. |
Siding per sqm |
The rate to install siding per square metre |
Wall top per m |
The rate to install wall top flashing |
External corner per m |
The rate to install external corner flashing |
Internal corner per m |
The rate to install Internal corner flashing |
Door head per m |
The rate to install door head flashing |
Door edge per m |
The rate to install door edge flashing |
Box gutter per m |
The rate to install box gutter |
Curved roofing per m2 |
The rate to install the curved sheeting on the roof (or verandah) |
Each curved sheet |
The amount to add for each curved sheet |
Per curved apron |
The amount to add for each curved apron (bullnose verandahs) |
Per curved barge |
The amount to add for each curved barge (bullnose verandahs) |
Per curved hip |
The amount to add for each curved hip (bullnose verandahs) |
Per curved valley |
The amount to add for each curved valley (bullnose verandahs) |
Curved apron per m |
The rate to install curved apron (bullnose verandah) |
Curved barge per m |
The rate to install curved barge (bullnose verandah) |
Curved hip per m |
The rate to install curved hip (bullnose verandah) |
Curved valley per m |
The rate to install curved valley (bullnose verandah) |
Roof removal per m2 |
The rate for roof removal |
Gutter removal per m |
The rate for gutter removal |
Material markup % |
The rate to markup the material costs for the final quote |
Wall base per m |
The rate to install wall base flashing |
Window sill per m |
The rate to install window sill flashing |
Window head per m |
The rate to install window head flashing |
Window edge per m |
The rate to install window edge flashing |
After you make a change and click [OK], the changes are saved in rates.bin for use in all future jobs.
If you click the Pitch Allowance button the Pitch Allowances dialog box is displayed.
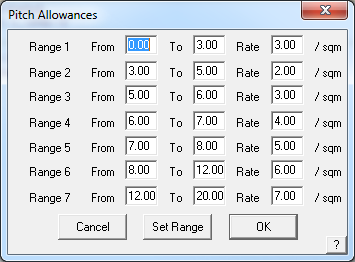
Here, you set the pitch ranges as well as the rate to apply for planes in that range. When you click Set Range, you can change the number of ranges. The maximum number of ranges you can have is 10.
These values are used in the labour charge calculation under Reporting > Supply+Install. Each plane in the model is tested for its pitch and area, and based on the roof pitch, the above table is used to derive a pitch allowance. The individual pitch allowances are added together to derive the total pitch allowance.
Metal Pay Rates – Variable
This command displays the Installer Pay Rates for Metal roofing box allowing you to set or change various labour rates associated with the installation of metal roofing. You select a pay-schedule for a job on the Cover > Select-metal dialog box. The maximum number of different labour rate tables is 50.
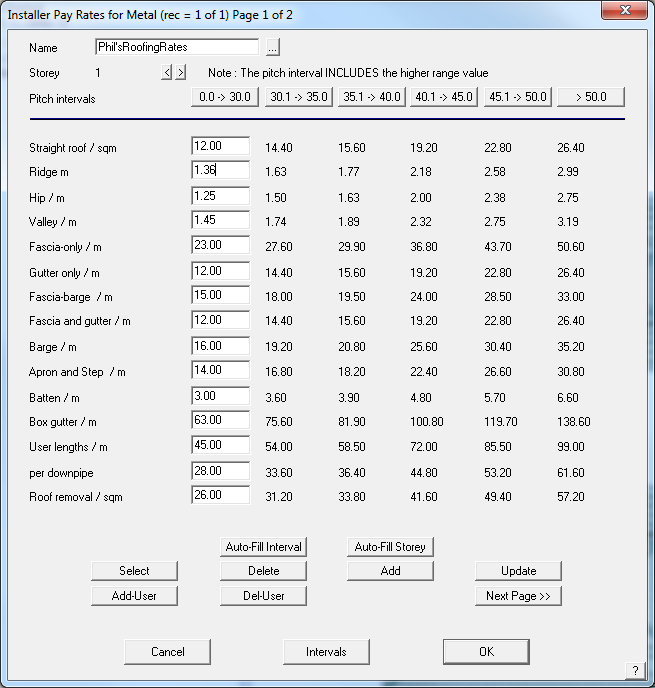
Name This is the name of this pay schedule.
Storey This is the storey to which the following rates apply. A schedule can have up to 10 storeys.
Pitch Intervals These are the pitch intervals you want to set for the job. You set them by clicking the Intervals button at the foot of the dialog. To edit a column of values you need to click on the interval value.
Line items For each line item you need to enter the rate per unit area or length for that line item. For roof removal and gutter removal only the first rate is actually read when the Reporting is performed.
Select This button lists up the existing schedules. You then select the one you want for editing. After selecting a schedule, the Update button appears letting you update the schedule.
Delete This button lets you delete the currently selected schedule.
Add This button lets you add the current schedule (schedules must have unique names).
Update Updates the currently selected table with changes.
Add-User Adds a pay rate for a User Defined flashing installation rate. The example below shows a new rate for ‘Special Gutters’.
Del-User deletes the new rate.
Next/Previous Page These buttons allow you to toggle between the two available pages.
[Cancel] Closes the dialog box without saving the changes you have made.
Intervals Lets you define the pitch intervals you want to use – see below, Interval Labels.
[OK] Closes and saves the changes you have made.
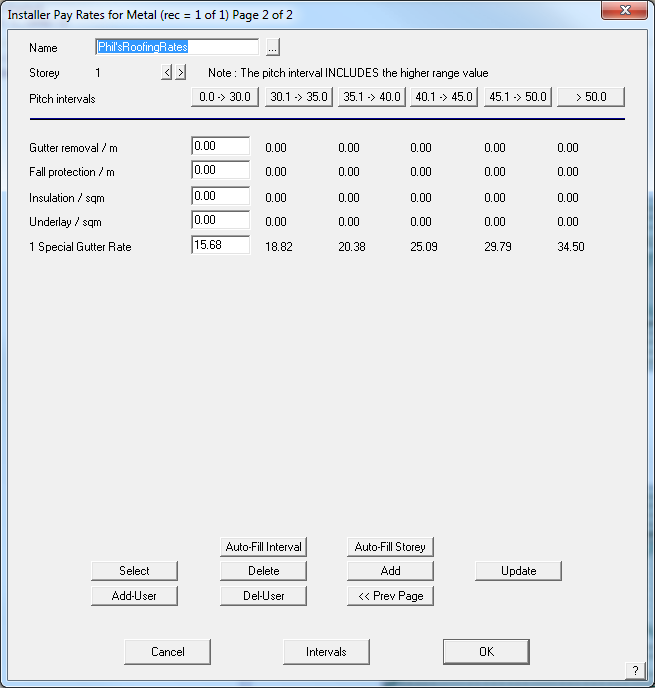
User defined pay rate for Special Gutters
Interval Labels
Customers utilising the GRIM output feature of AppliCad to link the estimation process to downstream systems have often had to create duplicate mappings of labour rates due to the output of variable labour rates in the Roof Wizard software. Outputs such as Ridge (1, 22.5) where the 1 specifies the storey and 22.5 specifies the pitch have had to create multiple mappings for each pitch gradient in 0.1 degree increments. In 8.2, we have provided the ability for each pitch interval to be given as a label (e.g. A, B, C as can be seen in the attached image) with the output therefore being Ridge (1,A), or Ridge (1,B) etc. This greatly reduced the number of mappings required, thus reducing the workload for our users and speeding up the interface between systems.
Curved-Metal-Pay Rates
(Pulldown Menu)
This command displays the Installer Pay Rates for curved metal roofing box allowing you to set or change various labour rates associated with the installation of curved metal roofing. You select a pay-schedule for a job on the Cover > Select-metal dialog box.
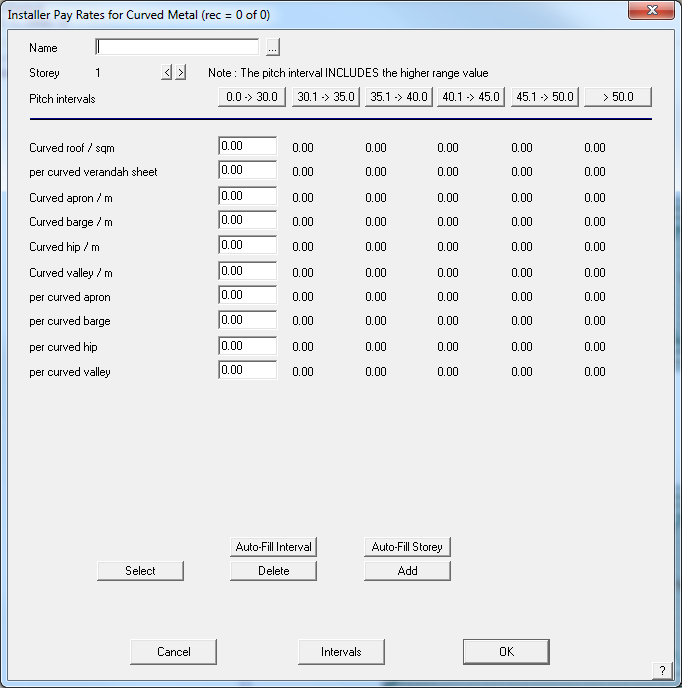
Name This is the name of this pay schedule.
Storey This is the storey to which the following rates apply. A schedule can have up to 10 storeys
Pitch Intervals These are the pitch intervals you want to set for the job. You set them by clicking the Intervals button at the bottom of the dialog. To edit a column of values, you need to click on the interval value.
Line items For each line item you need to enter the rate per unit area or length for that line item. For roof removal and gutter removal, only the first rate is actually read when the Reporting is performed.
Select This button lists the existing schedules. You then select the one you want for editing. After selecting a schedule, the Update button appears letting you update the schedule.
Delete This button lets you delete the currently selected schedule.
Add This button lets you add the current schedule (schedules must have unique names).
[Cancel] Closes the dialog box without saving the changes you have made
Intervals Lets you define the pitch intervals you want to use
[OK] Closes and saves the changes you have made.
Nett-Rates
(Pulldown Menu)
This command displays the Roofing Reporting rates for nett-only roofing dialog which allows you to set the rates for the Reporting > Nett-Only command.
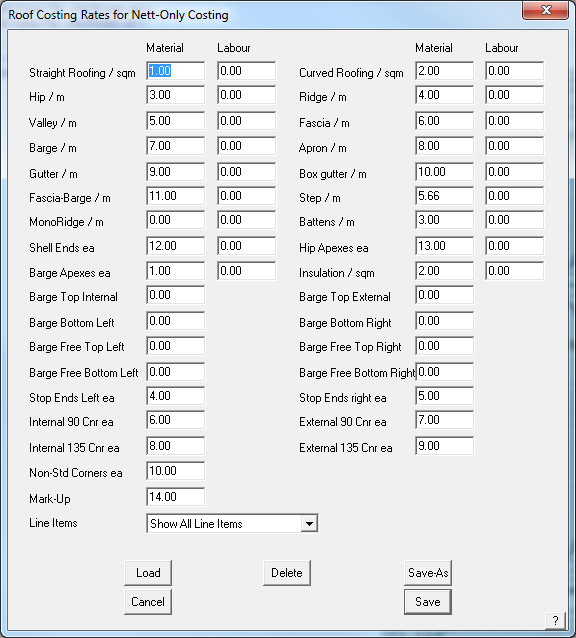
The values you set here are used by the Nett-Only Reporting method, to provide you with a quick and easy way to develop a quote using a pricing approach (rather than a cost up process).
Load Loads a predefined set of Net-Only rates for specific roof systems.
Save-As Saves a Nett-Only pay schedule for specific roof systems.
Here we present you with the option to supply material and labour rates for different parts of the job, which are multiplied by the nett quantities for the job (the nett quantities relate to the quantities displayed by the Tools > Tally-Quantities command). You can choose to set a rate to something meaningful or leave it at zero, and therefore has no impact on the quote.
So, if you have a rate per unit area you use to quote a job with, then this is the quickest and easiest method.
When you click [OK], the rates you defined are saved for use by the Reporting > Nett-Only command.
Comments are closed.