Stage Manager
 Stage-Manager
Stage Manager is a process by which you can group together different parts of the job. Based on your preference settings, Stage Manager is either always on or always off. You would employ Stage Manager because:
- you want different installers for different sections of one job.
- you want materials for one part of a job ordered and delivered at different times.
- you want to quantify materials for a specific part of a job.
- you want to present your customer with quotations dealing with different stages.
- you want to present your customer with staged orders or invoices.
Once grouped, the job can be costed and ordered by stage. Stage Manager provides comprehensive control over ALL aspects of the job and the materials.
Stage Manager may be turned on or off as required and this is set under Set-up > System Preferences > Preference Settings. If you do not use Stage Manager functions, it is best to have it turned off as the extra steps do cause a small degradation in the speed of processing larger jobs, since Stage Manager controls all subsequent reporting processes in the software. It can also unnecessarily complicate a job. You can also turn on or off Stage Manager from the Stage Manager screen by selecting the SM Enabled/Disabled button.
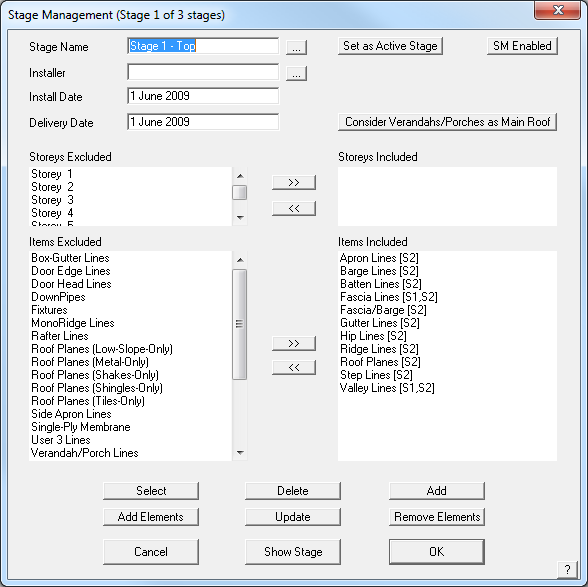
When you select Cover > Stage Manager, the Stage definition dialog box is displayed. This command lets you define a stage and set which items are included from what storey for each new stage.
Type the stage name and the installer’s name. Set the required dates as appropriate. Next you select the storey to be included in this stage then select the items that are required to be installed from this storey as part of this stage.
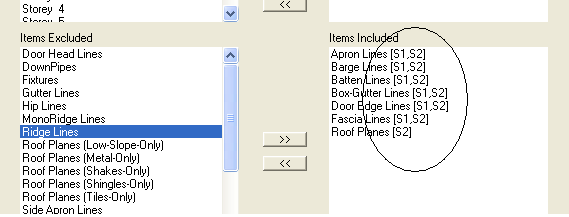
As each group of items is selected, it is displayed in the ‘Items Included’ pane of the dialog box and the storey number that it is to be included with this stage – ie Roof Planes [S2] indicates that only the roof planes for storey 2 are to be included whereas Barge Lines [S1,S2] indicates that barge cap will be included for both storey one and two.
Stage name This is the name you want to call the stage (eg Main roof, Fascia and Gutter or Stage 1, Stage 2 or Top Roof, Bottom Roof etc.)
Installer This is the name of the installer for this stage. When you click the ‘…’ button, you can select the installer from the list of installers defined under Job Info from the Pulldown menu.
Install date This is the date you want this stage installed
Delivery date This is the date you want the materials delivered to the site.
Select This button lists the existing stages you have defined in this job and lets you select one.
Delete This button will delete the currently selected stage
Add This button adds a new stage.
Update After you select a stage, the update button updates the current stage with the new details.
[Cancel] This button cancels the dialog box without saving changes
Set as Active Stage When you start a new job, the stages are loaded from this file
[OK] This button will save the stages in the current job.
Remove-Elements This command lets you remove individual geometric elements from the stage already defined in the job.
Show Stage This button highlights all the roof items included in the stage being defined.
The stage definition information is stored in a text file called Stages.dat. It is in the form of:
Stage 1
0
17 April 2009
10 April 2009
0
Roof Planes
0
Ridge Lines
2
Hip Lines
2
Valley Lines
2
Fascia Lines
3
…… etc
The item category is listed, followed by a number indicating if that item is included in the stage and from which storey, in a mathematical progression.
A zero indicates not included in the stage, a 1 indicates storey 1; a 2 indicates storey 2; a 3 indicates storey one and two; 4 indicates storey 3 only etc. As this progression is automatically determined by the software from the input to the dialog box as shown above, the operator does not need to remember how this works.
![]()
Note: With Stage Manager enabled, ALL Reporting processes are controlled by it, including the generation of cutting lists, orders etc.
Take the example where a job is being developed according to stages, the required stages have been defined and the operator wishes to extract orders for material for Stage 1.
Select the Reporting > Supply+Install option. If a quotation has previously been saved, then the operator will be prompted to open a previous quote, or Re-Calculate quote. If this is a new job, you will go straight to the ‘Select Stage’ dialog. Assuming we wish to determine a new set of reports just for Stage 1, then we would select ‘Re-Calculate quote’.
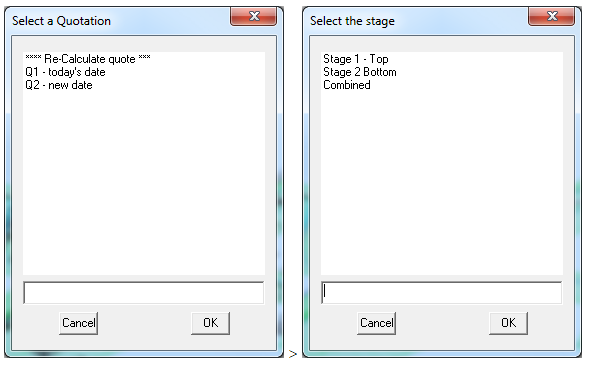
The software then prompts the operator for which stage is to be reported on – in our example we would select Stage 1. Regardless of what was previously done on the job, the materials for the whole job are then re-calculated from scratch, all the trim and roof cover etc. and the results displayed in the Supply+Install dialog box. The results will be just those materials necessary for this stage and any items defined as Extras, and nothing else. This quotation can be saved, and the process repeated for Stage 2 and saved. Once the operator is happy with the quotations for each stage, then the required reports and drawings may be printed.
The Stage Manager process can become quite complex and does impact on the final result dramatically, so careful thought must be applied to ensure all the stages are correctly defined. If there is any doubt, delete the stage and start again.
Test the definitions and the results on a simple ‘test job’ that is representative before using it on any real job. Create a model that has multi-levels and storeys and all manner of trim types. Become familiar with the job so that you know what to expect. If the result works for the test job, your confidence in the Stage Manager will increase substantially.
In any case, the operator should use all their skill and experience to check the job carefully – the software is only doing what you tell it to do.
Comments are closed.