Select Tile +
 Select-Tile
(when preference is set to Tiles+ database)
Tiles+ is a material database structure that provides for the most detailed breakdown of all the material items that are required to complete a tiled roof, especially those systems that have a comprehensive range of roof tile accessories such as vented ridge, half tiles, rake tiles etc. and components that are necessary to install these accessories.
The Select-Tile command displays the Tiles+ dialog box if you have selected Tiles+ as the preferred tile database to use. Once you have selected a tile, the Current Tile details are displayed.
![]()
Note: Refer to the Set-Up > Preference Settings > System Preferences command to see how you set the preference to Tiles+ database.
The Tiles+ database structure is essential for using the Costing+ pricing options described elsewhere in this manual. Costing+ provides for determining margin on costs among other things.
The defined settings for cover and gauge are displayed for the tile selected. If you wish to change the tile selected, click the change button and select a new tile.
![]()
Note: If you change the material definition for any reason (under the Set-Up option), then you must re-select the item by clicking the Change button so that the new tile definitions are reloaded.
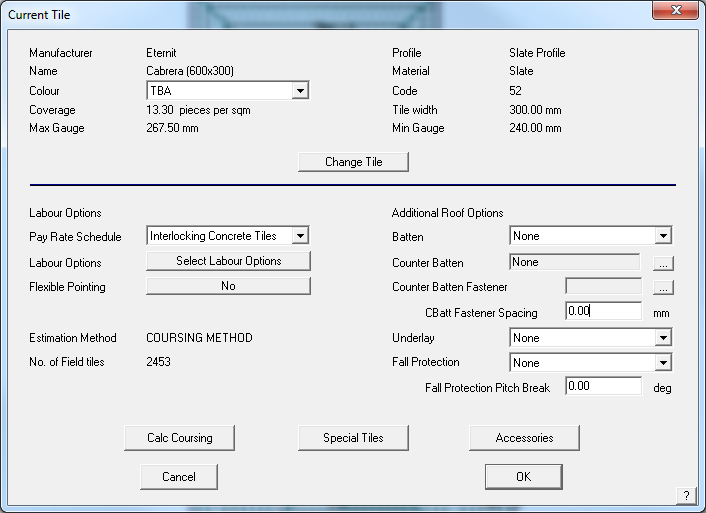
Colour This drop down box lets you select the colour for this tile from a list of colours provided by that supplier. Colours for accessory pieces are also set to this colour.
Pay Rate Schedule Select the previously defined pay rate to install tiles (refer Set-Up > Set up Pay Rates > Tile-Pay.)
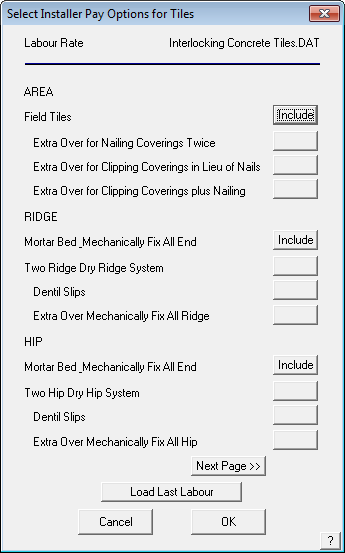
Labour Options Selecting this button brings up the screen below and displays the labour options for you to include with the Reporting for this job.
![]()
Note: You must read the section of the reference manual that deals with setting up the options for labour rates and the labour item descriptions, since your definitions are what determines what is included and what is not. There is also a description in the Appendix on the Tiles+ database structure. Also refer Set-Up > Set up Pay Rates > Tile-Pay.
Depending upon the definition of the Labour Items and their descriptions, you will get a dialog something like the one below. The important thing for you to do here is decide which options are required for the job you are currently quoting. If the button is blank, then that labour item will not be included. By clicking the button, the selected labour item is included.
Flexible pointing This is either Yes or No
Batten To select a batten for the job, select the appropriate size from the Batten combo box. These battens are read directly from the batten materials database. You can define a new batten using the Set-Up > Flashings command. See below for a description of the Apply To button.
Counter batten This will be the counter batten you want to use.
Counter batten Fastener Fastener for the counter batten as it may be different from regular battens.
Counter batten spacing This is the spacing of the counter battens. It defaults to be the rafter spacing you set under Job-Details, unless changed.
Underlay This is the underlay you want to use. It is assumed that you want to apply the underlay to the entire roof. If you want to apply it partially, then refer to the Cover > Underlay command. To define an underlay to appear in this list, you must define a new insulation using Set-Up > Insulation with the name of “Sarking” or “Underlay”.
Fall protection Here you can define the fall protection you want to use. To get a fall protection item listed, you must define a new user-defined flashing with the profile of “Fall Protection”. You do this with the Set-Up > Flashing command.
FP Pitch Break This is the fall protection pitch break value. The system automatically assumes that fall protection is applied to all eaves for storeys 2 and above and on first storey roofs where the pitch of the roof is greater than this value. If you want to apply fall protection to other eave lines, then refer to the Cover > Fall-protection command.
You will not see these battens on the drawing but the lengths of the relevant roof lines are added to estimate the total length of battens required.
To cancel the tile selection dialog click [Cancel]
To change the tile selection, click Change-Tile. You must remember to select a new tile or re-select the tile if the tile definition has been changed (such as size or cost changes).
To accept the tile selection, click [OK]. This then becomes the cover material for all the tile roof planes in the model.
Calc Coursing
Clicking this button lets you perform an estimate of the tile quantity by simulating the laying of the courses for the tiles. Waste is not applied at this stage so the numbers are the raw numbers before waste.
The number of field tiles is reported for either the area or the coursing method. If coursing lines are present, it will be the coursing quantities that are used later under Costing. To use the area method figures, delete the coursing lines by clicking Delete. You can control the coursing gauge by entering the gauge you want (as long as it falls in the gauge range) and selecting Use required gauge (rather than Use best fit gauge).
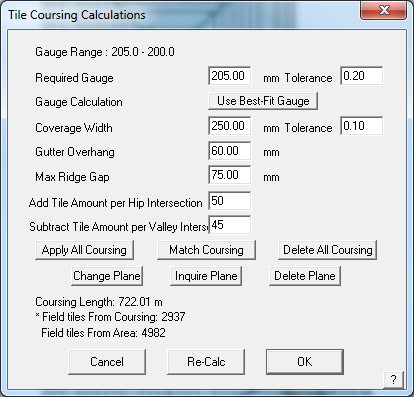
Use Best-Fit Gauge This button toggles between Best-Fit and Required Gauge so that you can control the course spacing.
Tolerance (Gauge) The tolerance value alongside the Required Gauge field allows you to set a stretching value. If the depth of the course at the ridge line is greater than the number specified, a course is added to the number of courses up the rafter. The number is expressed as a decimal between 0 and 1. This process is duplicated on all roof planes.
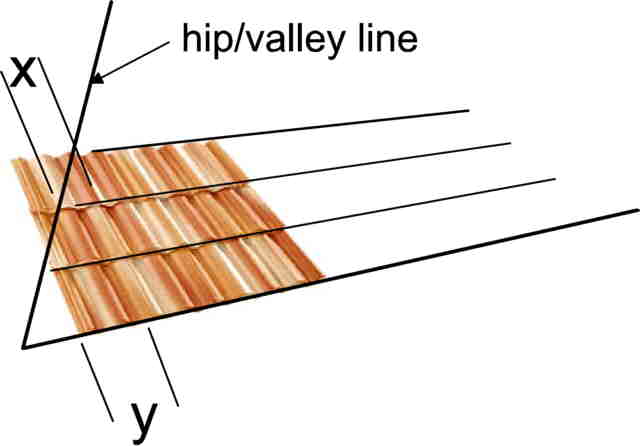
Tolerance (Width) If the width of the tile at the end of a course line (X) is greater than the number specified, a tile is added to that course. The number is expressed as a decimal and usually between 0 and 1 and is effectively calculated as X/Y (Y being the width of a full tile). For example, if the operator specifies a course tolerance of 0.5 on a tile that has an exposure width of 300mm, then for every instance where more than 150mm of course line remains at the end of that course line the software will add a tile to that course. This is duplicated for every course line on the job. A number greater than 1 may be used in special circumstances where the tile panel is very wide, (such as steel tile). A number such as 1.15 will reduce the tile per course by 1.15 pieces, thus allowing for reuse of off-cut pieces.
For any of these fields you can enter whatever values you like to obtain the result you desire and these should be verified against field results and experience.
Gutter Overhang The amount of tile to hang into the gutter, which effectively reduces the first course width.
Max Ridge Gap The amount of gap at the ridge that effectively reduces the ridge to eave measurement.
Apply Coursing Simulates the application of the tiles, course by course and draws the coursing lines on the roof drawing. The course lines are effectively the same as the batten lines.
Delete Coursing This deletes the coursing lines so that you can re-apply them. If you delete the coursing and do not re-apply it, the software assumes that you wish to quantify by Area only.
The result is displayed:
The number of tile pieces is displayed in the roof plane area as a guide to where all the tiles are to be installed. The example below is for a grossly exaggerated tile size to see how the process works.
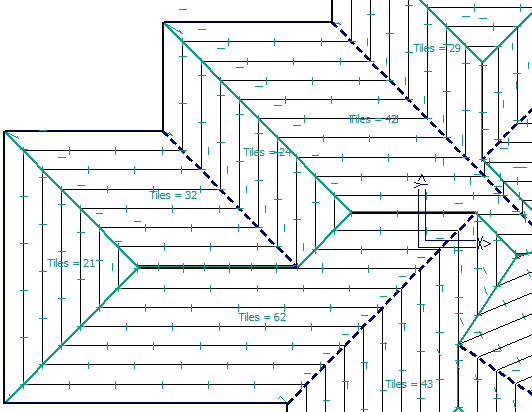
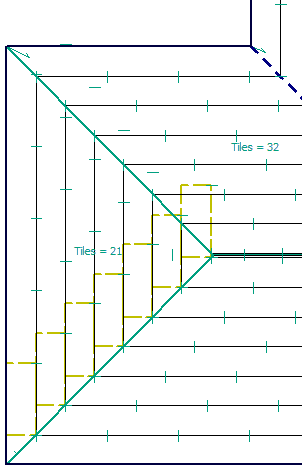
Each tick mark representing a whole field tile piece, in abbreviated form to indicate that tile quantities have been calculated and the total number of pieces on each plane is displayed, as shown below.
 =
= 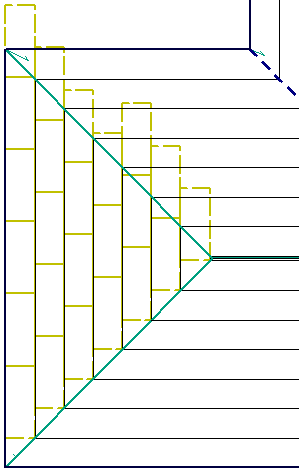
The tick mark is only for representation on screen and does not plot or print. It also indicates how the field tile quantity is determined by the software. It does represent the actual tile size.
Quantity will be determined using Area
Special Tiles
This button takes you to the full set of options for associating Special Tiles such as verge tiles, hip tiles, tile and a half tile etc. with the field tiles. Each Special Tile can have a second special tile and these can be defined as they are required, ie by course, or alternate course etc. controlling exactly how each and every item is quantified for your job. The frequency section sets the stagger or estimation rules for special tiles. For each of the contexts (at left verge, at hips etc), you can nominate how often you want tile+half pieces (at every course, at every other course etc). If you have a standard set of rules, you can click Set as default to save these rules for your next job.
The total number of field tiles may be reduced by the number of Special Tiles quantified by the software by setting the button, Yes or No.
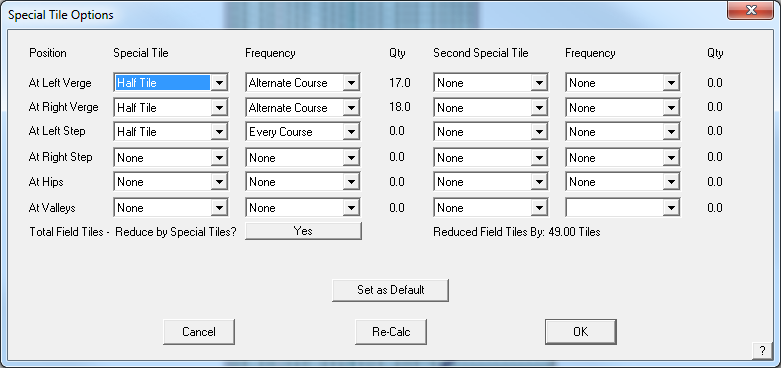
The Special Tiles Option box
Fitting and Accessories
This button takes you to the dialog box as displayed below where you set the fittings and the accessories required for each accessory.
Select the down arrow on the drop down box next to each category of fitting and select the item required for this job, such as which ridge cap profile. Notice that you can set the list you define as a default setting so that you don’t have to reselect them each time. Select the re-calc button, and each fitting tile is quantified.
The next step is to check the accessories that have been defined for the accessory tile and add or subtract fitting item and accessories for the job.
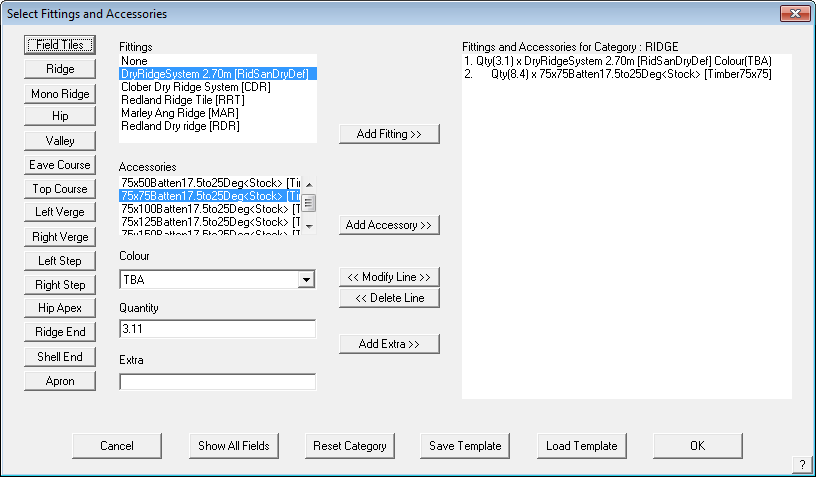
The Tile Fittings and Accessory dialog box
For hip, valley, left and right verge and various other special tiles the estimation method is “by course” or “by length” depending how you defined them under Set-Up > Tiles+. The “by course” method requires you to generate the coursing later. The “by length” method uses the length of each piece to determine the quantity required. For hip tiles, you can also select the “Same as Ridge’ option which means that the ridge tile is used on hips as well.
Here you have buttons to add Fittings and Accessories, modify the quantity of each that are required from what was previously defined as the standard quantity. Notice that the fitting and accessory items are tabbed in the list so that the association between items is clear.
<Add Fitting Add any tile fitting from the defined fittings to the material list
<Add Accessory Add any accessory component from the defined accessories list
Modify Line Select an item in the list to modify quantities. These values do not assume any waste. Adding waste pieces is done later under Costing.
Delete Line Delete an item in the list
Add Extra Add a user defined item to the list.
![]()
Note: The quantity for the newly added item is adopted from the selected fitting item. Use Modify to change the required quantity if different. You select Previous Category and Next Category as necessary to setup all the items for the job.
From here you can see what Fittings and the appropriate Accessory options selected for the job. If you want to add an additional Fitting, simply select the required Fitting from the drop down Fitting box and click Add Fitting. The Fitting and any accompanying Accessories will be added to the left hand side window.
If you would like to add a Accessory from a Fitting simply select the Fitting, the list of Accessories will then be listed under the Accessories window. Select the required Accessory and select Add Accessory. In this way, a comprehensive material list may be put together in the one screen for all roof materials.
If you need to modify the quantified number, simply click on the item to be modified from the left hand window, the quantity will appear in the Quantity field, change the quantity and click Modify Selected Item, the quantity will be updated.
If you select the the Show All Fields button, all selected Fittings and Accessories are displayed in a single list. Individual item quantities may be adjusted manually at this time. Select the item and insert a new quantity value.
The Save Template button provides for the operator to save the selected items as a template for other jobs. The Load Template Allows the operator to recall a previously saved list or parts template.
Select [OK] and the previous Fittings dialog is displayed
Once you have set the required accessories for the complete job, you can go to Reports / Reporting to cost the materials and labour for your job.
Comments are closed.