Select Tile
 Select-Tile
(This is used when your preference is set to Tiles database, as distinct from Tiles+ database. Refer to the Set-Up > Preference Settings > System Preferences command to see how you set the preference to Tiles database or Tiles+ database.
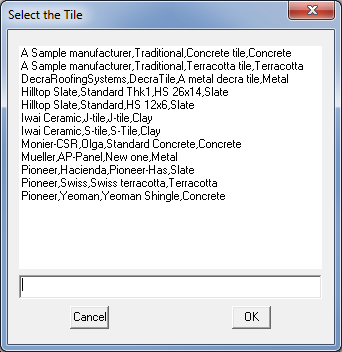
This command lets you select the tile for the job as well as other tiled roof parameters. When you first select Select-Tile, the Select the tile dialog box is displayed.
Once you have selected a tile, click [OK] and the Current Tile dialog box appears:
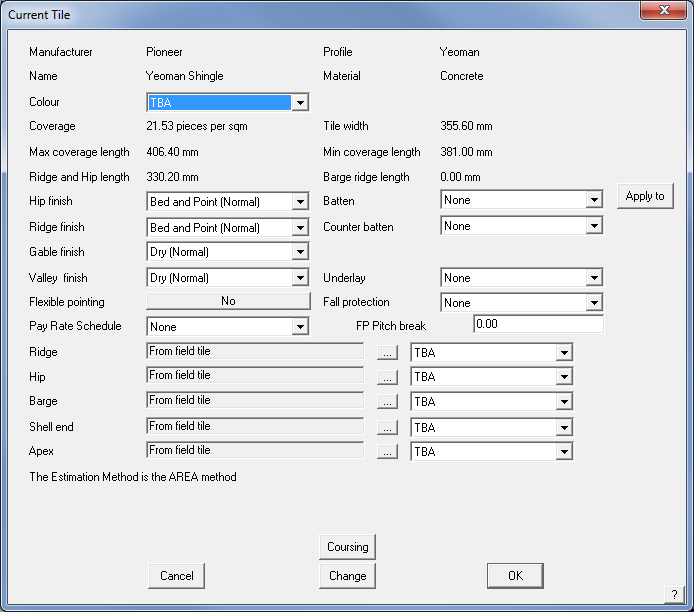
This dialog reports to you the coverage as well as other geometric values for the selected tile. Refer to Set-Up > Tiles command to see how you can define and change a tile definition.
Colour This drop down box lets you select the colour for this tile from a list of colours provided by that supplier. Trim tiles which are set to “From field tile” will also adopt this colour.
Hip-finish Hip Type is one of, Bed and point (normal), Seal and Butt
Ridge- finish Ridge Type is one of Bed and point (normal), Seal and Butt
Gable- finish Gable Type is one of Dry (normal), Bed and point, Seal and Barge ridge (this is actually a different tile whose cost needs to be provided under cover costs)
Valley- finish Valley Type is one of Dry (normal), Bed and point and Seal
Flexible pointing This is either Yes or No
Pay rate schedule Clicking in this field will display a list of the pay rate schedules you have defined. Refer to the Reporting > Tile-Pay command to see how you define a pay rate schedule.
Batten To select a batten for the job, select the appropriate size from the Batten combo box. These battens are read directly from the batten materials database. You can define a new batten using the Cover > Flashings command. See below for the operation of the Apply To button
Counter batten This will be the counter batten you want to use.
Spacing This is the spacing of the counter battens. It defaults to be the rafter spacing you set under Job-Details.
Underlay This is the underlay you want to use. It is assumed that you want to apply the underlay to the entire roof. If you want to apply it partially, then refer to the Cover > Underlay command. To define an underlay to appear in this list, you must define a new insulation using Set-Up > Insulation with the name of “Sarking” or “Underlay”.
Starter course Clicking this field will open a list of shingles or shakes you can use as the starter course. The starter course is applied to all eaves as well as to rake edges when using shingles. This field only appears in the Select-Shingle and Select-Shake commands.
Fall protection Here you can define the fall protection you want to use. To get a fall protection item listed, you must define a new user-defined flashing with the profile of “Fall Protection”. You do this with the Set-Up > Flashing command.
FP Pitch Break This is the fall protection pitch break value. The system automatically assumes that fall protection is applied to all eaves for storeys 2 and above and on first storey roofs where the pitch of the roof is greater than this value. If you want to apply fall protection to other eave lines, then refer to the Cover > Fall-protection command.
Ridge tile Clicking this field lets you assign a ridge tile from another profile, or to select no ridge tiles at all. You can also select a different colour for this ridge tile too.
Hip tile Clicking this field lets you assign a hip tile from another profile, or to select no ridge tiles at all. You can also select a different colour for this ridge tile too.
Barge tile Clicking this field lets you assign a barge tile from another profile, or to select no barge tiles at all. You can also select a different colour for this barge tile too.
Shell end Clicking this field lets you assign a shell end from another profile, or to select no shell end tiles at all. You can also select a different colour for this shell end tile too.
Apex tile Clicking this field lets you assign an apex tile from another profile, or select no apex tiles at all. You can also select a different colour for this apex tile.
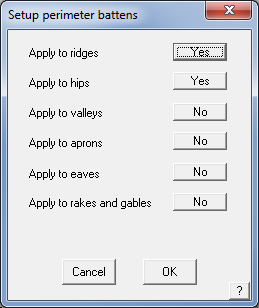
Apply To This button lets you select where you want extra battens to be estimated around the perimeter of each roof plane. Initially no perimeter battens are estimated
You will not see these battens on the drawing but the lengths of the relevant roof lines are added to estimate the total length of battens required.
At the bottom of the dialog, a message is written to inform you which estimation method is used (area or coursing). If you generate coursing lines (see later), the estimation method will become, ‘coursing’.
To cancel the tile selection click [Cancel]
To change the tile selection, click [Change].
To accept the tile selection, click [OK].
This then becomes the cover material for all the tile roof planes in the model.
Coursing Clicking this button lets you perform an estimate by simulating the laying of the tiles course by course. If you do not want to estimate by coursing, you can ignore this step and the estimate will default to the area method ie pieces per square metre (or square).
When you select Coursing, the Tile coursing dialog box is displayed:
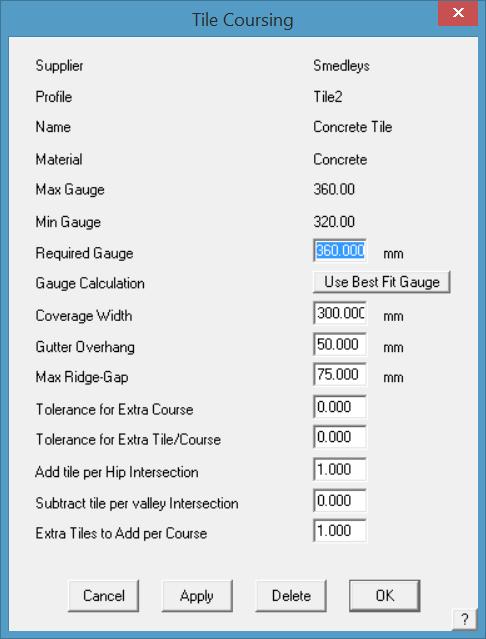
This dialog displays the tile you have selected as well as its coverage data. The maximum and minimum coverage lengths are set when you define the tile.
Required Gauge This is the gauge you want to use when you select the next option as “Use the required gauge”
Gauge calculation This is a toggle between using the gauge you entered, or the process calculating an appropriate gauge.
Coverage width This is the effective width of the tile
Gutter overhang this is the amount you want to have the first course to overhang into the gutter. You can also use this value to effectively offset the location of the second course.
Max ridge gap This is the maximum gap between a ridge and the top of the closest course. That is, a course is not inserted if it falls within this value.
Tolerance for Extra Course The tolerance value alongside the Required Gauge field allows you to set a stretching value. If the depth of the course at the ridge line is greater than the number specified, a course is added to the number of courses up the rafter. The number is expressed as a decimal between 0 and 1. This process is duplicated on all roof planes.
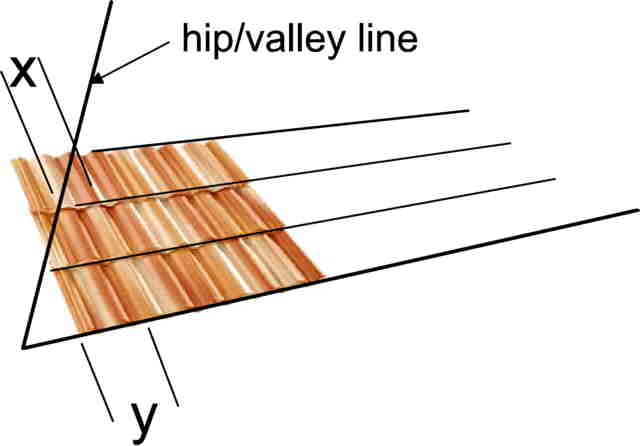
Tolerance for Extra Tile/Course If the width of the tile at the end of a course line (X) is greater than the number specified, a tile is added to that course. The number is expressed as a decimal and usually between 0 and 1 and is effectively calculated as X/Y (Y being the width of a full tile). For example, if the operator specifies a course tolerance of 0.5 on a tile that has an exposure width of 300mm, then for every instance where more than 150mm of course line remains at the end of that course line the software will add a tile to that course. This is duplicated for every course line on the job. A number greater than 1 may be used in special circumstances where the tile panel is very wide, (such as steel tile). A number such as 1.15 will reduce the tile per course by 1.15 pieces, thus allowing for reuse of off-cut pieces.
Add tile per Hip Intersection Adds an extra tile when a course line intersects with a hip intersection. Can be a number less than one. That is, if you specify 0.5, an extra tile is added every other course at a hip.
Subtract tile per valley intersection Subtracts a tile (or part there-of) when a course line intersects with a valley line. That is, if you specify 0.5, a tile is subtracted every other course at a valley.
Extra Tiles to Add per Course Provides to the ability to further refine the quantity calculated to account for other variables such as breakages in transit etc. May be less than a whole number. That is, if you specify 1.5, you will have 1.5 tiles added at the end of every course.
For any of these fields you can enter whatever values you like to obtain the result you desire and these should be verified against field results and experience.
When you click [OK], coursing lines are inserted onto the roof planes. If you had selected counter battens, the lines depicting them would also be inserted.
If you click Delete, the coursing lines on the roof are deleted.
If you click [OK], then the command terminates and the dialog box closes.
For each roof plane, the eave course is laid from the longest eave. From there, an optimum course separation is calculated which will fall between the maximum and minimum values relevant to the tile. Note that the start of the eave course is determined by the gutter overhang.
After the courses are drawn, the number of tiles (excluding waste) is reported on the dialog box. You can determine the waste when you prepare the quote.
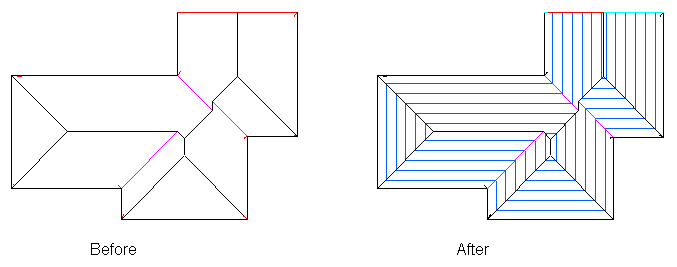
The following diagram shows the coursing lines generated on a roof.
Comments are closed.