Tiles
 Tiles
Tiles
Here you can define a new tile in the database. After selecting define, the Define Tile dialog box is displayed. As is the case for defining all products in Roof Wizard, the key item in the definition is the Product Code – it is this that links the products with the accessories , the pricing and labour etc. The dialog box lets you enter textual information about the tile as well as geometric values. The textual information is used to select the tile later. The geometric values determine the course spacing and how many of these tiles are to be used for the job.

Supplier This is the supplier of the tile. You can enter any name you wish, or if you click the Supplier button, you can select the name from a list. The list is derived from all the supplier names already in the database.
Profile This is the profile of the tile. You can enter any name you wish, or if you click the Profile button, you can select the name from a list. The list is derived from all the profile names already in the database.
Name This is the name of the tile. You can enter any name you wish, or if you click the Name button, you can select the name from a list. The list is derived from all the names already in the database.
Material This is the material of the tile. You can enter any name you wish, or if you click the Material button, you can select the name from a list. The list is derived from all the material names already in the database. If the tile material is Concrete, then the concrete pay rates are used; if it is not concrete, then the terracotta pay rates are used.
Roof tile coverage area This is the number of tiles per square metre (or square foot depending upon units selected). This value is used if you choose to do the estimate by the area method.
Max roof tile coverage length This is the maximum length of coverage for this tile. This value is used later in the coursing commands to determine the course layout.
Min roof tile coverage length This is the minimum length of coverage for this tile. This value is used later in the coursing commands to determine the course layout.
Roof tile coverage width This is the coverage width of the tile. It is used to determine the number of tiles when you use the coursing method.
Fastener Code You may select a required fastener from the list of previousy defined fasteners. Select the button and all available fasteners will be displayed. You may also define a fastener or clip using the accessories option below.
Num. Fasteners per Tile Define the required fasteners per tile.
Recommended Batten Select the […] button to get a list of battens available for use with this tile.
Batten Len. per Unit Area Many installers use this formula to calculate the quantity of batten, especially when using the ‘Area Method’ of costing tiles.
Product Code Each different tile must have a unique product code. Typically the same code as used by the supplier so that the orders you generate have the same detail on them. The product code must be unique. The tile and all the tile accessories are associated by means of the product code.
Roof Tile Cost The cost per tile piece.
Roof Tile Waste File If you have defined specific tile waste factors for this profile, then this is where you link the tile to the tile waste file (refer Setup > Set Up Pay Rates > Tile Waste Factors).
Alternate Category Allows you to define a different category so that the tile may be listed under a different group in the Supply and Install summary list.
PDF File Allows you to define a PDF document that might include the tile spec sheet for example, for later inclusion in your document package.
Delete This button deletes the current definition.
Add This button adds the current definition to the database as long as it is unique.
Update This button appears only after you have selected Select. This button then updates the current record with the current details.
Select This button lists all the tiles in the database from which you can select one to view, edit or delete as required.
Cancel Does not make the changes permanent.
[OK] Makes all the changes permanent – nothing is actually written to the data file until you select [OK].
Roof Wizard is moving towards an improved pricing and job management solution, with linkages to external accounting systems, a requirement to allow splitting up of an estimate into various groupings became apparent. The best way to do this is with Quote Groups, and so the ability to modify the default “category” for each material item in the software has been provided for on each data entry dialog box.
In addition to this, the linking of a PDF file (typically used to describe the part) has been allowed for also so that documentation sets can be created for estimates without users having to go and search for the documentation relating to each part in an estimate at some stage when requested by their customer. Both of these improvements have been added to all product definition dialog boxes and provide
Tile Accessories
Select the [Accessories] button to define tile accessories.
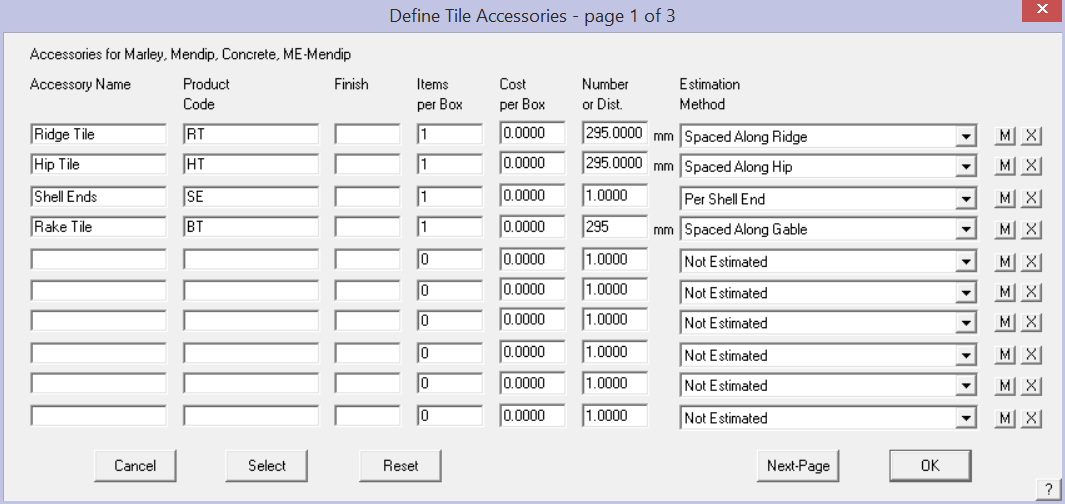
Ridge, hip and other tile accessories – These are defined as accessories to the field tile. You define the product name, product code and finish as appropriate. The product code is what is used to bind the accessory to the main product.
The product code must be unique to that part, although the part may be used for multiple tiles in which case it will have the same product code. The key to extracting the correct products in your material list is select the correct estimation method.
An accessory may also be a labour item, indicated by selecting the [M] button at the end of a row.
The correct association between the accessory and the tile is how the software gets your material orders perfect every time.
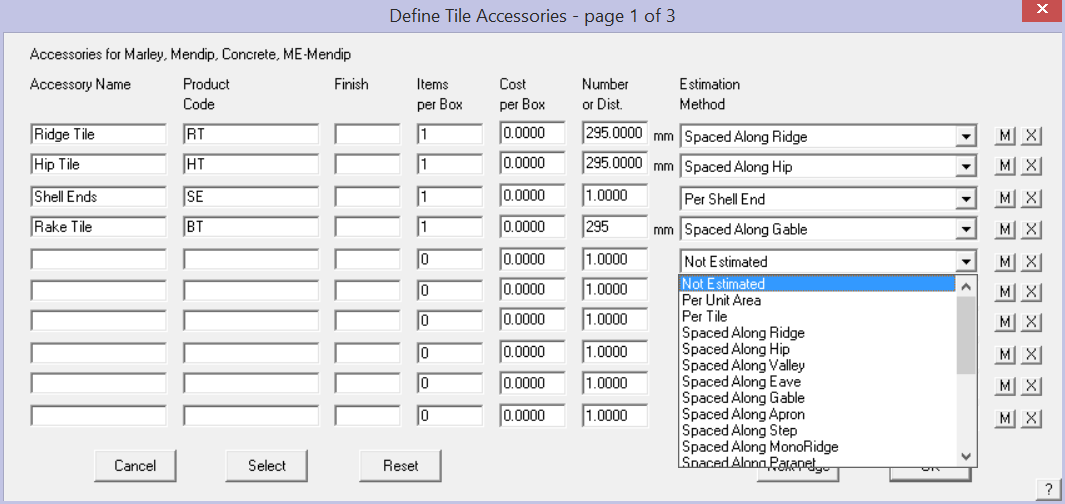
Not Estimated As it says, item is listed but not estimated.
Per Unit Area Item is quantified based on unit area of roof where this panel is installed.
Per Tile adds an accessory item(s) per tile
Spaced Along the Ridge Adds accessory item based on the ridge length.
Spaced Along the Hip Adds accessory item based on the hip length.
Spaced Along the Valley Adds accessory item based on the valley length.
Spaced Along the Gable Adds accessory item based on the gable length.
Spaced Along the Roof to Wall (Apron) Adds accessory item based on the apron length.
Spaced Along the SideWall (Step) Adds accessory item based on the sidewall (step) length.
Spaced Along the Monoridge Adds accessory item based on the monoridge length.
The software automatically adds an accessory category based on the flashing line types defined.
Per Apex Adds accessory item based on each ridge/hip apex.
Per Shell End Adds accessory item per hip end (a ‘shell-end’ piece).
Per Wind Zone Any additional accessories required due to the wind zone of the structure.
Select This button lists all the tile accssories in the database previously defined from which you can select one to add to the current accessories list.
Reset Aborts any current changes to the list.
[OK] Adds the accessories to the current tile record.
When you click [OK], you are informed that the changes you have made are saved. They are saved to a binary data file called – tiles_v6.csv. Users should be aware that this format of tile definition and database file is not the same as that used for Tiles+ as described below.
![]() Note: Be aware that there is another Tiles data structure we have called Tiles+. This structure is particularly suited to those markets where there are lots of accessory pieces such as half tile, verge tiles and special tiles etc. Review the description of Tiles+ before you decide which to use. In general, the Tiles database works in Australia and NZ, the Tiles+ database works in the UK and Europe, either method may suit the North American situation. The determining factor will be the number and style of cast or moulded accessory items used in the product system as additional accessory items. With the addition of Tile accessories to the Tiles database in V8.0, the Tiles+ database has been made largely redundant.
Note: Be aware that there is another Tiles data structure we have called Tiles+. This structure is particularly suited to those markets where there are lots of accessory pieces such as half tile, verge tiles and special tiles etc. Review the description of Tiles+ before you decide which to use. In general, the Tiles database works in Australia and NZ, the Tiles+ database works in the UK and Europe, either method may suit the North American situation. The determining factor will be the number and style of cast or moulded accessory items used in the product system as additional accessory items. With the addition of Tile accessories to the Tiles database in V8.0, the Tiles+ database has been made largely redundant.
Comments are closed.