Change Entity
 Cha-LineType
[Tools > Change Entity > Line Type]
 This command allows you to change the line type or category to another line-type or to nothing. The command may also be accessed by simply pointing the cursor at a line and double clicking the mouse.
For modelling and estimation purposes, each line is given a line type automatically. This option allows you to change individual lines or groups of lines on a line by line basis. For example, the software automatically assigns the lowest point of the roof to be an eave, you may wish to install box gutter. In that case you will change the line type to Box-Gutter.
This function may also be activated by a double click of the left mouse button on the line.
After you select the command, the following dialog box is displayed, listing the different line type categories available.
You then select one of the line types. Crosshairs will appear and you simply select the lines that you would like to change to that line type. By doing so, the tag will change and the colour of the line may change and the style of the line may change to whatever you have defined in the Tools > Set Line Style command. You can use Verify on each line to see what the tag actually is, or you can use the Show button in the Flashings dialog.
The table below describes the menu item, the tag the system assigns, and how the flashing is reported.
| Line Type | Tag | Reported Flashing |
| None | NONE | Ignored |
| Ridge | RIDGE | Reports ridge flashing |
| Valley | VALLEY | Reports valley flashing |
| Hip | HIP | Reports hip flashing |
| Fascia&Gutter | FASCIA | Reports both fascia and gutter. |
| Gable | GABLE | Reports both barge and fascia flashings. |
| Fascia-Barge | FASCIA-BARGE | Only reports fascia as barge flashing. |
| Fascia-Only | FASCIA-ONLY | Only reports fascia flashing. |
| Gutter-Only | GUTTER-ONLY | Only reports gutter flashing. |
| Barge-Only | BARGE-ONLY | Only reports barge flashing. |
| Apron | APRON | Only reports fascia flashing. |
| Tuck-Under | TUCK-UNDER | Ignored |
| Box-Gutter | BOX-GUTTER | Only reports as a box gutter |
| Step | STEP | Reports the step flashing |
| Monoridge | MONORIDGE | Reports monoridge tiles |
| Purlin | BATTEN | Reports batten or purlin |
| Purlin2 | BATTEN2 | Reports alternate batten or purlin |
| Headwall | HEADWALL | Reports headwall flashing |
| User 1 | User Defined | Reports as defined by the operator |
| User 2 | User Defined | Reports as defined by the operator |
| User 3 | User Defined | Reports as defined by the operator |
| User 4 | User Defined | Reports as defined by the operator |
| Drawing Entity | DRAWINGLINE | Will appear on your drawings but will not affect the material or labour estimate. This may also be applied to other graphical elements that you add to a model, not part of the model, such as descriptive text, and you need them to appear on the report. |
| Wall-Base | WALL-BASE | Reports wall base flashing |
| Wall-Top | WALL-TOP | Reports wall top flashing |
| Wall-Corner | WALL-CORNER | Reports wall corner flashing |
| Window-Head | WINDOW-HEAD | Reports window head flashing |
| Window-Sill | WINDOW-SILL | Reports window sill flashing |
| Window-Edge | WINDOW-EDGE | Reports window edge flashing |
| Door-Head | DOOR-HEAD | Reports door head flashing |
| Door-Edge | DOOR-EDGE | Reports door edge flashing |
The User defined line types are defined under the Set-Up > Preference Settings > System Preferences.
Cha-PlaneType

(Pulldown Menu)
[Tools > Change Entity > Plane Type]
This command allows you to change the type of plane to a Roof Plane, Wall Plane or to None. Changing to None has the effect of the system not recognizing that plane as a roof plane in its calculations.
 Cha-PlaneMat
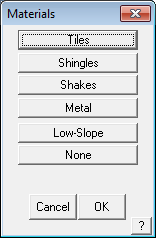 [Tools > Change Entity > Plane Material]
This command allows you to change the material assigned to a roof plane. By selecting this command you are prompted with another menu with the options, Tiles, Shingles, Shakes, Metal or Low-Slope. Select the material that you want o change you plane to and then select the planes required to be changed.
This function may also be activated by a double click of the left mouse button on the plane.
You can determine the roof plane material by selecting the Verify command from the main menu, then selecting a plane. You can then read the tags on the plane. The plane material is stored as a ROOFMAT tag.
 Cha-Storey
Tools > Change Entity > Storey
This command allows you to change the storey of one or more roof planes. After selecting the command, you then select the planes you want to change. You are then prompted to enter the new storey. Any line work attached to the planes is changed to that new storey also. The storey number allows different pat scales to be applied to different levels of the roof -typically, installers get paid more as they get further from the ground (but not always).
Comments are closed.