Metal Panels
 Metal Panels/Sheets
This is where you define the metal panels you use of the roof. It will also include polycarbonate or fibreglass sheeting, as they are selected from the same database for a similar purpose. As is the case for defining all products in Roof Wizard, the key item in the definition is the Product Code – it is this that links the products with the accessories , the pricing and labour etc.
When you select Set-Up > Metal Panels, the Define Panels dialog box is displayed similar to this:
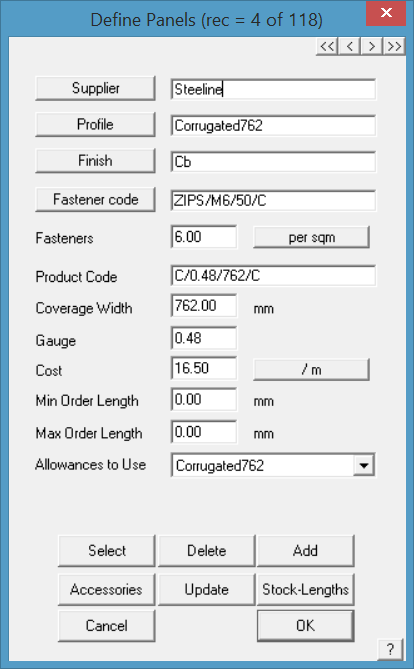
Supplier This button lists all the suppliers in the sheeting database from which you can select one. You can also enter a new supplier’s name directly into the supplier field.
Profile This button lists all the profiles in the sheeting database from which you can select one. You can also enter a new profile directly into the profile field.
Note: if you wish to use the panel definition for a curved sheeting material, then you must put ‘curve quality’ in this box for it to be available.
Finish This button lists all the finishes in the sheeting database from which you can select one. You can also enter a new finish directly into the finish field.
![]() Note: If you insert ‘Painted’ or ‘Color’ or ‘Colour’ in the Finish box (indeed anything with ‘COL’ in the name such as colorbond or colorclip), then you will be prompted for a colour when it is selected for use. You define the colours available under Set-Up > Metal Colours.
Note: If you insert ‘Painted’ or ‘Color’ or ‘Colour’ in the Finish box (indeed anything with ‘COL’ in the name such as colorbond or colorclip), then you will be prompted for a colour when it is selected for use. You define the colours available under Set-Up > Metal Colours.
Fastener code This button lists all the fasteners in the fastener database from which you can select one. You can also enter a new fastener directly into the fastener field.
Product code Here you can enter a product code for ordering purposes. You must have a product code for each product as it is the product code that keeps it all together. Avoid using any special characters (@#$%&*!) and spaces. If you need a space, use an underscore eg Product_code.
Fasteners This is either the number of fasteners per square metre (or square foot) or the number of fasteners per metre of purlin (or per foot of purlin) supporting this metal panel. For the latter, you must select and insert purlins from the Cover > Flashing dialog.
Coverage width The exposure or coverage width of the sheet. It is this number that determines how many sheets will cover the roof.
Thickness The base metal thickness of the sheet – used for information only.
Cost The cost of the material. The Reporting unit is defined by the button to the right of the cost field. This toggles between per unit area (either square metres or square feet) and length (metres or feet). If you set the unit to be area, then under the Reporting > Supply command, the area of material is reported. If you set the unit to length, then the length of material is reported.
Min order length The minimum length you can order. Set it to zero and you can have sheets down to the smallest length. It would be usual to set this to the sheet width.
Max order length The maximum length you can order. Set this to zero and you can get any length sheet – this would only be appropriate if you were roll-forming onsite.
Allowances to Use When the operator defines a set of allowances to be applied to the roof sheet/panel in calculating the coverage and quantity, an option exists to save that allowance set away for re-use with various sheets/panels. (Estimate > Allowances) This is where you elect the required allowance file to used and saves having to redefine it each time. The complete allowance set is only used by the Generate Panel Layout option. Other Estimate options only use parts of the allowance table. Refer to the specific command description for more detail.
Is this a composite panel? When you split the panel later on (Estimate > Split-Panels) composite panels will report a cut back length and a lay direction too. Standard panels will not report these values.
Select This button lists all the sheets in the database from which you select to view, edit (to update or create a similar sheet) or delete.
Delete This button deletes the current definition.
Add This button adds the current definition to the database as long as it has a unique product code and description.
Roof Wizard is moving towards an improved pricing and job management solution, with linkages to external accounting systems, a requirement to allow splitting up of an estimate into various groupings became apparent. The best way to do this is with Quote Groups, and so the ability to modify the default “category” for each material item in the software has been provided for on each data entry dialog box.
In addition to this, the linking of a PDF file (typically used to describe the part) has been allowed for also so that documentation sets can be created for estimates without users having to go and search for the documentation relating to each part in an estimate at some stage when requested by their customer. Both of these improvements have been added to all product definition dialog boxes.
Accessories
Set up all accessory items required for the installation of your roof panels.
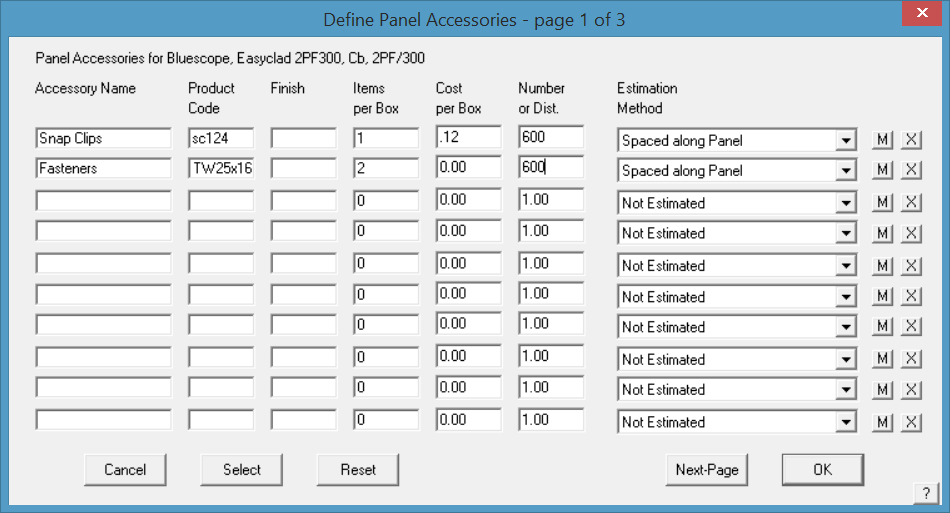
For each accessory, you enter the following information:
Accessory name This is the name by which you know this accessory (eg panel clip, joining plate).
Product code This is the code by which you know this accessory.
Finish This is the finish for the accessory. By default, the finish is that of the host flashing, but you can change it to what you want. If you define the finish as either “Colour”, “Color” or “Painted”, then the accessory will adopt the same colour as the host flashing.
Items per box This is the number of items of this type in a box you order.
Cost per box This is the cost of a box of these items.
Number This is a number (or a spacing) applied to the estimation method you select.
Estimation method This is the method by which this accessory will be estimated. (See below).
Number of fasteners This is the number of fasteners used to fix the accessory to the frame.
[M]/[L] This sets the Accessory item as a material accessory or a labour accessory to the trim item being defined. For example, a gutter or fascia may require special finishing that incurs extra cost over regular gutters. Add the charge to this list as a Labour item and it will be added to the labour summary.
[X] Deletes the Accessory item from this list.
Select The Select button lists all the accessories you have defined for all flashing, from which you can select one. Keep in mind that the supplier of an accessory is assumed to be the same as the flashing, except when you select an accessory from this list. In other words, by selecting an accessory from this list, you override the supplier’s name of the accessory.
Reset Resets the full list to the condition prior to changes.
[Cancel] Does not make any changes.
Accessory Estimation methods
The estimation method you select is one of the following:
Not estimated This accessory will still be reported in the material list in the costing, but will have zero quantity.
Per Unit Area Adds accessories simply based on a number per square of panel material.
Spacing along Panel (nett) This accessory is estimated as a function of the nett length of the panel. The nett length is the length this panel covers rather than the length of panel to order. The number then relates to a spacing along the panel (in mm or linear feet). You would use this method for things such as panel clips or brackets which hold the panel. If you set the spacing to be zero (0), the spacing will adopt the value you set under Roof-Defaults > Rafter-Spacing. Therefore, if you have brackets dependent on the rafter spacing (which may differ from job to job), then use a spacing of 0.
Per Join This accessory is estimated as a function of the number of joins between connected panels. You might use this method to define specific joining sealant used to connect 2 pieces together.
Per Panel This accessory is estimated as a function of the number of pieces you are ordering for this flashing.
Per Inetersection with Batten/Purlin This accessory is estimated as a function of the number of times a panel crosses a batten or purlin line.
Per m in Zone This option allows you to set the additional clips and screws that would be required based on the wind zones defined on the roof (set under Cover > Zones).
Stock-Lengths Allows the operator to setup a table of stock lengths and costs. Typically used for long run metal tile.
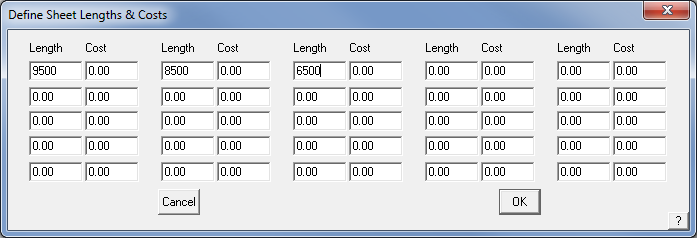
Once set, the overlap/underlap allowances set with Estimate > Gen-Panels > Modify-Panels > Split-panels will be applied.
[OK] Saves all the changes to the data file, Sheeting.csv.
Material data files such as this are best edited from within AppliCad software via the appropriate dialog box, however as they are in a comma separated text file format (CSV) they may also be edited in a spreadsheet program such as Microsoft Excel or a simple text editor.
Comments are closed.