Navigation
Mouse Controls
The Roof Wizard interface has been optimised for use with a three button mouse. Therefore, for the most effective use of our software a three button mouse is recommended, or at least a two button and scroll wheel mouse.
The left mous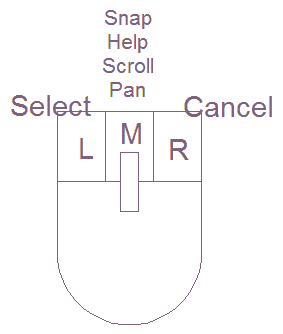 e button is used to select a command or digitise a point on the screen. The right mouse button is used to cancel, finish or abort a command. The middle button is used to snap to an existing point or line end point. It may also be used to bring up the “inline” commands and online help.
If your mouse is fitted with a scroll wheel, this would be used as a ‘middle’ mouse button in the normal way.
The middle mouse button can also be used to zoom scroll in and out and around your model. The middle mouse button may also be used to perform a Zoom > Fit-Screen by double clicking the middle mouse button any where in the screen work area. Hold down the middle mouse button anywhere in the work area and ‘pan’ the job.
If you hold down the Ctrl key and move the middle mouse button, the view will spin around the selected screen point.
![]() Note: If you do not have a middle mouse button, hold down the shift key and use the left mouse button for the functions of the middle button.
Note: If you do not have a middle mouse button, hold down the shift key and use the left mouse button for the functions of the middle button.
Enhanced Mouse Controls
Using various combinations of the Shift, Ctrl and Alt keys in conjunction with a double click of the left mouse selection has a range of additional context specific functions, especially useful when modifying the model and checking the model.
On selection, the various options are displayed in the prompt area of the screen as shown here, followed by the appropriate functional dialog box as summarised below. A ‘tool-tip’ is displayed as a reminder.
| Summary of Enhanced Mouse Control Functions
|
||
| Hold the key(s) and double-click [DC] left mouse button on a line or plane entity | ||
| Lines and Planes | ||
| On any line | DBL Click (DC) | Change Line Type |
| On any plane | DBL Click (DC) | Change Plane Material |
| Modify Roof | ||
| On an Eave Line | Alt+DC | Dormer |
| Ctrl+DC | Drop Eave | |
| Shift+DC | Slice Hip | |
| Shift+Ctrl+DC | Atrium | |
| On a Ridge line | Alt+DC | Dutch Gable |
| Ctrl+DC | Hip To Gable | |
| Shift+DC | Split Gable | |
| Shift+Ctrl+DC | Gable to Hip | |
| On a Gable/ Step line | Ctrl+DC | Extend Barge |
| On a Box Gutter/Apron line | Ctrl+DC | Cricket |
| On a Hip or Valley line | Alt+DC | Hip-Valley Gable |
| Ctrl+DC | Hip-Valley Dormer | |
| On a Plane entity | Alt+DC | Change Pitch |
| Ctrl+DC | Link Planes | |
| Shift+DC | Change Plane Storey (also changes the storey of lines attached to it) |
|
| Shift+Ctrl+DC | Merge Planes | |
Shortcut keys, Keyboard Macros, ESC key and F4 key
When closing an outline definition, you may use ‘C’ for close square, ‘X’ for close straight, ‘V’ for close two lengths, ‘E’ for close extend and ‘F’ to finish.
Keyboard Macros
You may also set up a series of programmed keyboard macros. Using the function Setup > Preference Settings > Keyboard Macros you can define almost any key to work with the Ctrl or Alt key to perform any function that you might select of a repetitive basis.
Upon selecting the ALT key or CTRL key from the keyboard, its currently assigned command statement is displayed in a dialog box. The selected key may then be re-assigned with a different command statement.
Main menu commands can be assigned to the selected key by beginning the command statement with !main and then specifying the command and its modifier levels.

For example, the following command statement will enable File > Save the current database: !main save
The Inline Menu commands can be assigned to the selected key by beginning the command statement with !menu and then specifying (if required) the command and its modifier levels. For example, the following command statement will enable the Inline Window command, set all options to Yes and then await window definition: !menu window out cross [OK]
Standard ‘Hot Key’ Functions
The software is installed with several shortcut keys programmed already.
These are:
| Ctrl Z | Undo |
| Ctrl Y | Redo |
| Ctrl S | File > Save (the same as !main save) |
| Ctrl T | Construct Roof > Track Outline |
| Ctrl D | Construct Roof > Digitise Outline |
| Ctrl V | Enable Underlay Image > Paste from Clipboard |
ESC Key
The Escape key [Esc] on the keyboard performs the same function as the right mouse button in that it cancels or aborts from any function. If you are confused or buried in a command and lost, hit the Esc key a couple of times, cancel what you were doing, and start again.
The Esc key also cancels any open dialog box.
![]()
Note: Occasionaly a dialog box may appear to have disappeared off the edge of the screen, especially if you have moved the dialog box around and you go from a big dialog to a small one, or working between multiple screens. Hit function key F4 and the missing dialog will jump back to the centre of the screen.
Comments are closed.