Align Planes
 Align-Planes
This command allows you to align two independent roof planes together to create the one roof plane. By clicking on this command you are prompted to select the plane you want to move and then the plane you want to align it to. With that done the following dialog box appears:

You then have three options of how to select the planes to move.
Align Selected Plane Only Only moves the originally selected plane to be aligned.
Select Planes to Move Allows you to manually select roof planes to align.
Align Plane and Remainder of Storey Aligns original plane and all other planes on selected story to be moved into alignment
Once you have chosen your method click [OK] and follow the additional prompts as required. This is a very powerful command that will allow you to create extremely complex roof shapes, one component at at time, as the following example shows.
Model the high set and low set parts of the roof as two separate roof shapes.

After using the Modify Roof > Cut-Out command to remove the area of low set roof under the high set roof, you have the roof geometry below.


Select the plane to use as a reference plane, in this example it would be the back plane of the high set roof.

Then select the plane to align with, in this case the back plane of the low set roof, and once confirmed, they will align automatically.
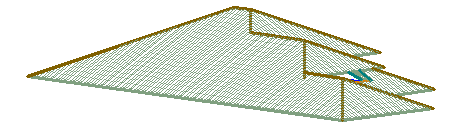
Once aligned, you may use Modify Roof > More… > Merge-Planes to combine the high set with the low set so that the roof plane is continuous from ridge to eave, as shown below.
Comments are closed.