Verandah/Porch

Verandah/Porch
This roof option lets you draw a straight or bullnose verandah quickly and efficiently onto the perimeter lines of the wall or eave.
Verandahs are subdivided into Simple and Complex ones. According to the basic definition, a simple verandah is a verandah which has the same width all the way around and its eave is parallel to the attaching wall. A complex verandah is one where the width may vary from one side to the next and the verandah eave does not necessarily follow the attached walls. It works in a similar way, but you must pay attention to the prompts in the prompt area – answer the questions posed in the prompts.

Even though a complex verandah can also draw a simple verandah, the simple verandah is easier to use and will handle the majority of verandah types. The Simple option is the most usual way to add verandahs to your model.
Simple Verandah
When you click the Simple command option, you then select successive lines which define the wall alignment of the verandah. These lines need not be connected but they must intersect. When you have finished selecting the wall lines, click the right mouse button.
Now, the first line remains highlighted for you to decide which side the verandah should be. After clicking a point, anywhere on the side you want the verandah, the Verandah defaults dialog is displayed.
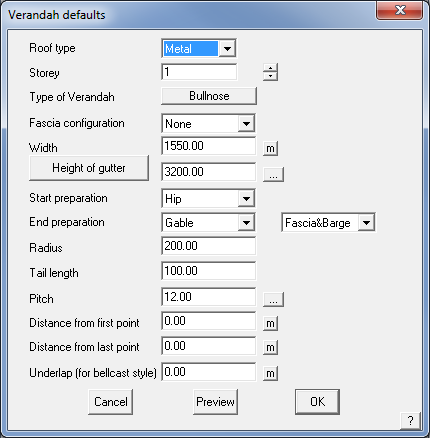
Here you set the parameters for the verandah:
Roof type Here you choose the material category on this roof. It is one of Tiles, Shingle, Shake, Metal or Low-Slope.
Storey You can set the storey of the verandah as 1, 2 etc. This makes it easier to separate the roofs making up each storey on screen. Also, various labour rates for estimating a roof can vary from one storey to the next.
Type of verandah This button toggles between Straight and Bullnose (See below).
Width This is the width of the verandah.
Height at wall This button toggles between Height at wall and Height of gutter. The value you then enter alters the overall height of the verandah accordingly.
Start preparation The start preparation can be one of Hip, Gable and Butts-Wall. Hip will draw a hip end on the verandah. If Gable, you can then select the type of gable preparation as one of fascia&barge, Barge-only or None. Butts-wall makes the start of the verandah a gable end with apron flashing.
End preparation The start preparation can be one of Hip, Gable and Butts-Wall. Hip will draw a hip end on the verandah. If Gable, you can then select the type of gable preparation as one of fascia&barge, Barge-only or None. Butts-wall makes the start of the verandah a gable end with apron flashing.
Pitch This is the pitch of the verandah.
Distance from first point This is the distance the verandah will start from the first point of the first alignment line. Notice that the display shows the ‘First Point’ and ‘Last Point’ of the line the verandah is attached to.
Distance from last point This is the distance the verandah will start from the last point of the last alignment line.
Underlap (bellcast style) This is the amount by which the verandah will protrude into the alignment or eave live you selected to attach the verandah to. You would set this value to something other than zero to make a bellcast style verandah.
Preview Clicking this button allows you to preview the resulting verandah before committing to insert it. Adjust the values above until you see the shape you need, then ‘Insert’ it.
If you select a Bullnose verandah type to draw, the dialog box has these extra parameters:
Radius This is the radius of the bend in the bullnose.
Tail length This is the vertical straight length of the bullnose hanging down the eave.
After you click [OK], the verandah is then drawn.
To keep all the entities of the bullnose verandah together, they are grouped together as a set. You can disassociate this group by selecting Delete from the main menu. If you make a mistake and want to delete the verandah quickly, select [Undo].
![]() Notes: If you impose an underlap for a straight or bullnose verandah and the alignment lines you initially selected were eave lines, flashing tags are removed from the portions of eave lines above the new verandah – effectively they are tagged as ‘None’ line type, thereby not having flashing assigned to them for quantity purposes. You may wish to check that for your roof.
Notes: If you impose an underlap for a straight or bullnose verandah and the alignment lines you initially selected were eave lines, flashing tags are removed from the portions of eave lines above the new verandah – effectively they are tagged as ‘None’ line type, thereby not having flashing assigned to them for quantity purposes. You may wish to check that for your roof.
If you attached the verandah to the eave lines of an existing roof and the pitch of the verandah is the same as the roof, then you are prompted as to whether you want to merge the verandah with the roof. This applies only to straight verandahs.
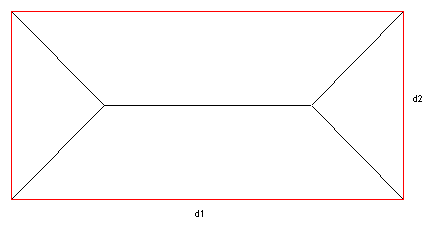
The following diagram shows a 4 hip roof, onto which we will draw a verandah on two sides (shown as d1 and d2).
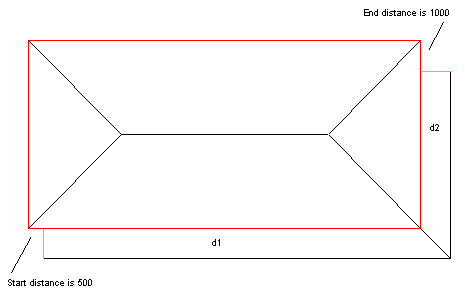
Selecting a simple, straight verandah, you get the following:
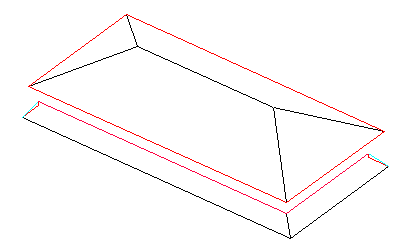
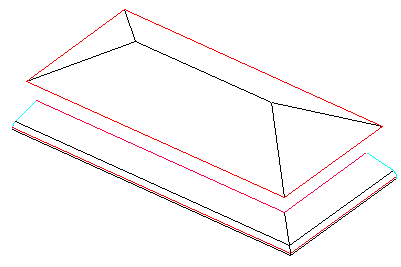
In isometric view, the straight verandah looks like the following. Here you see the verandah set down below the eave line.
For a bullnose verandah, the roof would look like this.
Comments are closed.