People
 People
Customer, Installer, Builder, Salesman and Distributor
[Set-Up > More… > People]
These commands let you set the particular person against each of these roles. When you select the particular role, the Select person details dialog box is displayed.
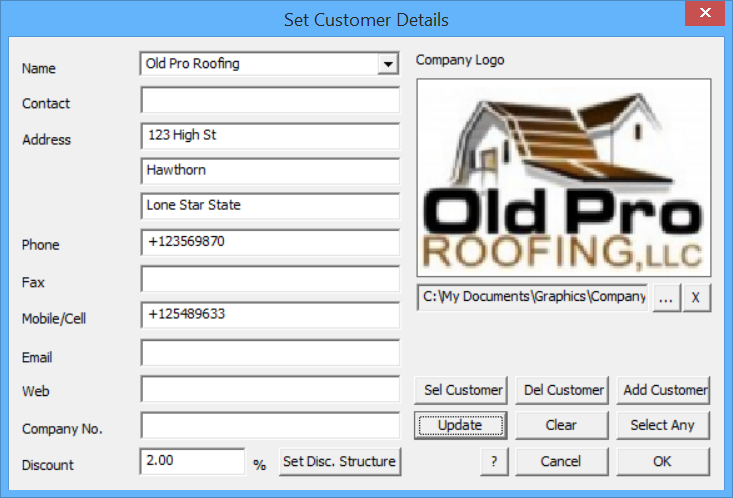
Here you can set or select the person you want. In this case, we are looking at the Customer role, but the same goes for all roles.
Name The name of the person or company
Contact The contact name
Address The 3 line address
Phone The phone number
Fax The fax number
Mobile The mobile/cell number
Discount The discount used for this customer. This is only preset for this Customer. This is the default value used when you do a job Reporting and applies the discount rate to all items unless modified by the next option – Set Discount Structure.
Discount Structure Allows the operator set up different discounts for different line items (see below):
Business No. Customer’s business number.
Company No Customer’s business number.
Company Logo Save a bitmap image file of the customer’s logo so hat you may include it on a report for them – TIF, JPG, PCX, GIF, BMP etc.
Select Any Allows you to select any existing entity from the People file (a builder or installer for example) as a customer.
![]()
Note: You may wish to set up the details of all of your Suppliers, Customers, Installers prior to use, or you may wish to set this information on a job-by-job basis. Information can be added at any stage in the process.
You can enter values as you wish and click [OK] to save that person. For more details about setting discount structures, go to the Reference Manual.
When all of the fields have been set, click on Add-Customer and your new customer will be added to the customer database. If you would like to choose an existing customer click on Sel-Customer and a dialog box similar to the following will appear, showing you all of the existing customers in the customer database.
To select an existing customer, click on a name and then click [OK]. This will now bring up that particular customer’s details in the select customer details dialog box. With this all now done click [OK] and these customer details will be put on the quotation form. You can also modify the customer’s details and click Update to save the changes. This process is identical for the Installer, Builder, Salesman and Distributor information in the database file we call People.csv.
When you select the option, [Set Discount Structure], the following dialog box is displayed. This provides for the situation where all your customers are given different discounts rates for different product categories.
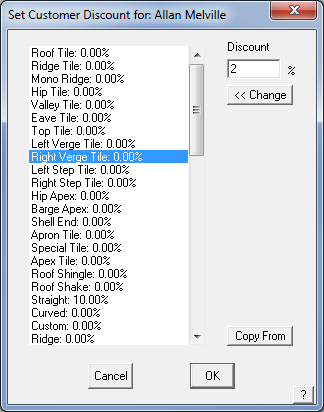
The product category name is as displayed on the Reporting screen when a job is quoted. Select a product category from the list in the left pane, set the required discount rate and select <<Change. You may also copy the rates from another customer’s discount file. Select Copy From, select the customer whose discount file you wish to copy to this customer. Make any further edits you need, then select [OK] to save the details.
When you select [OK], a text file is created that sets up these rates for this particular customer. The file is a simple text file or ‘flat file’ structure and may be viewed or edited in a word processing program. It is in the form as displayed below.
Roof Tile:0.000000
Ridge Tile:0.000000
Mono Ridge:0.000000
Hip Tile:0.000000
Valley Tile:0.000000
Left Verge Tile:0.000000
Right Verge Tile:0.000000
Left Step Tile:8.000000
Apron Tile:0.000000
Special Tile:0.000000
Apex Tile:0.000000
Roof Shingle:0.000000
Roof Shake:0.000000……
…… etc
The file name is automatically given by the software and is in the form of –
<CustomerName>_CustDisc.DAT where <CustomerName> is extracted from the customer’s name that you entered in the Set Customer Details dialog.
You can enter values as you wish and click [OK] to save that Customer to the text data file called – people2.dat. This allows the file to be viewed and edited in external editors such as Notepad or Microsoft Excel.
You can also select a new customer from the list of customers by clicking Sel Customer.
You can delete the current customer by clicking Del Customer,
You can add a new customer to the person database by clicking Add Customer.
Select Load Last and the last customer you were editing will be displayed.
If you want to select from the entire database, select the Select any person button.
If you want to update an existing person, first select the person. An Update button then appears on the dialog box. Make your changes, then click Update which then updates that person back into the database.
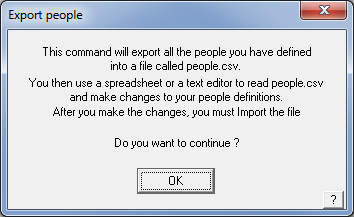
Export-People
This command lets you export the people2.dat file to an ascii text file called people.csv. Then you can transfer the ascii file into another program (eg Microsoft Excel), make changes then import the file using Import-People. To help, the following dialog box is displayed.
Import-People
This command lets you import (convert) people.cvs to people2.dat. This function allows you to create a text file of your people information in another program, such as a spreadsheet, or export from a program such as your accounting system or a customer relationship management (CRM) program.
The format must match the syntax and format of the people2.dat file – to review this, export the file from AppliCad Roof Wizard, then review the format in a text editor.
Wind Zones
Wind zones may be defined and saved and these allow for various accessory items to be quantified using an estimation method of ‘Wind Zone’. This is useful for adding extra clips or fasteners to roofing materials in high wind areas etc.
The Select/Define dialog displayed below is found in the Job Details dialog box – the […] button.
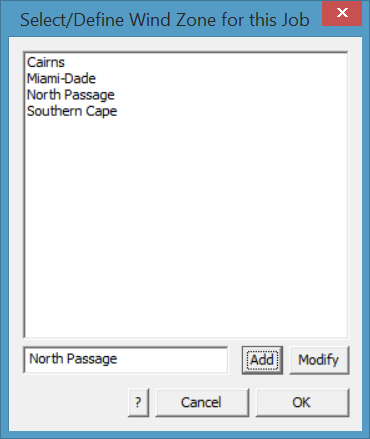
The most common use of this will be to provide additional fasteners or fixings per tile or clips for areas that have high or cyclonic wind categories.
Define a zone and select [Add] and selct [OK] to save the details to a file called WindZones.csv.
Comments are closed.