Panel Allowances
 Panel Allowances
Here you can set the standard allowances you want to apply for clearances or setbacks for the roof panel or sheet around ridges, hips and valleys. Also you can allow for gutter overhang and the thickness of the battens in calculating the resultant panel lengths. These values are used by the Estimate Offset-roof command to generate the new roof planes.
Offset-Roof Parameters
Gutter Overhang This is the amount to add to the panels for overhang into the gutter. It is also added automatically to blocks.
Hip Clearance This is the clearance you want along a hip
Ridge Clearance This is the clearance you want along a ridge
Gable Clearance This is the clearance you want along a gable
Valley Clearance This is the clearance you want along a valley
Apron Clearance This is the clearance you want along an apron
Batten Thickness This is the batten thickness from the rafter to the underside of the sheet/panel.
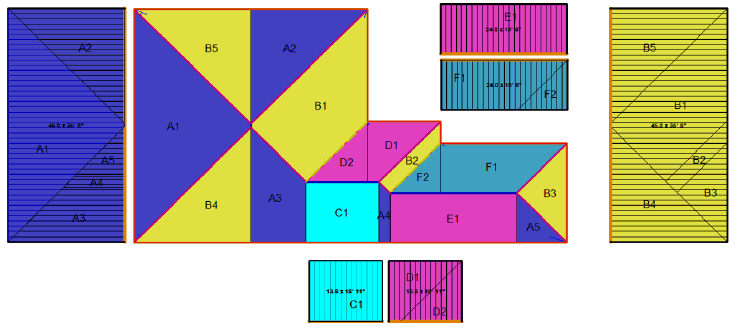
Generate-Off-cuts Options
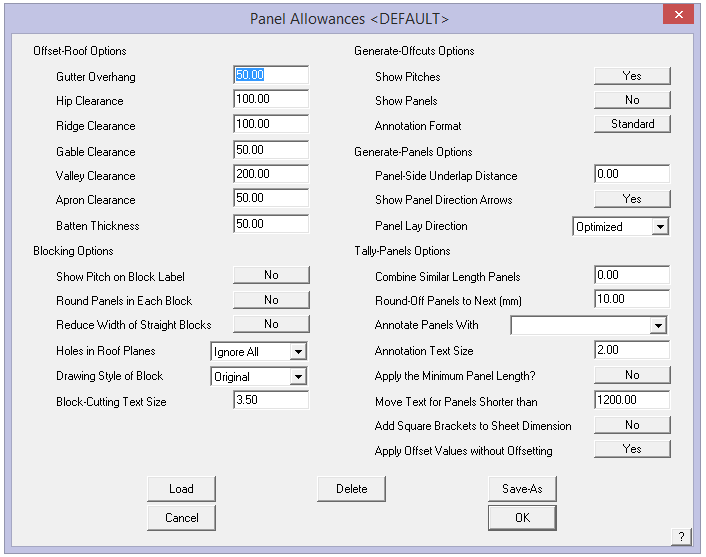
Show Pitches Y/N – Displays the pitch with the annotation of the off-cut areas
Show Panels Y/N – Displays the number of sheets in the off-cut group
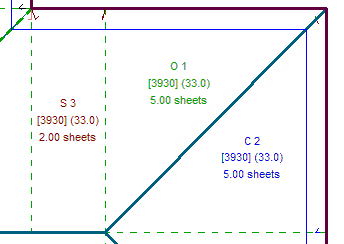
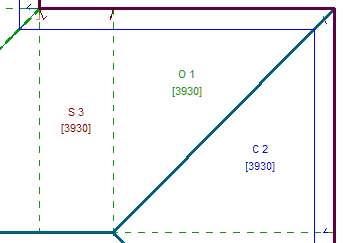
Annotation Format Abridged/Standard – The standard output is displayed above. The abridged version of the annotation is shown below. This is designed to show the same information but in a shortened form to make the field drawings easier to read – as shown below:
Blocking-Options
Show Pitch on Block Label Simply Yes or No to having the roof pitch shown.
Round Panels in Each Block Rounds the number of roof panels or sheets to a whole number in the initial pass. This effects both regular ‘Blocking’ and ‘Block-Cut’ methods of cutting list creation. This displays the actual number of sheets/panels and may be larger than the plane based measured rectangle of panels.
If you select No, then the panels of the same length are totalled at the end. This results in one or two sheets of each length less. A very tight result without room for error on the job site.
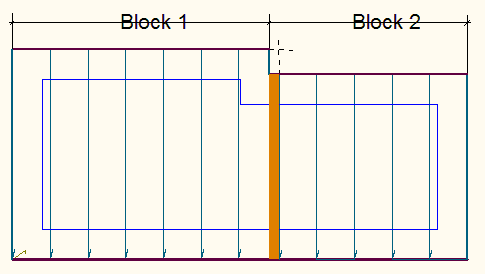
Reducing the Width of Straight Blocks:
Effectively, what this function is doing is looking across the width of a run of eave, in case of the illustration below, the combined width of Block 1 and Block 2 and determining the number of panels/sheets required to cover the roof and compares that with the number determined by the number of panels/sheets in each block.
In the example, Block 1 would require 6.6 panels and Block 2 would require 5.3.panels. If each block is rounded then the total number of panels supplied would be 13 (7 panels in Block 1 plus 6 panels in Block 2). If it is accepted that rounding the whole run instead of each block would work for the job, select Yes, then you will supply 12 panels – the over supply of the longer panel in Block 1 will account for the under supply in Block 2 (7 panels in Block 1 and 5 panels in Block 2).
Rounding the Sheets in Each Block:
By selecting NO, it will treat each block of same length sheets separately, and only round up once they have all been grouped together. e.g. 3.6 @ 3000, 2.2 @ 3000, will calculate 3.6 + 2.2 = 5.8 rounded to 6 sheets @ 3000mm.
If you select YES, each block is rounded up before being grouped together. e.g. 3.6 @ 3000, 2.2 @ 3000, will be rounded up first to 4 @ 3000 and 3 @ 3000 and calculate 4 + 3 = 7 sheets @ 3000mm.
By selecting NO it will not reduce the widths.
If you select YES, it will calculate the total length of the eave defining the length of the block(s) and divide it by the panel/sheet width. If this number is less than what has been calculated without reduction, it will use the smaller number of sheets. This process only works when Rounding is turned on.
Holes in Roof Planes The options are Ignore All, or Ask Each Time. If you select Ask Each Time, the software prompts whether a hole in a roof plane needs to be taken into account while blocking.
Drawing Style of Block The options are Original or Block-Cut. The Block Cut allows the blocks to extracted and sub-divided using the Block-Cut method.
Block-Cutting Text Size As the software generates the sub-divided blocks, they are annotated. This sets the text size so that it can be more easily read in the field when turned into a report using your template.
Generate Panels Options
Panel Side Underlap Distance This is the distance one panel is overlapped by the next panel. This is the amount subtracted from the overall panel width. Typically, this would be set to zero if the panel width is defined as the cover width or exposure of the panel.
Show Panel Direction Arrows Allows the lay direction arrows to be shown, and printed on the report.
Panel Lay Direction Sets the lay direction of the panels. May be left to right, right to left or optimised. Optimised will select the best direction based on the most logical starting edge, such as the gable end, for example.
Tally Panels Options
 Combine Similar Length Sheets After you generate a sheet list, sheet lengths which are less than this amount apart, are assumed to be the same length and are merged together. The shorter lengths are merged into the longer lengths.
Round-Off Sheets to Next (mm) This can be defined as any number, it will then round up to that number. If you don’t want it to round up at all you need to set it to -1, as 0 will be rounded to the nearest 10mm
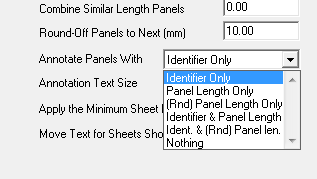
Annotate Panels With Here you can set how you want to annotate the drawing of the panels. The options are the identifier for each panel when you generate the cutting list using Estimate > Tally-panels.
You can have the Panel Identifier Only, Panel Length Only, Rounded Panel Length Only, Indentifier and Panel Length, Identifier and Rounded Panel or Nothing. The panel length is the length calculated by the software and adjusted for the allowances. You may also annotate the panels with the rounded up sheet or panel length adjusted by the operator under the Modify-Panels > Cha-Panel-Len option or the rounding set in the Allowances dialog as described above under Round-Off Panels.
Annotate Text Size The size of the text as it will appear on the reports. The size is in millimetres. If you work in Feet/Inches, the text size is still millimetres.
Apply the sheet minimum length If you have set a minimum sheet length, would you like it to be applied or not? If it is any sheet length below this number will be grouped together to create sheets longer than this number.
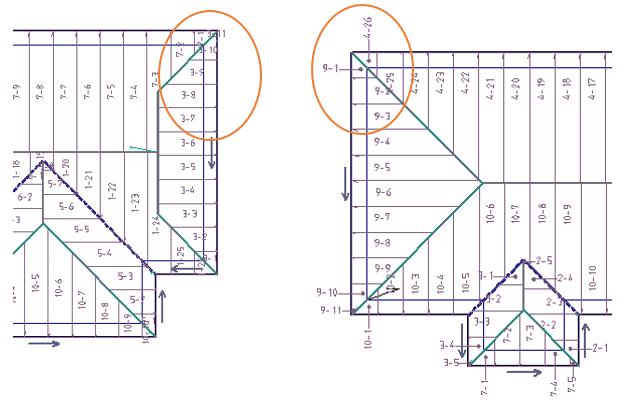
Move Text for Sheets Shorter Than This number sets the length of sheet/panel where the annotation gets placed automatically beyond the borders of the roof model.
Should the location of the annotation still be difficult to read, a function exists to move the annotation and the leader line repositioned to suit. This is found under Estimate > Generate Panel Layout > Modify Panels option which displays the following dialog. Select the option Move-Text and the prompts guide you through selecting, moving and moving the text and reposition the leader line. A further button also provides for deleting or adding a leader line.
Add Square Brackets to Sheet Dimension provides the opportunity to remove the square brackets around the panel lengths.
Apply Offset Values without Offsetting This allows you to get the cutting list for the panels, as if the offsets had been applied, even though the offsets are not drawn on the job.
Load This button allows you to load a pre-defined set of allowances for the particular roof system.
Delete Deletes a pre-defined allowances file.
Save-As Allows the operator to define allowances for a particular roof system and save that for future jobs. You may have as many allowance files as you have roof systems.
When you click [OK], these values are saved for use in all jobs.
[Cancel] quits the dialog box without making any changes.
Comments are closed.