Mouse Controls
The Roof Wizard software is designed to take full advantage of the mouse to control functions. We have found that, while some of these operations take a while to get used to, once you master it, control of the software is very efficient andf effective.
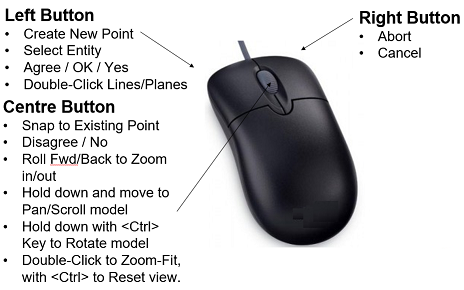
The left mouse button is used to select a command or digitise a point on the screen. The right mouse button is used to cancel, finish or abort a command. The middle button is used to snap to an existing point or line end point. It may also be used to bring up the “inline” commands and online help.
If your mouse is fitted with a scroll wheel, as many of them are, this may be used as a ‘middle’ mouse button in the normal way.
The middle mouse button can also be used to zoom scroll in and out and around your model. The middle mouse button may also be used to perform a Zoom > Fit-Screen by double clicking the middle mouse button any where in the screen work area. Hold down the middle mouse button anywhere in the work area and ‘pan’ the job.

If you hold down the <Ctrl> key and move the middle mouse button, the view will spin the view around the screen point.
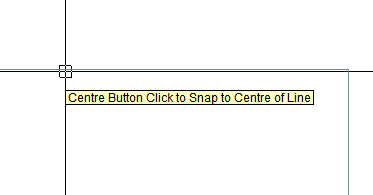
You have the option to snap to the end and centre of a line using the centre mouse button. Snapping to ends of lines was always available, but software now “jumps” to a line endpoint to assist users in locating the pick box over the required point.

In addition, if the user holds down the <Shift> button, the option will be provided to snap the line to another line at the centre-button digitised location.
![]()
Note: If you do not have a middle mouse button, hold down the shift key and use the left mouse button for the functions of the middle button.
Enhanced Mouse Controls
Using various combinations of the <Shift>, <Ctrl> and <Alt> keys in conjunction with a double click of the left mouse selection has a range of additional context specific functions, especially useful when modifying the model and checking the model.
On selection, the various options are displayed in the prompt area of the screen as shown here, followed by the appropriate functional dialog box as summarised below. A ‘tool-tip’ is displayed as a reminder.
Summary of Enhanced Mouse Control Functions |
||
Hold the key(s) and double-click [DC] left mouse button on a line or plane entity |
||
Lines and Planes |
||
On any line |
DBL Click (DC) |
Change Line Type |
On any plane |
DBL Click (DC) |
Change Plane Material |
Modify Roof |
||
On an Eave Line |
Alt+DC |
Dormer |
Ctrl+DC |
Drop Eave |
|
Shift+DC |
Slice Hip |
|
Shift+Ctrl+DC |
Atrium |
|
On a Ridge line |
Alt+DC |
Dutch Gable |
Ctrl+DC |
Hip To Gable |
|
Shift+DC |
Split Gable |
|
Shift+Ctrl+DC |
Gable to Hip |
|
On a Gable/ Step line |
Ctrl+DC |
Extend Barge |
On a Box Gutter/Apron line |
Ctrl+DC |
Cricket |
On a Hip or Valley line |
Alt+DC |
Hip-Valley Gable |
Ctrl+DC |
Hip-Valley Dormer |
|
On a Plane entity |
Alt+DC |
Change Pitch |
Ctrl+DC |
Link Planes |
|
Shift+DC |
Change Plane Storey (also changes the storey of lines attached to it) |
|
Shift+Ctrl+DC |
Merge Planes |
|

