Generate Offcuts
 Gen-Offcuts
The Gen-Offcuts method of estimation utilises the off-cut created from hips and valleys and places it elsewhere on the roof, thus reducing wastage and optimizing the material required. Effectively it is ‘flip-flop’ing triangles of material, rather than rectangles of material as was used in the previous method of estimating we call Blocking.
This method is only feasible with certain profiles that maybe split and flipped etc. It is not practical for profiles such as standing seam for example.
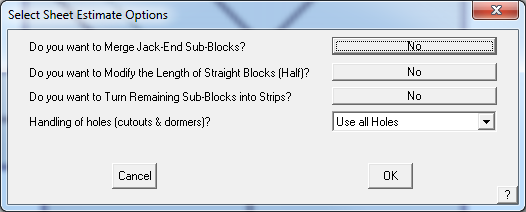
Upon selecting Gen-Off-cuts as your estimation method you are prompted with the following dialog box:

The three options you have, relate to how you want your panels/sheets “Optimised”, if at all.
Do you want to Merge Jack-End Sub-Blocks?
By selecting NO it will not review the placement of Jack-End Sub-Blocks.
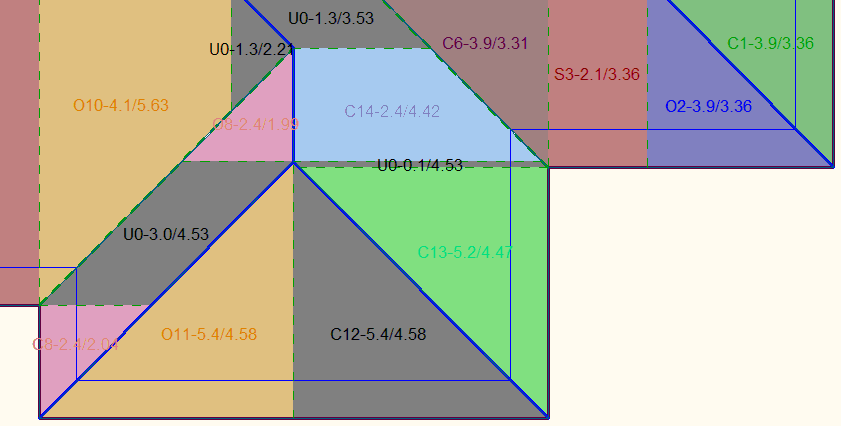
If you select YES, the software looks at each and every Jack-End Sub-Block (the triangle shaped block bounded by a hip and a valley) and determines whether that block can be accounted for with an adjacent triangle in the same roof plane – O8 and C8 in the example below.
 Gen-Offcuts
The Gen-Offcuts method of estimation utilises the off-cut created from hips and valleys and places it elsewhere on the roof, thus reducing wastage and optimizing the material required. Effectively it is ‘flip-flop’ing triangles of material, rather than rectangles of material as was used in the previous method of estimating we call Blocking.
This method is only feasible with certain profiles that maybe split and flipped etc. It is not practical for profiles such as standing seam for example.
Upon selecting Gen-Off-cuts as your estimation method you are prompted with the following dialog box:
The three options you have, relate to how you want your panels/sheets “Optimised”, if at all.
Do you want to Merge Jack-End Sub-Blocks?
By selecting NO it will not review the placement of Jack-End Sub-Blocks.
If you select YES, the software looks at each and every Jack-End Sub-Block (the triangle shaped block bounded by a hip and a valley) and determines whether that block can be accounted for with an adjacent triangle in the same roof plane – O8 and C8 in the example below.
Do you want to Modify the Length of Straight Blocks (Half)?
By selecting NO it will not reduce the number of panels/sheets in a block.
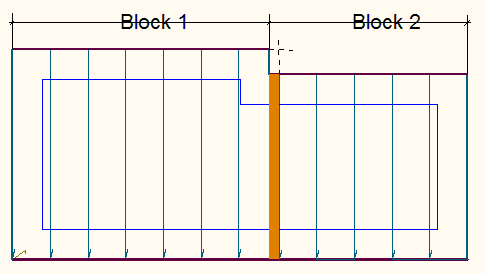
If you select YES, it will calculate the total length of the eave defining the length of the block(s) and divide it by the panel/sheet width. If this number is less than what has been calculated without reduction, it will use the smaller number of panels/sheets. This process only works when Rounding is turned on.
Effectively, what this function is doing is looking across the width of a run of eave, in case of the illustration below, the combined width of Block 1 and Block 2 and determining the number of panels/sheets required to cover the roof and compares that with the number determined by the number of panels/sheets in each block.
In the example, Block 1 would require 6.6 panels and Block 2 would require 5.3.panels. If each block is rounded then the total number of panels supplied would be 13 (7 panels in Block 1 plus 6 panels in Block 2). If it is accepted that rounding the whole run instead of each block would work for the job, select Yes, then you will supply 12 panels – the over supply of the longer panel in Block 1 will account for the under supply in Block 2 (7 panels in Block 1 and 5 panels in Block 2).

To the prompt – “Do you want to round the sheets in each block?”
Selecting NO, will treat each block of same length sheets in the whole job separately, and only round up once they have all been grouped together. e.g. 3.6 @ 3000, 2.2 @ 3000, will calculate 3.6 + 2.2 = 5.8 rounded to 6 sheets @ 3000mm. This is the smallest number of panels/sheets to cover the roof and the best result in the cut-list, but has no margin for error on site.
If you select YES, each block is rounded up before being grouped together. e.g. 3.6 @ 3000, 2.2 @ 3000, will be rounded up first to 4 @ 3000, 3 @ 3000 and calculate 4 + 3 = 7 sheets @ 3000mm. This is efficient and with maybe one or two spare panels/sheets in case of error on site
By clicking [OK], the off-cuts process will begin. Once the off-cuts have been generated, you are prompted with the following dialog box.

Often you get a lot of short sheets on roofs where a hip and valley are close together, and other areas of material that do not end up with a matching triangle of off-cuts. This prompt relates to the way they are nested together to further reduce waste.
Maximum sheet length:
This length then determines the order of the sequence. As you reduce the maximum length, the amount of waste increases. Also, pieces longer than the maximum length are not modified. The default length you are presented with is the one associated with that profile when you created it. If you enter zero (0), then the process ignores a maximum sheet length.
Nesting of narrow pieces:
Here you choose to either combine the narrow pieces into the nesting, or ignore them, and simply add them to the end of the coil.
Detailing of narrow pieces:
If you choose to add the narrow pieces to the end of the sequence you can nominate how you have them annotated. You can have them annotated collectively or individually.
By clicking [OK] the off-cuts are generated giving you your cut list, similar to the following.
By clicking [Continue], you can see how the job has been estimated by the software. As with the Blocking method of estimation there is provision to manually interact with the layout or lengths of sheets to reduce waste through having too much off-cut material.
As this example shows, waste was reduced from 12.4% to 8.3% of the material supplied. Other examples have produced savings of as much as 10 or 12% depending on the roof shape and the number of cuts.
Do you want to Turn Remaining Sub-Blocks into Strips?
By selecting NO it will not divide sub-clocks into individual roof sheets, instead just describing the area as a number sheets that will cover the area and it will not attempt to nest the panels into one or multiple lengths to reduce waste from off-cuts.
If you select YES, the areas that cannot be divided into triangular Off-cut Blocks, are then further divided into individual panels/sheets that are then nested using the linear nesting algorithm to reduce the waste from cut sheets as shown below.
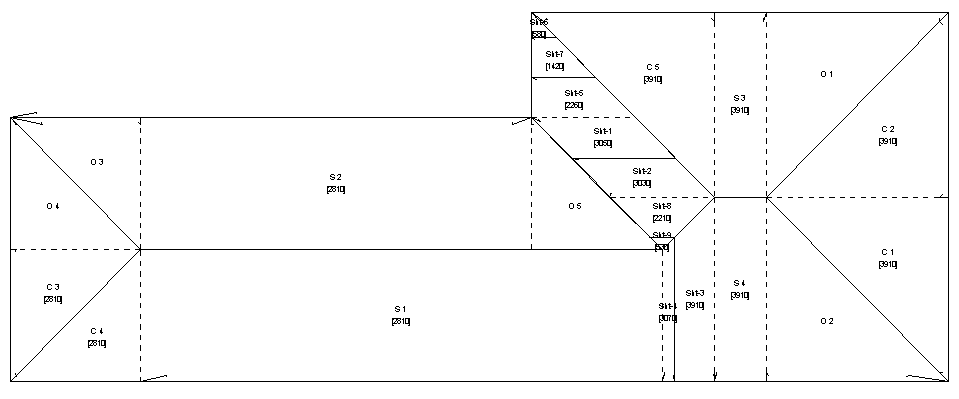
There are 3 different categories for how the sheets are reported:
C/O – Cut sheet and related Off-cut, which are also grouped by colour – matched triangles of roof areas.
S – Straight sheet areas – rectangular blocks/Areas.
Sht – Single sheets, individual or nested sheets.

Once the Gen-OffCuts process is complete, the placement of sheets are shown on the off-cut layout drawing (shown above) and tallied on the accompanying sheet printout shown below. The 2 main drawings for the off-cut method are found under Main > Drawings and are called Off-cut Layout and Panel Cutting Details.

The top table is a summary of the individual sheets which may be nested, required for the job. The bottom table is a summary of the Cut/Off-cuts and Straight sheets/blocks.
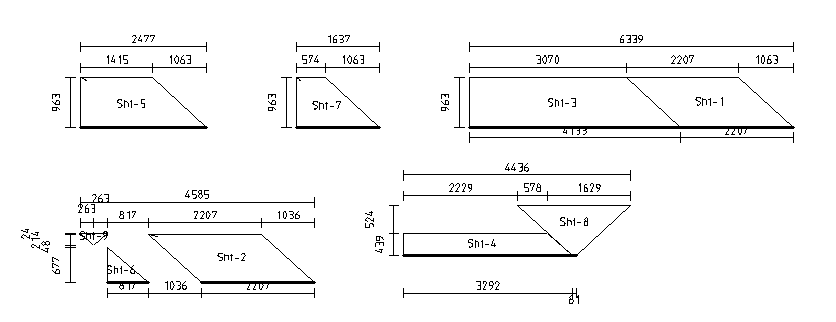
Following is an example of the Panel Cutting Details drawing generated for the individual sheets in a nested group.

Do you want to Modify the Length of Straight Blocks (Half)?
By selecting NO it will not reduce the number of panels/sheets in a block.
If you select YES, it will calculate the total length of the eave defining the length of the block(s) and divide it by the panel/sheet width. If this number is less than what has been calculated without reduction, it will use the smaller number of panels/sheets. This process only works when Rounding is turned on.
Effectively, what this function is doing is looking across the width of a run of eave, in case of the illustration below, the combined width of Block 1 and Block 2 and determining the number of panels/sheets required to cover the roof and compares that with the number determined by the number of panels/sheets in each block.
In the example, Block 1 would require 6.6 panels and Block 2 would require 5.3.panels. If each block is rounded then the total number of panels supplied would be 13 (7 panels in Block 1 plus 6 panels in Block 2). If it is accepted that rounding the whole run instead of each block would work for the job, select Yes, then you will supply 12 panels – the over supply of the longer panel in Block 1 will account for the under supply in Block 2 (7 panels in Block 1 and 5 panels in Block 2).
To the prompt – “Do you want to round the sheets in each block?”
Selecting NO, will treat each block of same length sheets in the whole job separately, and only round up once they have all been grouped together. e.g. 3.6 @ 3000, 2.2 @ 3000, will calculate 3.6 + 2.2 = 5.8 rounded to 6 sheets @ 3000mm. This is the smallest number of panels/sheets to cover the roof and the best result in the cut-list, but has no margin for error on site.
If you select YES, each block is rounded up before being grouped together. e.g. 3.6 @ 3000, 2.2 @ 3000, will be rounded up first to 4 @ 3000, 3 @ 3000 and calculate 4 + 3 = 7 sheets @ 3000mm. This is efficient and with maybe one or two spare panels/sheets in case of error on site
By clicking [OK], the off-cuts process will begin. Once the off-cuts have been generated, you are prompted with the following dialog box.

Often you get a lot of short sheets on roofs where a hip and valley are close together, and other areas of material that do not end up with a matching triangle of off-cuts. This prompt relates to the way they are nested together to further reduce waste.
Maximum sheet length:
This length then determines the order of the sequence. As you reduce the maximum length, the amount of waste increases. Also, pieces longer than the maximum length are not modified. The default length you are presented with is the one associated with that profile when you created it. If you enter zero (0), then the process ignores a maximum sheet length.
Nesting of narrow pieces:
Here you choose to either combine the narrow pieces into the nesting, or ignore them, and simply add them to the end of the coil.
Detailing of narrow pieces:
If you choose to add the narrow pieces to the end of the sequence you can nominate how you have them annotated. You can have them annotated collectively or individually.
By clicking [OK] the off-cuts are generated giving you your cut list, similar to the following.
By clicking [Continue], you can see how the job has been estimated by the software. As with the Blocking method of estimation there is provision to manually interact with the layout or lengths of sheets to reduce waste through having too much off-cut material.
As this example shows, waste was reduced from 12.4% to 8.3% of the material supplied. Other examples have produced savings of as much as 10 or 12% depending on the roof shape and the number of cuts.
Do you want to Turn Remaining Sub-Blocks into Strips?
By selecting NO it will not divide sub-clocks into individual roof sheets, instead just describing the area as a number sheets that will cover the area and it will not attempt to nest the panels into one or multiple lengths to reduce waste from off-cuts.
If you select YES, the areas that cannot be divided into triangular Off-cut Blocks, are then further divided into individual panels/sheets that are then nested using the linear nesting algorithm to reduce the waste from cut sheets as shown below.

There are 3 different categories for how the sheets are reported:
C/O – Cut sheet and related Off-cut, which are also grouped by colour – matched triangles of roof areas.
S – Straight sheet areas – rectangular blocks/Areas.
Sht – Single sheets, individual or nested sheets.
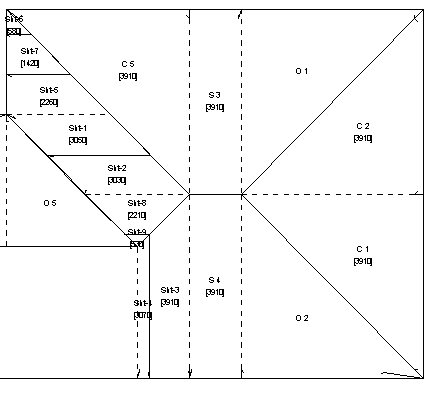
Once the Gen-OffCuts process is complete, the placement of sheets are shown on the off-cut layout drawing (shown above) and tallied on the accompanying sheet printout shown below. The 2 main drawings for the off-cut method are found under Main > Drawings and are called Off-cut Layout and Panel Cutting Details.
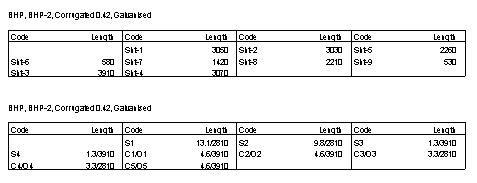
The top table is a summary of the individual sheets which may be nested, required for the job. The bottom table is a summary of the Cut/Off-cuts and Straight sheets/blocks.
Following is an example of the Panel Cutting Details drawing generated for the individual sheets in a nested group.
Comments are closed.