Select Membrane
 Select – Membrane
This command allows you to create groups or layers of individual membranes (as a roof system) to the entire roof or simply to parts of the roof. You can even assign areas which have no system applied. When you click this command, a sub-menu is displayed.
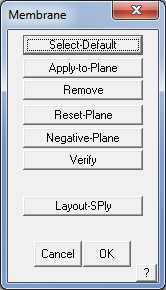
Select-default
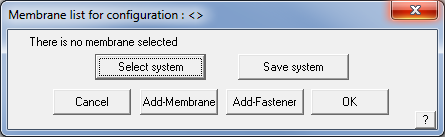
This option allows you to set the system for the entire roof. When you first click this command, the Membrane list states there are no membranes selected in your roof system.
Consider a membrane as a layer in your roof system. A membrane does not have to literally be a membrane, it can also include base ply, asphalt, interplay, ballast etc – all the layers that make up your roof system. Note that asphalt may be defined as a fastener because it can be considered a type of adhesive material that is supplied as bulk liquid. Refer back to Set-Up > Membrane for how these products may be defined.
When you click Add-membrane, the list of available membranes is displayed. You do this for each of the membranes you want. When you click Add-Fastener, the list of fasteners is displayed. You then enter the application rate for this fastener. The membranes and fasteners are displayed separately in the dialog. The order is not relevant for the estimate, but it helps to have them in some sort of order, say the order of application, so that you can more easily see that it is correct when you select it for use on a different job.
You can select up to 20 different membranes to create a ‘roof system’. This may be saved as a system for later use.
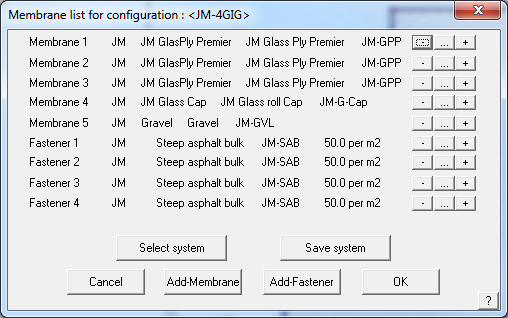
When you click Select system, a list of roof systems is displayed from which you can select one. After you do select one, the list of materials associated with this system is displayed.
The manipulation buttons to the right of each line item are:
– Delete this line
… Change this line
+ insert an item before this line
When you click [OK], the list of membranes you have selected is applied to all Low-Slope roof planes in the job.
Apply-to-Plane
This command allows you to apply the system to a single plane, independent of the global settings. You first select all the planes you want to change, then build the list of membranes you want. Those membrane settings are then stored with that plane.
Remove
This option allows you to have no system applied to the selected plane. First you select one or more planes. When you accept the selection, those planes will be marked as having no membrane.
Reset-Plane
This command allows you to reset all the planes in the job to adopt the global membrane list. That is, it removes any user defined changes you have made.
Negative-plane
Here you can insert a negative membrane area. After you digitise points defining the extent of the area, a plane is inserted. When the total amount of membrane is tallied later on, this area will be subtracted from the plane area to leave a nett membrane area. You can select the type of membrane for this negative area the same way you do for a standard plane.
Verify
This command displays in a dialog box, the membrane associated with a plane you select. It also notes if the plane is actually a negative area.
Layout-SPly
This command lays out single-ply membrane on a low-slope roof allowing for different perimeter and field sheets and fasteners.
When you select the command, you first select the roof plane you want to cover, then the membrane supplier you want to use. After selecting the membrane to use, the Single-Ply layout defaults dialog box is displayed.
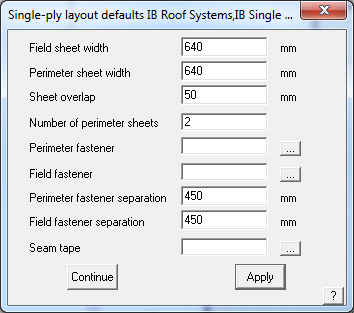
Field sheet width The width of the field sheets
Perimeter sheet width The width of the perimeter sheets
Sheet overlap The width of the lap between perimeter sheets
Number of perimeter sheets The number of perimeter sheets you want to use
Perimeter fastener The fastener you want to use for the perimeter sheets
Perimeter fastener separation The fastener spacing for the perimeter sheets
Field fastener separation The fastener spacing for the field sheets.
Seam tape The seam tape to use on all longitudinal and end seams. You must have defined the seam tape as a roll type fastener using Set-Up > Fastener.
You would use Set-Up > Membrane to define the sheet widths.
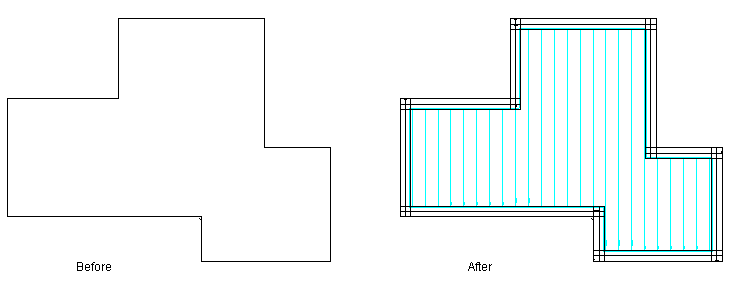
When you click Apply, you will notice that the perimeter sheets are then constructed around the perimeter of the roof plane. You are then prompted to select a line which defines the direction of the field sheets. The field sheets will be laid parallel to the line you select. Then you need to locate a position through which a seam will occur.
After the field sheets are constructed, a material report is displayed detailing the number of perimeter and field sheets, as well as the number of fasteners.
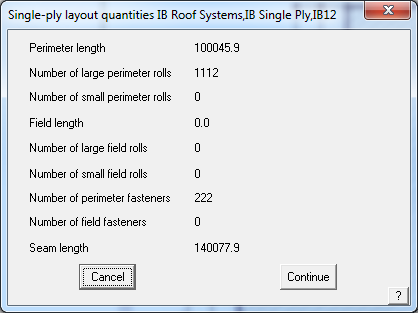
Click [Continue] to finish the process.
The following diagram shows a single ply layout including perimeter sheets and field sheets.
Delete-SPly
Deletes all single ply membranes applied to the roof model.
Comments are closed.