Multi GRIM Out
Multi-GRIM-Out
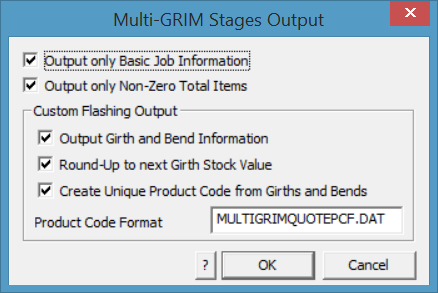
Multi-GRIM for Stages
(Pulldown Menu)
This command lets you generate a single GRIM file containing a breakdown of details based on each stage in your current job. You must have defined one or more stages to continue with this command.
The resultant gro file has each stage braced between a STARTSTAGE-ENDSTAGE pair. A sample file looks like this:
GRIM file header
STARTSTAGE
###STAGENAME Main roof
###STAGEINSTALLER Benny the builder
###STAGEINSTALLDATE 12 February 2001
###STAGEDELDATE 12 February 2001
###TIME 14:32:33
###TODAY 12 February 2001
…
ENDSTAGE
STARTSTAGE
…
ENDSTAGE
END
A plot file for each stage is also written. The format for the plot file is:
Order-<job number>-<supplier index>-<stage name>.PLT
Multi-GRIM for Quotes
(Pulldown Menu)
This command works in a similar manner to Mutli-Grim Stages but will break down the details based on each Quote Group defined.
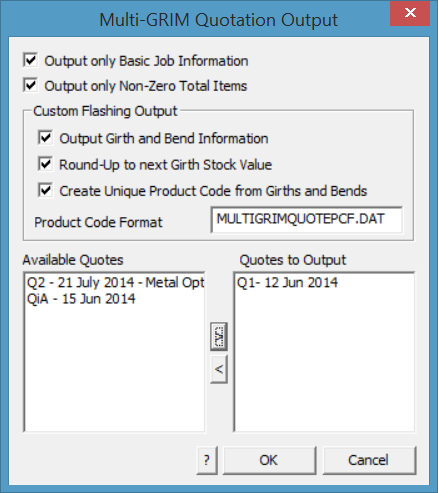
Note that a feature is available to control what happens with Custom Profile Flashings where a product code is not normally allocated as each profile can be unique, based on different girth and/or number of bends. The GRIM file can be made to automatically create a product code using the girth and bends information.
You may also create a text file that controls the format of the product code for each Custom Profile. The text file must be called MULTIGRIMQUOTEPCF.DAT and be in the form of:
Supplier1
###CODE-###BENDSx###GIRTH
Supplier2
###GIRTH x ###BENDS, ###CODE
This would result in a line in the GRIM file that might look like this:
Supplier1, CUSTOMType#1-5×300
….
And then the balance of the cutting list for this item called CUSTOMType#1, 5 bends and 300mm girth, the the details for the second supplier’s material order (if you have multiple suppiers of custom profile trim).
His order would look like this:
Supplier2, 300 x 5, CustomType#1
…..
And then the cutting list for this item.
Repeated as required.
The GRIM Out Process
The GRIM out process is initiated from the Reporting > Supply Only or Reporting Supply and Install dialog box.
ExportGRIM This allows you to write the current job as a GRIM file. If you have given this job a quote number then the name of the grim file is <Quote Number>.GRO. If you have not, the name of the grim file is GrimFileOut.GRO.
You also get separate grim files defining the materials required from each supplier. These are named Order-<Job Number>-<Index>.GRO.
A plot file of the roof plan is also exported in HPGL format that may be used to illustrate reports in other systems. It is saved as GrimOutFile.plt into the …\User folder.
A TIFF bitmap image file is also created. If a job number exists, then the file is called Job#.TIF. If no job number is defined, then it is called GRIMOUTFILE.TIF.
Selecting Export GRIM brings up the GRIM File Options:
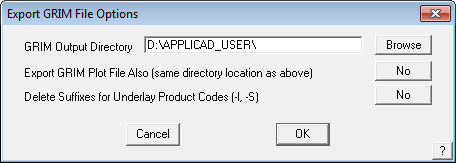
Select the required path for the file. This may be a dedicated path where you have set up a utility program to look for newly created files for processing, thus automatically taking the GRIM data and processing it for use in an external program such as business management or inventory management software. The *.GRO file is written to the specified folder as described above.
Select [OK] and the following dialog is displayed. You may also set which quotes to output, if multiple have been created, and exclude zero quantity items if there are any.
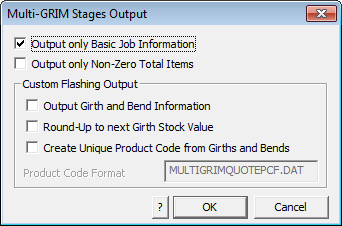
Select the options you require and select [OK] to write the GRO file to the specified folder.
GRIM Roof Plan Picture (Plot File)
When you export a grim file, a plot file is created of the roof plan. The plot file is an ASCII vector format that conforms with Hewlett Packard Graphics Language 2 (HP-GL2) – this is a generic format used to drive Hewlett Packard plotters. Lines and line properties are plotted as defined by the operator using the Tools > Change Entity > Lines Styles option. Essentially what you see on screen is what will be plotted to the HPGL2 file. Sarking or Underlay planes (where there is partial Underlay) appear as filled planes.
The HPGL2 file format is an ASCII text file, which means the instructions may be viewed in a text editor and an importation routine may be easily written for custom applications where the roof plan needs to be displayed. Many word processors and graphics programs will import HPGL2 files directly. You may need to install specific functions to enable this feature.
A TIFF bitmap image file is also created. If a job number exists, then the file is called Job#.TIF. If no job number is defined, then it is called GRIMOUTFILE.TIF.
The TIF file output can be controlled using various options in the text file TIFFOPT.DAT so that the TIF images meets you subsequent use of the file – to illustrate the job in a database for example.
An example is shown here:
;xSize ySize xDPI yDPI
1200 700 150 150
;Coursed (1=Yes, 0 = No)
0
;Planes (1=Yes, 0 = No)
1
;Black & White (1=Yes, 0 = No)
0
GRIM Template Files
This feature gives the user a method by which a user defined data file can be generated. This would be most useful in transferring data from Roof Wizard to other systems.
A Grim Template file is an ascii file with a ‘.grt’ extension. The file contains grim text strings which are swapped over for their current value when you do an ExportGRIM from the Reporting > Supply or Reporting > Supply and Install dialog box.
An example format data file would be something like the following
My header line
###JOBNUMBER , ###JOBQUOTE ,###TAX, ###TOTALINCTAX
This is some sample text
If you called this file MyGrim.grt, the result would be a file called MyGrim-data.csv with the actual values.
My header line
jn-8888 , qn-9999 ,224.36, 2467.95
This is some sample text
You can have up to 5 grim template files in your user directory and up to 10 lines in the *.grt file.
Comments are closed.