GRIM File Import/Export
GRIM File Format
A GRIM (Generic Roof Interface Method) file is designed to facilitate the transfer of roof geometry and roof material costing data between AppliCad and other computer systems such as accounting and business management or ERP systems.
Brief overview of the Generic Roof Interface Method
The process assumes that a business wants to minimize data entry and/or re-use data across the enterprise that is entered already when a job is started. The job management system may be any number of proprietary management information systems that firms have to provide some degree of control over jobs, accounts, stock etc.
Creating the text file in GRIM format is simply a matter of writing a query in the job management system and saving the data in the appropriate form as described below. It can then be picked up by one of AppliCad’s programs (Roof X), either automatically or manually, and used without re-entering the data. AppliCad’s program models the roof geometry, automatically extracts roof details such as lengths, areas etc. and writes an output text file that may be picked up in a similar way and used by the job management system.
AppliCad’s programs do provide basic job management functions, but interfacing with advanced systems provides the tools to manage jobs at a much higher level. Typical users of this process will be medium to large roofing contractors and material suppliers that offer job lots for their clients.
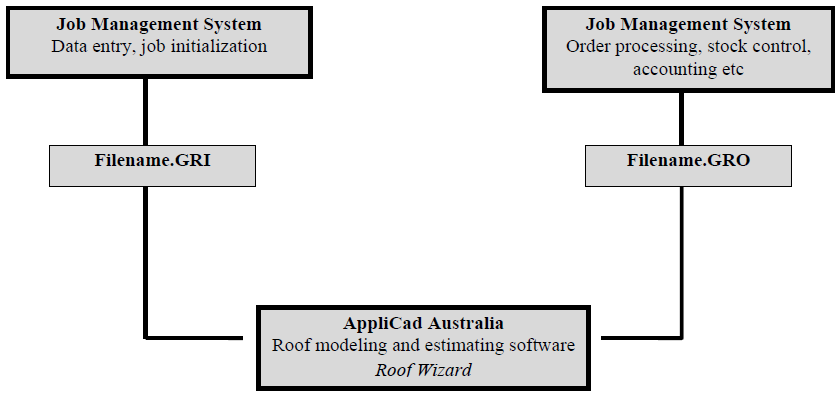
The process marries up advanced job management and accounting with advanced roof modelling and take-off and closes the job management loop. Data may be created in the business’s management system and saved as a GRI file for pick up by the AppliCad application; it may also be saved from the AppliCad application for pick up by the business management system as described in the illustration below.
As it is possible that there will be much information that AppliCad creates that does not need to be shared with the business management system, a GRIM Template file can be created which filters the data exported. This delivers only the information that the business management system requires, in the order that it requires it.
The AppliCad Roof Wizard has been designed to not only model roofs but provide some job management and information sharing capabilities. The GRIM file is generated from the [Export GRIM] button on the Reporting > Supply and Install option.
A GRIM file is an ASCII file, with a header line followed by one or more lines containing a key text string and a value. A key text string is one of those defined for creating/modifying templates as described earlier in this manual.
A key text string starts in column 1 and is a maximum of 20 characters. The value for this key text string starts in column 21. For example, ###PITCH 26.6 where ###PITCH is the Key Text String and 26.6 is the pitch value.
The last line in the file is defined with ‘END’.
A sample GRIM Out File (GRO) appears below:
GRIM file header
 ###TODAY 16 July 1999
 ###JOBDELAREA Area 1
 ###JOBINSTALDATE 16 July 1999
 ###JOBPICKUPDATE 16 July 1999
 ###JOBDELDATE 16 July 1999
 ###MAPREF
 ###COMPNAME AppliCad
 ###COMPADD1 70 Railway Road
 ###COMPADD2 Blackburn Vic 3130
 ###COMPPHONE Ph 03 9878 5000
 ###COMPFAX Fx 03 9878 5055
 ###COMPACN
 ###COMPNOTE1
 ###COMPNOTE2
 ###SCALE 1 : 1
 ###PAGE Page 1 of 1
 ###PITCH 26.6
 ###EAVEOFFSET 610
 ###EAVEHEIGHT 2700
 ###RAFTERSPACE 610
 ###BATTENSZ 90x38
 ###HIPTYPE 0
 ###RIDGETYPE 0
 ###VALLEYTYPE 0
 . . .
 . . .
 . . .
 . . .
 ###TILEMAN
 ###TILECOLOUR
 ###TILEPROFILE
 ###TILETYPE
 ##TILEMATERIAL
 ###TILECOV 10.50
 ###TILEBARGECOST 0.00
 ###ROOFMAT Not included
 ###RIDGEMAT Roll top ridge, Merino
 ###FASCIAMAT Metal fascia, Mountain Blue
 ###GUTTERMAT Not included
 ###BATMAT Not included
 ###VALLEYMAT Not included
 ###BARGEMAT Not included
 ###INSULMAT Not included
 ###CROOFMAT Not included
 ###DPMAT Not included
 ###DATABASENAME Roof Wizard File : aasample.dab Model : model
 ###DATABASEFILENAME aasample
 ##DATABASEMODELNAMEmodel
 ###ROOFAREA 314.48
 ###RIDGELEN 15.50
 ###HIPLEN 47.49
 ###VALLEYLEN 13.83
 ###FASCIALEN 75.88
 ###GUTTERLEN 75.88
 ###BARGELEN 0.00
 ###FASCIABARGELEN 0.00
 ###APRONLEN 0.00
 ###BOXGUTTERLEN 0.00
 ###SHELLENDS 6
 ###APEXES 4
 END
Refer to the complete list of key text strings described here.
Repeated Structures
There are also repeated structures which handle material line items reported in the job as well as cutting list. For each material line item present in the job there is the following set of key text strings
LINEITEM the name of the line item:
###LINEITEM_SUP the supplier of this item
###LINEITEM_MAN the supplier of this item
###LINEITEM_CODE the product code of this item
###LINEITEM_PRO the profile of this item (user defined)
###LINEITEM_FIN the finish of this item (user defined)
###LINEITEM_QTY the quantity of this item
###LINEITEM_RATE the cost per unit of this item
If the line item defines straight metal roofing or flashings, a cutting list may follow. The cutting list is of the repeated
form
CUTLIST_SIZES the number of cutting list sizes to follow:
###CUTLIST_QTY the number off of the following length
###CUTLIST_LENGTH the length required
Labour line items are also written in a repeated form:
###LABOUR_ITEM The name of this labour item
###LABOUR_QTY The labour quantity
###LABOUR_RATE The labour rate
The following file segment shows this format:
LINEITEM Ridge
###LINEITEM_SUP StramitIndustries
###LINEITEM_MAN StramitIndustries
###LINEITEM_CODE RTRVCTL--
###LINEITEM_PRO Roll top ridge
###LINEITEM_FIN Merino
###LINEITEM_QTY 2.000000
###LINEITEM_RATE 10.280000
###CUTLIST_SIZES 6
###CUTLIST_QTY 1
###CUTLIST_LENGTH 3200
###CUTLIST_QTY 4
###CUTLIST_LENGTH 2950
###CUTLIST_QTY 6
###CUTLIST_LENGTH 2840
###CUTLIST_QTY 4
###CUTLIST_LENGTH 2800
###CUTLIST_QTY 6
###CUTLIST_LENGTH 2720
###CUTLIST_QTY 2
###CUTLIST_LENGTH 2300
A material cutting list similar to that shown above is written if the name of the line item is one of:
‘Straight roofing’,
‘Ridge’,
‘Valley’,
‘Fascia’,
‘Gutter’,
‘Barge’,
’Apron’, or
‘Batten’.
The GRIM-In Process
If the GRIM in process is to be used, the operator must tell the software that it should look for GRIM In files to be read at start-up. This is done by selecting the option through the Set-Up > Preference Settings > System Preferences dialog. Select the button, ‘Import GRIM File on Start-Up’ to toggle it to Yes.

At start-up the AppliCad software will look for any files with a *.GRI extension. The operator selects the required GRIM file and all data that has been set up at the business management software end will automatically populate the appropriate fields in AppliCad.
This minimises data entry and potential errors in transcribing information from the order form to the software.
The GRIM-Out Process
The GRIM out process is initiated from the Reporting > Supply Only or Reporting Supply and Install dialog box.
ExportGRIM This allows you to write the current job as a GRIM file. If you have given this job a quote number then the name of the grim file is <Quote Number>.GRO. If you have not, the name of the grim file is GrimFileOut.GRO.
You also get separate grim files defining the materials required from each supplier. These are named Order-<Job Number>-<Index>.GRO.
A plot file of the roof plan is also exported in HPGL format that may be used to illustrate reports in other systems. It is saved as GrimOutFile.plt into the …\User folder.
A TIFF bitmap image file is also created. If a job number exists, then the file is called Job#.TIF. If no job number is defined, then it is called GRIMOUTFILE.TIF.
Selecting Export GRIM brings up the GRIM File Options:
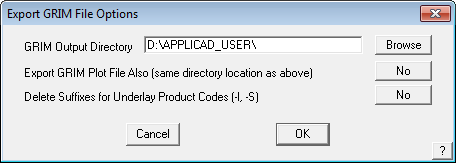
Select the required path for the file. This may be a dedicated path where you have set up a utility program to look for newly created files for processing, thus automatically taking the GRIM data and processing it for use in an external program such as business management or inventory management software. The *.GRO file is written to the specified folder as described above.
Select [OK] and the following dialog is displayed. You may also set which quotes to output, if multiple have been created, and exclude zero quantity items if there are any.
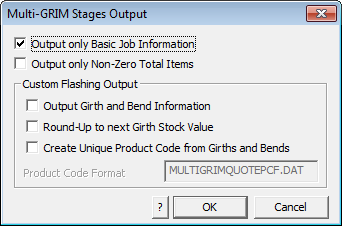
Select the options you require and select [OK] to write the GRO file to the specified folder.
GRIM Roof Plan Picture (Plot File)
When you export a grim file, a plot file is created of the roof plan. The plot file is an ASCII vector format that conforms with Hewlett Packard Graphics Language 2 (HP-GL2) – this is a generic format used to drive Hewlett Packard plotters. Lines and line properties are plotted as defined by the operator using the Tools > Change Entity > Lines Styles option. Essentially what you see on screen is what will be plotted to the HPGL2 file. Sarking or Underlay planes (where there is partial Underlay) appear as filled planes.
The HPGL2 file format is an ASCII text file, which means the instructions may be viewed in a text editor and an importation routine may be easily written for custom applications where the roof plan needs to be displayed. Many word processors and graphics programs will import HPGL2 files directly. You may need to install specific functions to enable this feature.
A TIFF bitmap image file is also created. If a job number exists, then the file is called Job#.TIF. If no job number is defined, then it is called GRIMOUTFILE.TIF.
The TIF file output can be controlled using various options in the text file TIFFOPT.DAT so that the TIF images meets you subsequent use of the file – to illustrate the job in a database for example.
An example is shown here:
;xSize ySize xDPI yDPI
1200 700 150 150
;Coursed (1=Yes, 0 = No)
0
;Planes (1=Yes, 0 = No)
1
;Black & White (1=Yes, 0 = No)
0
GRIM Template Files
This feature gives the user a method by which a user defined data file can be generated. This would be most useful in transferring data from Roof Wizard to other systems.
A Grim Template file is an ascii file with a ‘.grt’ extension. The file contains grim text strings which are swapped over for their current value when you do an ExportGRIM from the Reporting > Supply Only or Reporting > Supply and Install dialog box.
An example format data file would be something like the following:
My header line
###JOBNUMBER , ###JOBQUOTE ,###TAX, ###TOTALINCTAX
This is some sample text
If you called this file MyGrim.grt, the result would be a file called MyGrim-data.csv with the actual values.
My header line
jn-8888 , qn-9999 ,224.36, 2467.95
This is some sample text
You can have up to 5 grim template files in your user directory and up to 10 lines in the *.grt file.
Using the GRIM File with Pitch Intervals
Customers utilising the GRIM output feature of AppliCad to link the estimation process to downstream systems have often had to create duplicate mappings of labour rates due to the output of variable labour rates in the Roof Wizard software. Outputs such as Ridge (1, 22.5) where the 1 specifies the storey and 22.5 specifies the pitch have had to create multiple mappings for each pitch gradient in 0.1 degree increments.
Roof Wizard now provides the ability for each pitch interval to be given as a label (e.g. A, B, C as can be seen in the attached image) with the output therefore being Ridge (1,A), or Ridge (1,B) etc. This greatly reduced the number of mappings required, thus reducing the workload for our users and speeding up the interface between systems.

Multi-GRIM-Out
The Multi-GRIM option lets you generate a single GRIM file containing a breakdown of details based on each stage in your current job. You must have defined one or more stages using Stage Manager to continue with this command.
This command also works in a similar manner to Mutli-Grim Stages but will break down the details based on each Quote Group defined.
Comments are closed.