Generate Blocks
Generate Blocks
 Auto-Block
This command constructs rectangular blocks across a roof shape using the roof geometry to generate the sheet/panel cutting list. There are actually two Blocking Methods that may be accessed from the Estimate menu – Auto-block 1 and Auto-block 2. Auto-block 1 is the process activated from the Icon menu.
![]() Note: The Icon menu starts Auto-Block 1. The Auto-block 2 method accessible from the Pulldown menu should only be used if the estimator understands the process and how the result will be employed by the installers.
Note: The Icon menu starts Auto-Block 1. The Auto-block 2 method accessible from the Pulldown menu should only be used if the estimator understands the process and how the result will be employed by the installers.
You should experiment with both methods for the jobs that you do. Each has a slightly different algorithm with quite different results, depending to some extent on the roof shape. AppliCad makes no recommendation as to which is the better blocking method. Each produces a result that replicates the methods used by estimators in different markets and you may not agree with the result.
This method is only feasible with certain profiles that maybe split and flipped etc. It is not practical for profiles such as standing seam for example.
The variation in result is the nature of these techniques. Everyone has their own methods and the slight variations can create striking differences in the resultant cutting lists. The Modify Block options are important tools that allow you to modify the result to provide the output that you are satisfied with. It should be noted that the Blocking tools will give the right result for the majority of jobs and you should expect to intervene in the balance of jobs. You may decide to manually draw the blocks on the whole job. That is what the tools are there for, so don’t be disappointed.
After you click the Auto-Block command, you are prompted with the following dialog box.
The two options you have relate to how you want your sheets “Optimised”, if at all.
After you click [OK], then the blocks are generated. If there are blocks already on the roof, they are first deleted.
After the blocks are generated, they are annotated with the number of sheets, sheet length as well as the pitch. There is also a hatching automatically applied to each block so they are identifiable. Also, the coverage direction of each block is defined by the side of the block which is highlighted (a fatter orange line).
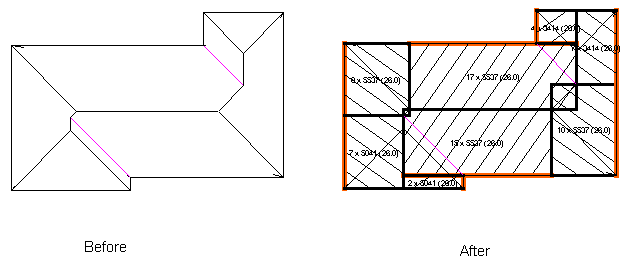
![]()
Note: the automatic blocking algorithm has been enhanced and simplified. It may be found on the pulldown menu at Full Job > Estimate > Blocking > Auto Block 2. The results may better suit certain situations, but the operator must be very clear as to the impact of the technique on the installers. It creates a much simplified Block sequence and in many cases, further reduces the waste and the number of panel/sheet lengths.
Auto-block2 uses an algorithm that effectively breaks the entire roof area into rectangular areas. This is different to Auto-block1 which effectively divides the roof into triangles based around the hip end and then combines the triangles into rectangles. The rectangles are then divided into roof sheet widths to determine the number of sheets required.
The cutting list results between the two methods can be dramatically different on some jobs, and almost identical on others.
Comments are closed.