Flashings
 Flashings
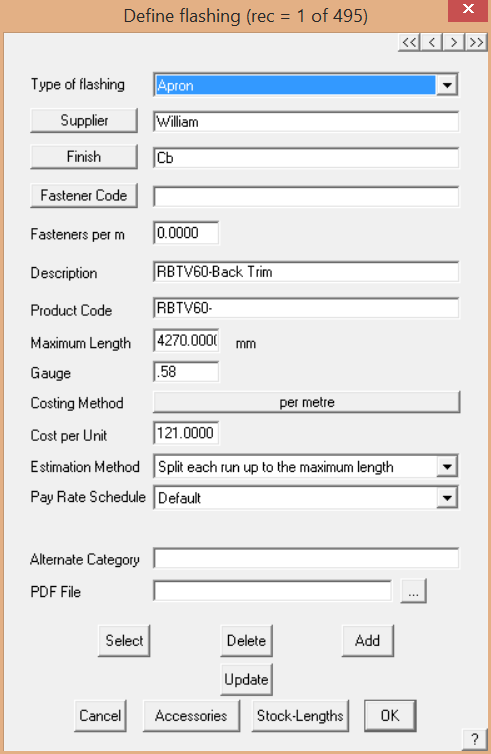
After you select [Set-Up > Flashings], the Define-Flashing dialog box is displayed.
![]() Note on setting up flashings and trim – From version 5.8 onwards an extra variable has been added (gauge) which makes the file not backward compatible with previous versions. The text file Flashing.csv describes all trim prior to V5.8 and if it exists will be read into the program. All new trim defined in V5.8 is saved to a file called Flashing_V6.csv. If a Flashing.csv file is read into v5.8 it will be automatically saved as the new file format thus preserving the functions of previous versions. They are not backwards compatible.
Note on setting up flashings and trim – From version 5.8 onwards an extra variable has been added (gauge) which makes the file not backward compatible with previous versions. The text file Flashing.csv describes all trim prior to V5.8 and if it exists will be read into the program. All new trim defined in V5.8 is saved to a file called Flashing_V6.csv. If a Flashing.csv file is read into v5.8 it will be automatically saved as the new file format thus preserving the functions of previous versions. They are not backwards compatible.
As is the case for defining all products in Roof Wizard, the key item in the definition is the Product Code – it is this that links the products with the accessories , the pricing and labour etc.
Type of flashing This is a drop down list letting you select the category of flashing – one of Ridge, Valley, Fascia, Gutter, Barge, Apron, Batten, Box gutter, User-defined or Step.
Supplier This button lists all the suppliers in the flashings database from which you can select. You can also enter a new supplier’s name directly into the supplier field.
Finish This button lists all the finishes in the flashings database from which you can select. You can also enter a new finish directly into the finish field. If you insert Painted or Colour or Colour, the software will prompt for a paint colour when you use the material. You define the colours available under Set-Up > Metal Colours.
Fastener code This button lists all the fasteners in the fastener database from which you can select for use with this flashing. You can also enter a new fastener directly into the fastener field.
Description A user defined description of this flashing from which you identify this flashing.
Product code Here you can enter a product code for ordering purposes.
Fasteners per m The number of fasteners per metre (or per foot) for estimation purposes.
Maximum length The maximum length of this flashing you can order (or 0 if there is no maximum, that is, the flashing is cut to length).
Gauge Displays the base metal thickness of the selected trim material.
Cost method This is either per metre (or per foot) or per length.
Cost per unit This is the cost per unit based on the above setting.
Estimation method This is the manner by which Roof Wizard estimates the number of lengths of this flashing. (See below)
Pay rate schedule You can nominate a specific pay rate schedule for this flashing. You can select it as:
None Do not calculate a labour charge for this item.
Default Use the default method (eg a ridge flashing will use the ridge labour item).
Current Use a designated line item in the currently selected pay schedule.
Name of pay schedule Use the designated line item in the specified pay schedule defined under Set-Up > Set Up Pay Rate > Metal pay rates – variable or Set-Up > Set Up Pay Rate > Metal pay rates – fixed.
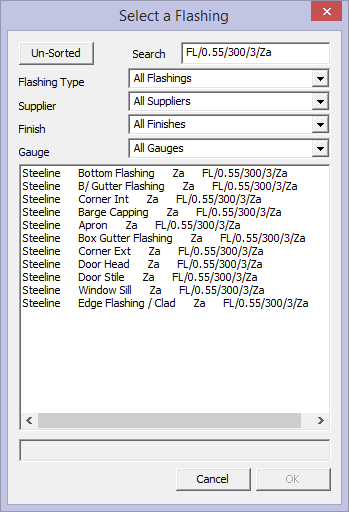
Select This allows you to select an existing flashing from a list.
Delete This allows you to delete the current flashing.
Add This allows you to add a new flashing definition as long as it is unique.
Accessories This allows you to associate accessories to the current flashing. (See below).
Stock-Lengths This allows you to associate a list of stock lengths and costs to the current flashing. (See below).
[Cancel] This button cancels all changes you have made.
[OK] This button saves the changes you have made..
To assist in finding the required flashing during setup, the flashings may be sorted and filtered using the Search option or by Type etc reducing a very long list to a short list.
Roof Wizard is moving towards an improved pricing and job management solution, with linkages to external accounting systems, a requirement to allow splitting up of an estimate into various groupings became apparent. The best way to do this is with Quote Groups, and so the ability to modify the default “category” for each material item in the software has been provided for on each data entry dialog box.
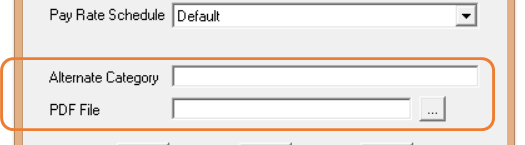
In addition to this, the linking of a PDF file (typically used to describe the part) has been allowed for also so that documentation sets can be created for estimates without users having to go and search for the documentation relating to each part in an estimate at some stage when requested by their customer.
Both of these improvements have been added to all product definition dialog boxes and provide for hyperlinking to external product sheets etc.
Flashing Estimation Methods
The estimation method is one of:
 Split each run up to the maximum length – this method measures each run and divides it into a number of equal length pieces which do not exceed the maximum length. Run and Lap allowances are also taken into account.
Split each run into maximum length pieces – this method measures each run, then supplies enough maximum length pieces to cover the run. Run and Lap allowances are also taken into account.
Split total run length into maximum length pieces – this method adds all runs of this flashing, then supplies enough maximum length pieces to cover the entire length. Run and Lap allowances are taken into account.
Split each run into stock length pieces – this method measures each run, then looks at the stock lengths you have defined for this flashing. It then supplies a combination of stock length pieces to cover this run taking run and lap allowances into account.
Split total run length into stock length pieces – this method adds all the runs of this flashing, then looks at the stock lengths you have defined for this flashing. It then supplies a combination of stock length pieces to cover this run taking run and lap allowances into account.
Flashing Accessories
When you click the Accessories button, the following dialog box is displayed.
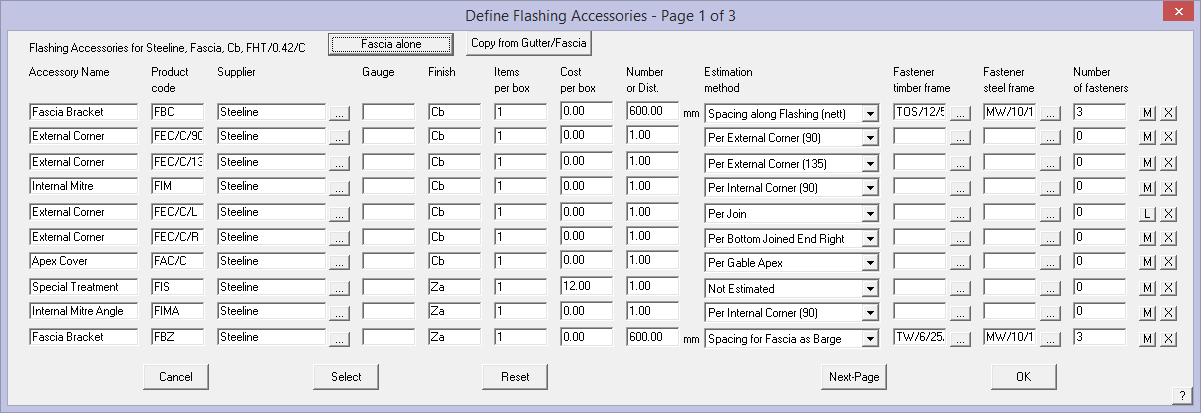
This is the first page of 3 pages of accessories you can define for this flashing. On each page there is space for 10 accessories to be defined. Note the Labour item designation [L]
![]()
Note: You may also copy the accessory items for a fascia from a corresponding Gutter Only or Fascia/Gutter item previously defined. This saves a lot of time when setting up the flashing database. The same applies for Gutter definitions.
For each accessory, you enter the following information:
Accessory name This is the name by which you know this accessory (eg Gutter clip, joining plate).
Product code This is the code by which you know this accessory.
Supplier Accessory supplier’s name – might not be the same as the flashing supplier.
Gauge Gauge of accessory material.
Finish This is the finish for the accessory. By default, the finish is that of the host flashing, but you can change it to what you want. If you define the finish as either “Colour”, “Color” or “Painted”, then the accessory will adopt the same colour as the host flashing.
Items per box This is the number of items of this type in a box you order.
Cost per box This is the cost of a box of these items.
Number This is a number (or a spacing) applied to the estimation method you select.
Estimation method This is the method by which this accessory will be estimated. (See below).
Fastener timber frame This is the fastener used to fix this accessory to the frame of the structure. This is the fastener used if the frame has been defined as Timber under Job-Info > Job-Details. You can either type the code into the field directly, or click the ‘…’ button to list the available fasteners.
Fastener steel frame This is the fastener used to fix this accessory to the frame of the structure. This is the fastener used if the frame has been defined as Steel under Job-Info > Job-Details. You can either type the code into the field directly, or click the ‘…’ button to list the available fasteners.
Number of fasteners This is the number of fasteners used to fix the accessory to the frame.
[M]/[L] This sets the Accessory item as a material accessory or a labour accessory to the trim item being defined. For example, a gutter or fascia may require special finishing that incurs extra cost over regular gutters. Add the charge to this list as a Labour item and it will be added to the labour summary.
[X] Deletes the Accessory item from this list.
Select The Select button lists all the accessories you have defined for all flashing, from which you can select one. Keep in mind that the supplier of an accessory is assumed to be the same as the flashing, except when you select an accessory from this list. In other words, by selecting an accessory from this list, you override the supplier’s name of the accessory.
For fascia flashings, you will see a button labelled [Fascia Alone]. When clicked, this button toggles between [Fascia Alone] and [Fascia with Gutter]. This setting allows you define a set of accessories for a fascia and a fascia-gutter combination independent of each other.
If the setting is [Fascia Alone], then these accessories are quantified whenever this fascia is used. If the setting is [Fascia with Gutter], then these accessories are only quantified when the fascia is used with a gutter. (A line adopting a fascia-gutter combination is tagged as FASCIA). If you have no accessories defined for the “Fascia with gutter” case, then the accessories used for [Fascia Alone] are quantified.
For gutter flashings, a similar feature is available. The button in this case toggles between “Gutter alone” and “Gutter with fascia”. Similarly, you can define a set of accessories for when the gutter is used individually (perhaps it is attached to a timber fascia) and when it is used in combination with a fascia
Accessory Estimation Methods
The estimation method you select is one of the following:
Not estimated This accessory will still be reported in the material list in the costing, but will have zero quantity.
Spacing along flashing (nett) This accessory is estimated as a function of the nett length of the flashing. The nett length is the length this flashing covers rather than the length of flashing to order. The number then relates to a spacing along the flashing (in mm or linear feet). You would use this method for things such as gutter brackets which hold the flashing. If you set the spacing to be zero (0), the spacing will adopt the value you set under Roof-Defaults Rafter-Spacing. Therefore, if you have brackets dependent on the rafter spacing (which may differ from job to job), then use a spacing of 0.
Per internal corner (90) This accessory is estimated as a function of the number of 90 degree internal corners connecting 2 runs used by this flashing.
Per external corner (90) This accessory is estimated as a function of the number of 90 degree external corners connecting 2 runs used by this flashing.
Per internal corner (135) This accessory is estimated as a function of the number of 135 degree internal corners connecting 2 runs used by this flashing.
Per external corner (135) This accessory is estimated as a function of the number of 135 degree external corners connecting 2 runs used by this flashing.
Per internal corner (other) This accessory is estimated as a function of the number of non-regular internal corners connecting 2 runs used by this flashing.
Per external corner (other) This accessory is estimated as a function of the number of non-regular external corners connecting 2 runs used by this flashing.
Per left hand end This accessory is estimated as a function of the number of free ends of this flashing. Left hand relates to looking at the run from the outside of the structure. You would use this method to define left hand stop ends for gutters.
Per right hand end This accessory is estimated as a function of the number of free ends of this flashing. Right hand relates to looking at the run from the outside of the structure. You would use this method to define right hand stop ends for gutters.
Per join This accessory is estimated as a function of the number of joins between connected flashings. You would use this method to define specific joining plates (splice plates) used to connect 2 pieces together.
Per Gable Apex This accessory is estimated as a function of the number of apex bends between 2 connected flashings. You would use this method to define apex pieces for the top of barge (rake) flashings on gable ends.
Per run This accessory is estimated as a function of the number of runs covered by this flashing. In the case of gutter clips, you may want to space them evenly along a fascia but require one more for each run. You would then estimate the gutter clip, with the spacing method above as well as this method.
Per piece This accessory is estimated as a function of the number of pieces you are ordering for this flashing.
Fastener for timber frame This accessory is estimated as a fastener for a timber frame structure based on the total length of runs covered by this flashing. You would use this method to provide fasteners for the accessories in preference to specifying fasteners for each accessory (if they are the same).
Fastener for steel frame This accessory is estimated as a fastener for a steel frame structure based on the total length of runs covered by this flashing. You would use this method to provide fasteners for the accessories in preference to specifying fasteners for each accessory (if they are the same).
per bottom joined internal This is at the bottom of a rake line, connected to the same flashing. You would use it to quantify barge moulds which cover the fascia at the eave/gable intersection as an internal corner.
per bottom joined external This is at the bottom of a rake line, connected to the same flashing. You would use it to quantify barge moulds which cover the fascia at the eave/gable intersection as an external corner.
per top joined internal This is at the top of a rake line, connected to the same flashing as an internal corner.
per top joined external This is at the top of a rake line, connected to the same flashing as an external corner.
per bottom free end This is at the bottom of a rake line, not connected to the same flashing. You would use it to distinguish between joined end positions.
per top free end This is at the top of a rake line, not connected to the same flashing.
spacing for fascia as barge This is a special method for fascia flashings used on barge (rake) ends. You can either enter a spacing value or enter 0. If you enter zero (0), then the rafter spacing you specified for the job is used.
per Hip Apex This accessory is estimated as a function of the number of apex bends between 2 connected hip flashings. You would use this method to define apex pieces for the top of hip flashings.
The [X] buttons at the end of the accessory description allow you to delete a previously defined accessory item.
Stock-Lengths
This button displays a dialog letting you enter lengths and costs of stock lengths for this flashing.
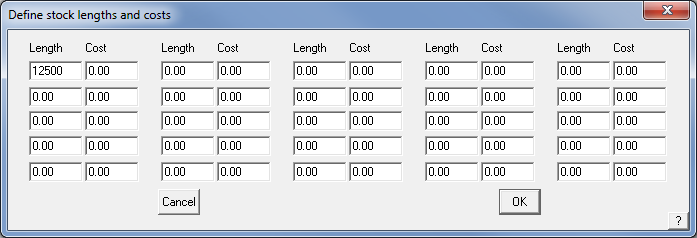
Here you enter a stock length, followed by a cost for that length. You can have up to 25 lengths. You do not need to worry about order or the cell you use to enter the length and cost pair.
![]()
Note: that these lengths will only be used if you have selected the ‘Split each run into stock length pieces’; and the ‘Split total run length into stock length pieces’ estimation methods. The costs are only used if you selected per length as the cost reporting method.
Determination of which stock lengths to use. The selection of stock lengths by the system uses an algorithm based on standard deviation and waste. Each length is used as a seed then a next best length is found. If there is more than one solution using the same number of pieces, then the one with the lesser standard deviation between the lengths is used. Then, if by adding 1 more piece, the waste is less, that solution is used.
Even though you may have multiple stock lengths, you will still only get 2 lengths calculated for each run.
Comments are closed.